GIT 101: A Beginner's Guide for GIT

👋 Hi, I’m @Varsha-Verma 👀 I’m interested in Cloud 🌱 I’m currently learning multi-cloud technologies and Devops 📫 How to reach me www.linkedin.com/in/Varsha-Verma-Cloud-DevOps
Getting Started with Version Control:
What is Version Control and why it is important?
Version Control is a system that will keep the records of the changes/alterations in a single file or set of files over the period so that it has the records of previous versions/generations which can be used later on if required.
Local Version Control System
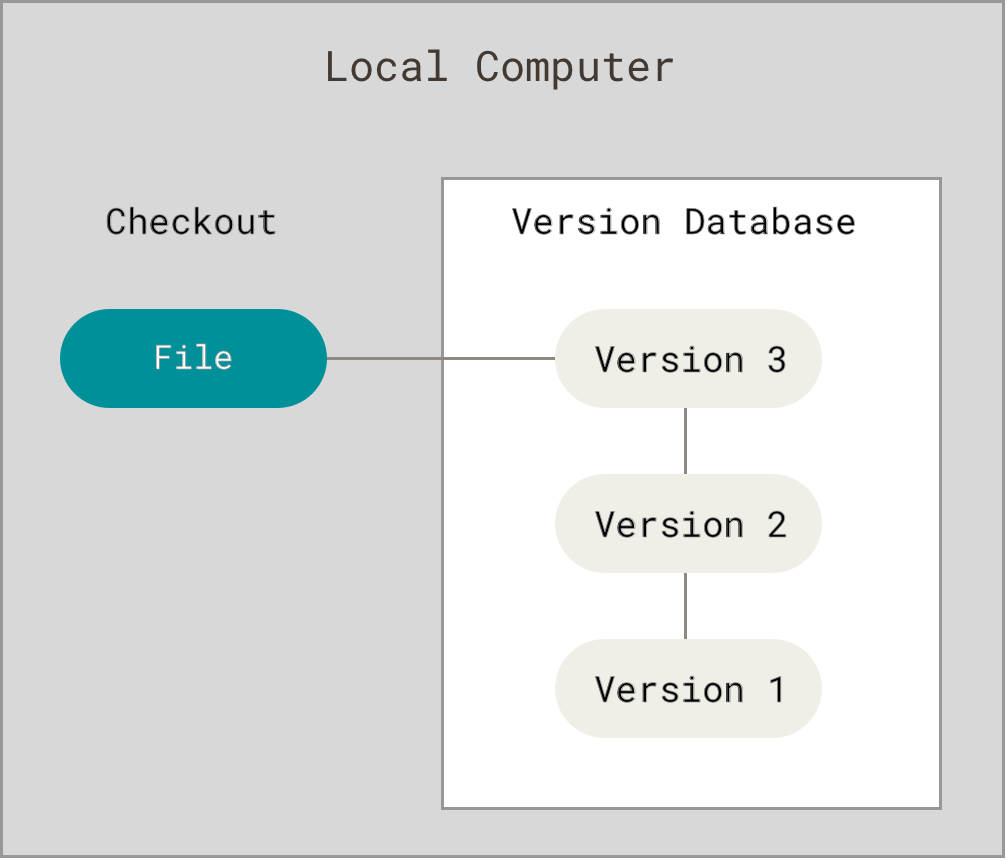
- This was developed to keep the versioning of the file or set of files in the local machine which can be distinguished by timestamp but the same named file cannot be stored at the same location. Hence, needs to be placed inside another directory which can cause errors while making the changes to the file.
Centralized Version Control Systems
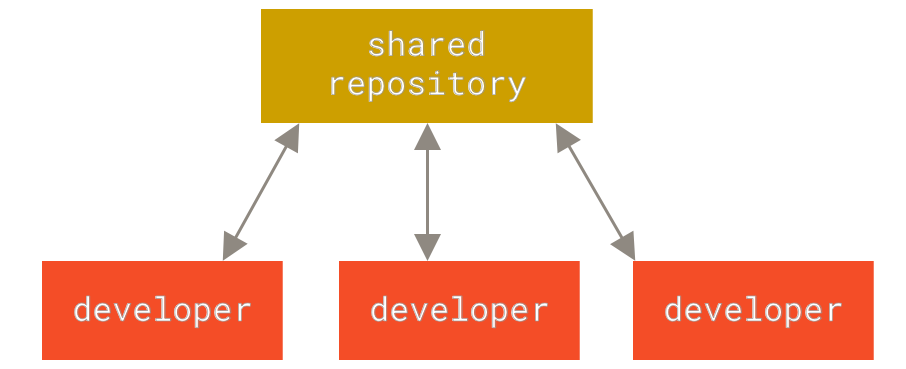
To Overcome the problem of Local version control System(LVCS), Centralized Version Control Systems(CVCS) is introduced.
Here all versioned files are stored at a central location so multiple users can checkout the file from it.
It has shown a great advantage over LVCS that now users can collaborate and the files are placed on a central server rather than a local machine.
But there is a possibility of major disadvantages like:
What if the Central Server goes down or Central DB gets corrupted?
What if backup's were not up to date on Central server?
You are going to loose everything if your project history or backup is placed at single place.
Distributed Version Control Systems
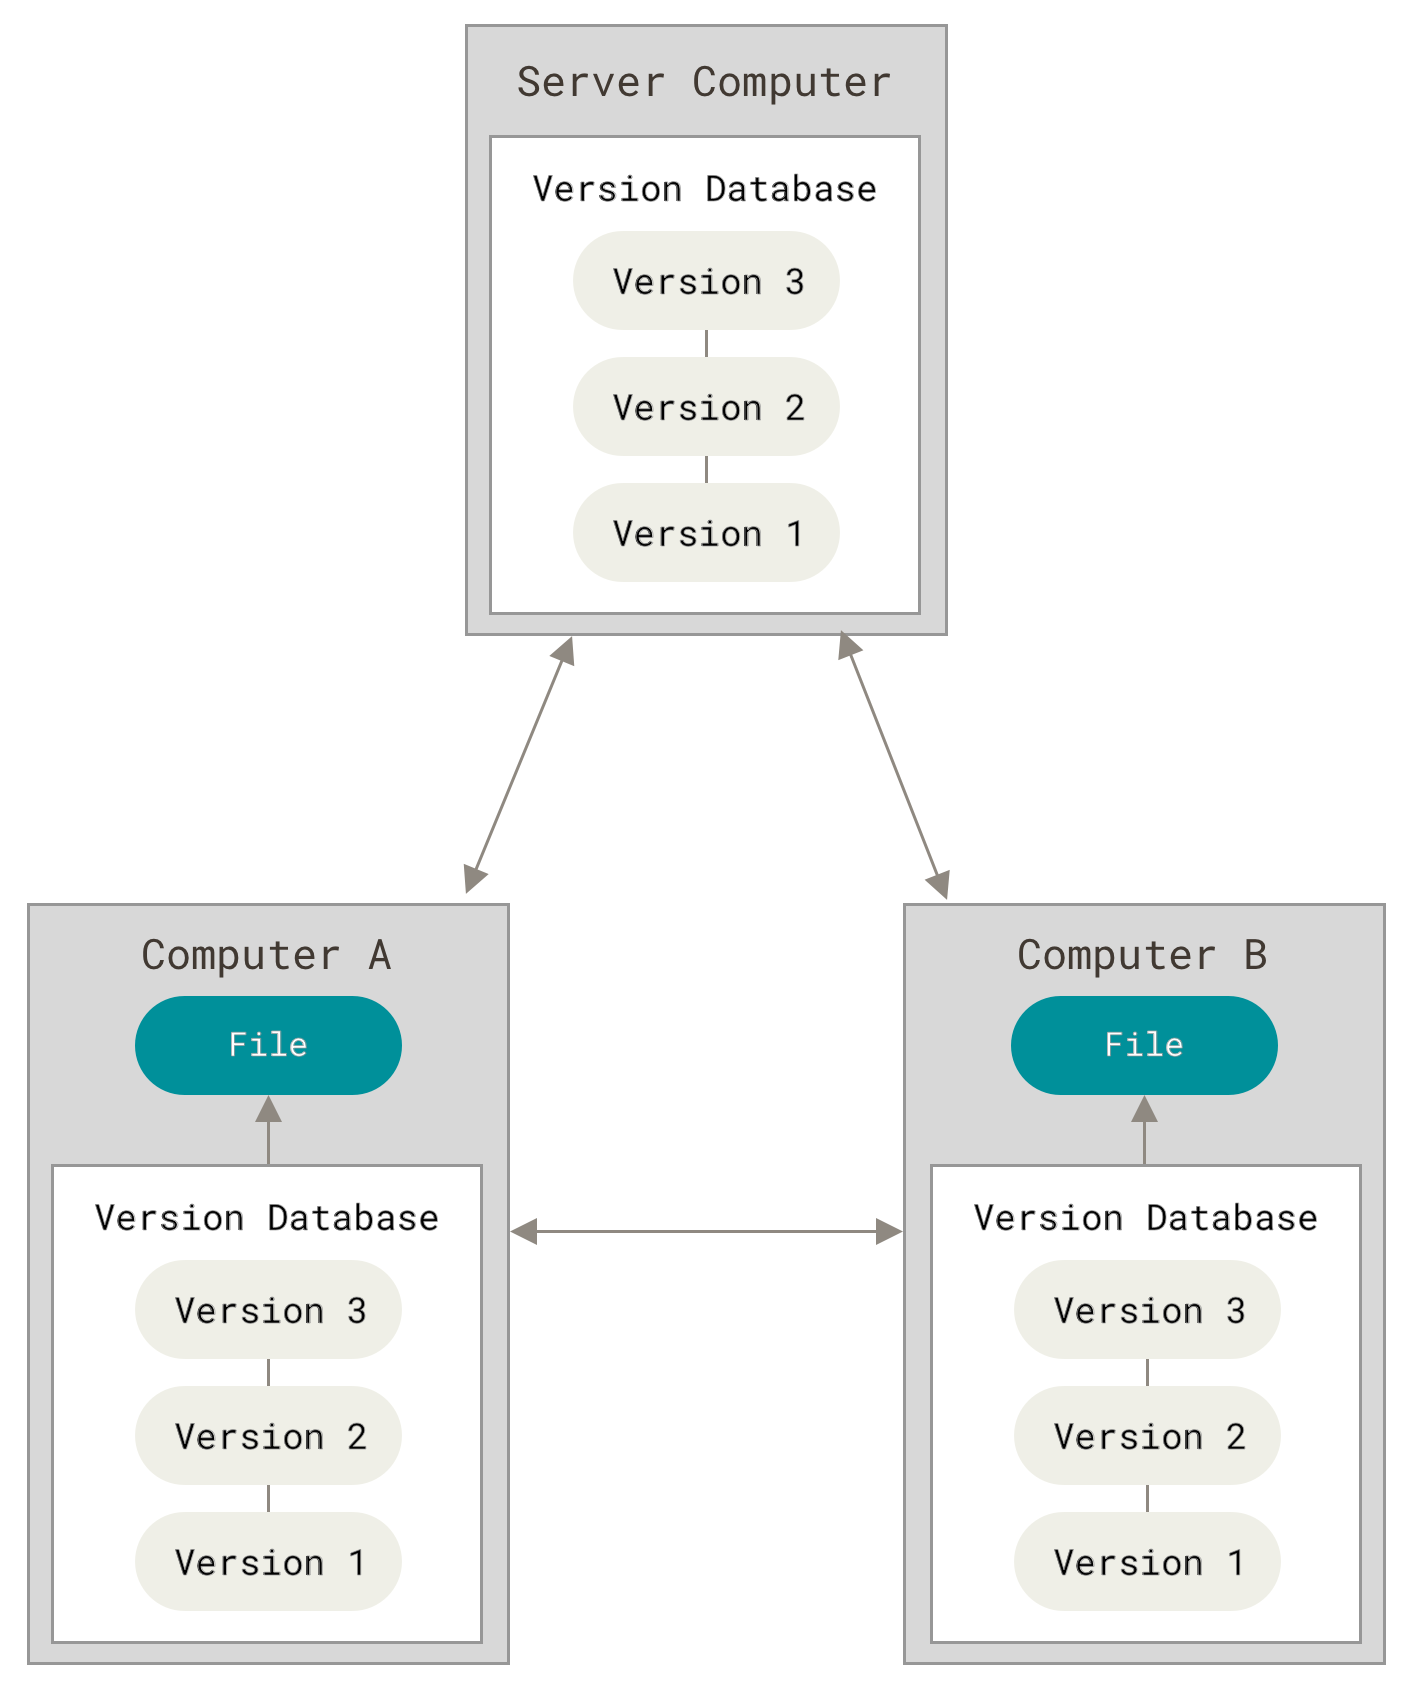
To Overcome the disadvantages of CVCS, Distributed Version Control Systems(DVCS) are introduced.
Here, versioned files are not only kept at a central location but also kept on the user's machine locally.
Users can mirror the backup of the file along with the repository including its full version history.
Thus even if the central server fails, data can be copied again from any of the machines and can restore it. Every clone is really a full backup of all the data.
Furthermore, many of these systems deal pretty well with having several remote repositories they can work with, so you can collaborate with different groups of people in different ways simultaneously within the same project. This allows you to set up several types of workflows that aren’t possible in centralized systems, such as hierarchical models.
History of Git
The Linux kernel is an open-source software project of a fairly large scope. During the early years of the Linux kernel maintenance (1991–2002), changes to the software were passed around as patches and archived files. In 2002, the Linux kernel project began using a proprietary DVCS called BitKeeper.
In 2005, the relationship between the community that developed the Linux kernel and the commercial company that developed BitKeeper broke down, and the tool’s free-of-charge status was revoked. This prompted the Linux development community (and in particular Linus Torvalds, the creator of Linux) to develop their tool based on some of the lessons they learned while using BitKeeper. Some of the goals of the new system were as follows:
Speed
Simple design
Strong support for non-linear development (thousands of parallel branches)
Fully distributed
Able to handle large projects like the Linux kernel efficiently (speed and data size)
Since its birth in 2005, Git has evolved and matured to be easy to use and yet retain these initial qualities. It’s amazingly fast, it’s very efficient with large projects, and it has an incredible branching system for non-linear development.
Important Terms before learning Git Better
Repository: It is a folder that has files of various multiple versions of a Project, where changes made are exclusive to a project.
Server: This stores all the repositories with metadata
Working directory: Where we modify the file in our local machine.
Get to know GIT Better:
GIT is a DVCS that tracks changes in any files and enables you to store code, track revision history, merge code changes, and revert to earlier code versions when needed.
Git stores the source code and its full development history locally in a repository. You can create a copy of the source code, known as a branch, which you can then work on in parallel to the main version.
When you are ready, you can commit changes to save your progress. Or you can merge your branch back into the main version. Every time you commit, Git takes a snapshot of your work and compares it to previous versions with a viewable operation called a diff. If there's been a change from previous commits, Git stores a new snapshot in the repository.
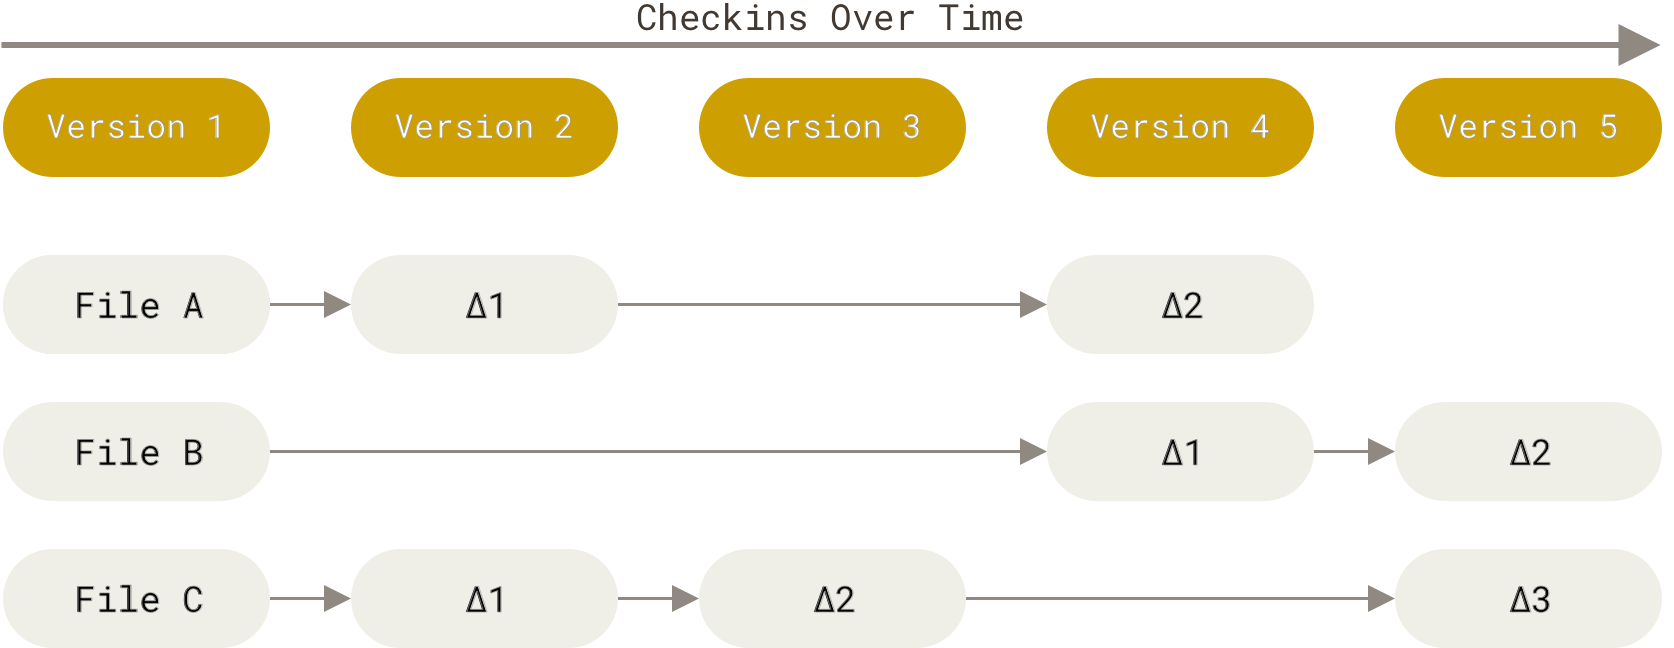
Differentiating factor between Git and any other VCS (Subversion and others included) is the way Git thinks about its data. Conceptually, most other systems store information as a list of file-based changes. These other systems (CVS, Subversion, Perforce, Bazaar, and so on) think of the information they store as a set of files and the changes made to each file over time (this is commonly described as delta-based version control).
- Git doesn’t think of or store its data this way. Instead, Git thinks of its data more like a series of snapshots of a miniature filesystem. With Git, every time you commit, or save the state of your project, Git basically takes a picture of what all your files look like at that moment and stores a reference to that snapshot. To be efficient, if files have not changed, Git doesn’t store the file again, just a link to the previous identical file it has already stored. Git thinks about its data more like a stream of snapshots.
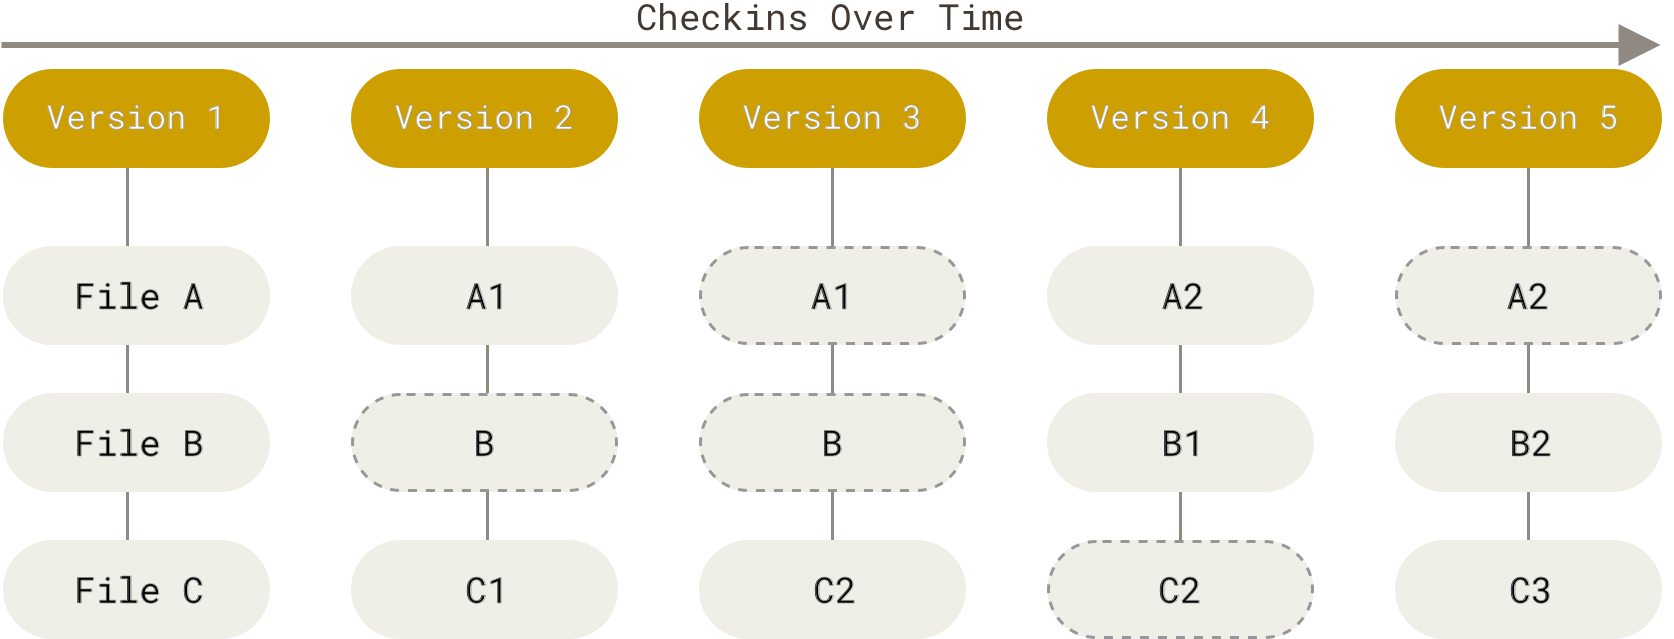
- This is an important distinction between Git and nearly all other VCSs. It makes Git reconsider almost every aspect of version control that most other systems copied from the previous generation. This makes Git more like a mini filesystem with some incredibly powerful tools built on top of it, rather than simply a VCS. We’ll explore some of the benefits you gain by thinking of your data this way when we cover Git branching in Git Branching.
Benefits of GIT:
Nearly Every Operation Is Local
Most operations in Git need only local files and resources to operate generally no information is needed from another computer on your network. If you’re used to a CVCS where most operations have that network latency overhead, this aspect of Git will make you think that the gods of speed have blessed Git with unworldly powers. Because you have the entire history of the project right there on your local disk, most operations seem almost instantaneous.
For example, to browse the history of the project, Git doesn’t need to go out to the server to get the history and display it for you — it simply reads it directly from your local database. This means you see the project history almost instantly. If you want to see the changes introduced between the current version of a file and the file a month ago, Git can look up the file a month ago and do a local difference calculation, instead of having to either ask a remote server to do it or pull an older version of the file from the remote server to do it locally.
Git Has Integrity:
Everything in Git is checksummed before it is stored and is then referred to by that checksum. This means it’s impossible to change the contents of any file or directory without Git knowing about it. This functionality is built into Git at the lowest levels and is integral to its philosophy. You can’t lose information in transit or get file corruption without Git being able to detect it.
The mechanism that Git uses for this checksumming is called a SHA-1 hash. This is a 40-character string composed of hexadecimal characters (0–9 and a–f) and calculated based on the contents of a file or directory structure in Git. A SHA-1 hash looks something like this:

523b6818ce0901d006edafa53e849cfe4aadd35e
You will see these hash values all over the place in Git because it uses them so much. In fact, Git stores everything in its database not by file name but by the hash value of its contents.
Git Generally Only Adds Data:
When you do actions in Git, nearly all of them only adds data to the Git database. It is hard to get the system to do anything that is not alterable or to make it delete data in any way. As with any VCS, you can lose or mess up changes you haven’t committed yet, but after you commit a snapshot into Git, it is very difficult to lose, especially if you regularly push your database to another repository.
This makes using Git a joy because we know we can experiment without the danger of severely screwing things up.
Snapshots, Not Differences:
- As already explained in the above section (Get to know GIT Better)
The Three States of GIT
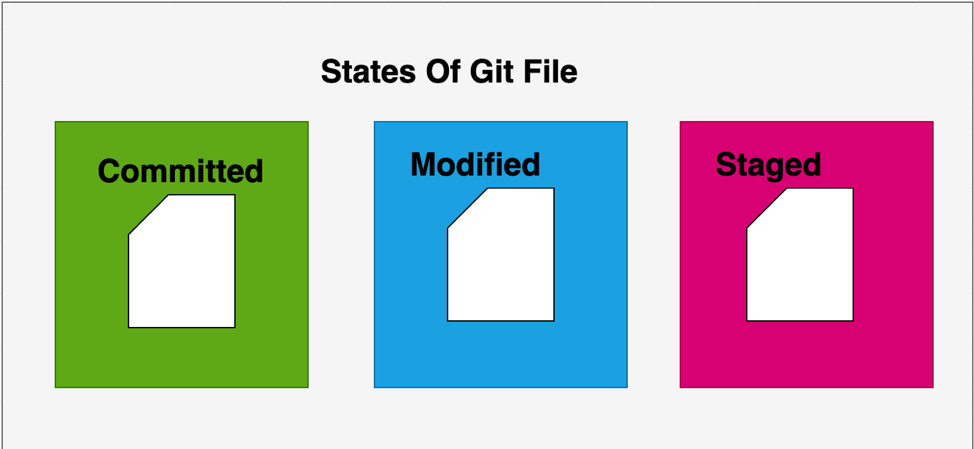
MODIFIED:
This means that you have changed or altered the file but are not committed to the database yet.
STAGED:
This means you have marked the file in its current version to go to the next commit snapshot.
COMMITTED:
This means data has been securely stored in the local database of your machine.
GIT Workflow
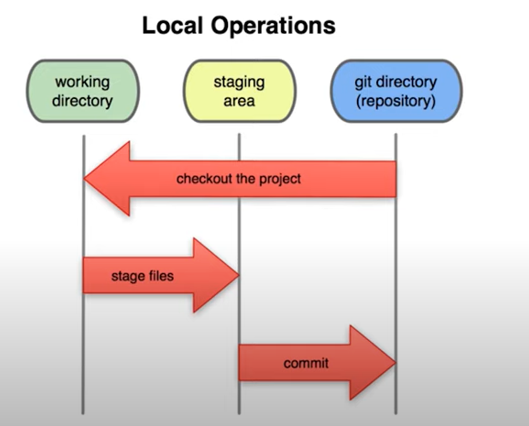
The working tree is a single checkout of one version of the project. These files are pulled out of the compressed database in the Git directory and placed on disk for you to use or modify.
The staging area is a file, generally contained in your Git directory, that stores information about what will go into your next commit. Its technical name in Git parlance is the “index”, but the phrase “staging area” works just as well.
The Git directory is where Git stores the metadata and object database for your project. This is the most important part of Git, and it is what is copied when you clone a repository from another computer.

Let's now understand the Git Workflow in simple terms:
We Modify the file in the working area.
We stage those changes that we want to commit in the next commit, this will only select the changes to the staging area.
Then we will commit the changes, which move the file from the staging area to the git repository and saves the snapshot permanently there.
Git Installation
Let's start with installing Git on your machine. Even if it is already installed, it is always good practice to keep it updated to the latest version. Below are steps to install & setup git :
A. Git Installation on Linux
For Centos, Fedora & Redhat
sudo dnf install gitIf using the older version then use yum instead of dnf
sudo yum install gitFor Debian, Ubuntu
sudo apt-get install gitFor Opensuse
sudo zypper install gitFor Arch and its derivatives
sudo pacman -S git
B. Git Installation on Windows
Click Here to install
To get an automated installation you can use the Git Chocolatey package.
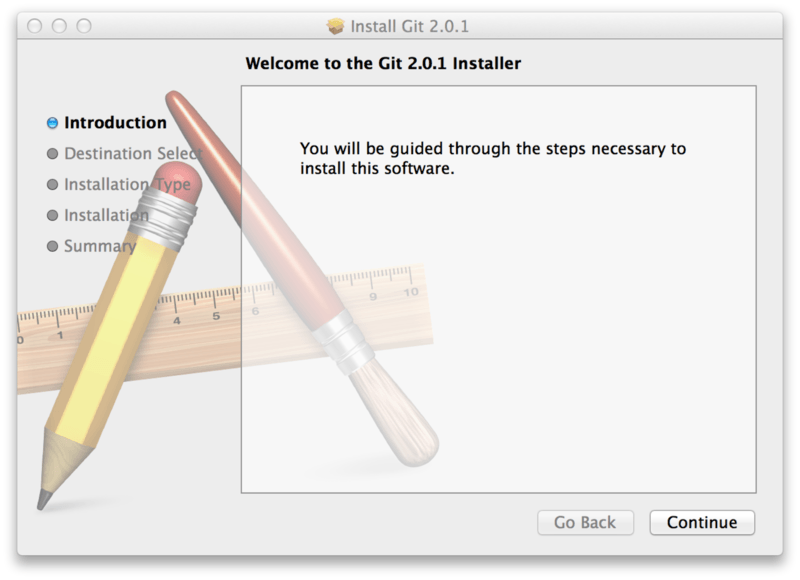
C. Git Installation on mac OS
You can install it via binary installer from Here
Git Verification
Post Installation use the below command to check the version
git --version

Git Setup
While you set git for the first time, this lets you get and set configuration variable that controls all aspect of how git looks and operates:
[path]/etc/gitconfigfile: Contains values applied to every user on the system and all their repositories. If you pass the option--systemto git config, it reads and writes from this file specifically. Because this is a system configuration file, you would need administrative or superuser privileges to make changes to it.~/.gitconfig or ~/.config/git/configfile: Values specific to the user. You can make Git read and write to this file specifically by passing the--globaloption and this affects all of the repositories you work with on your system.config file in the Git directory (that is,
.git/config) of whatever repository you’re currently using: Specific to that single repository. You can force Git to read from and write to this file with the--localoption, but that is the default. Unsurprisingly, you need to be located somewhere in a Git repository for this option to work properly.
Below specifies all the settings and origin details of the user:
git config --list --show-origin
Ref Output:

We should always set the username and Email address as soon as we installed git, this is important because Git uses this information while we starting committing. These setup are required to be done once because we are passing the option --global which enables Git to use information everytime.
git config --global user.name “username”
git config --global user.email “email id”
To check the configuration use:
git config –list
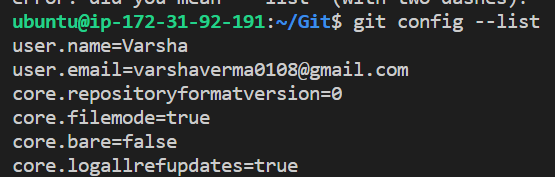
For checking specific value of username and email address if already configured then use:
git config user.name
git config user.email
Git is Helpful too🤗
If you stuck somewhere and want to check more details about the command used in git then, you are at right place. Below mentioned Git commands are quite useful:
git help <verb>
git <verb> --help
git <verb> -h
man git-<verb>
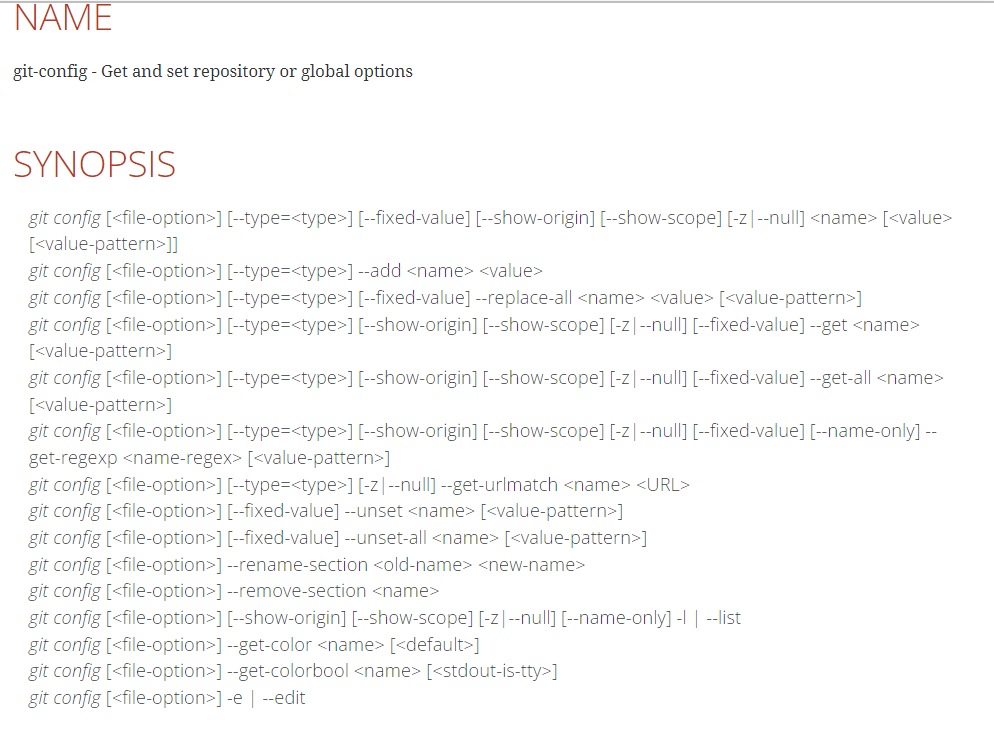
Just replace verb with some git commands and that's it. It is that simple. Example:
git help config

Getting a Git Repository
We can get Git repository in two possible ways:
Create a new directory in the local machine and initialize it as a Git repo.
Clone an existing repository from GitHub.
Create a new directory in the local machine and initialize it as a Git repo.
Initializing a new Repository
cd /home/user/foldername
git init
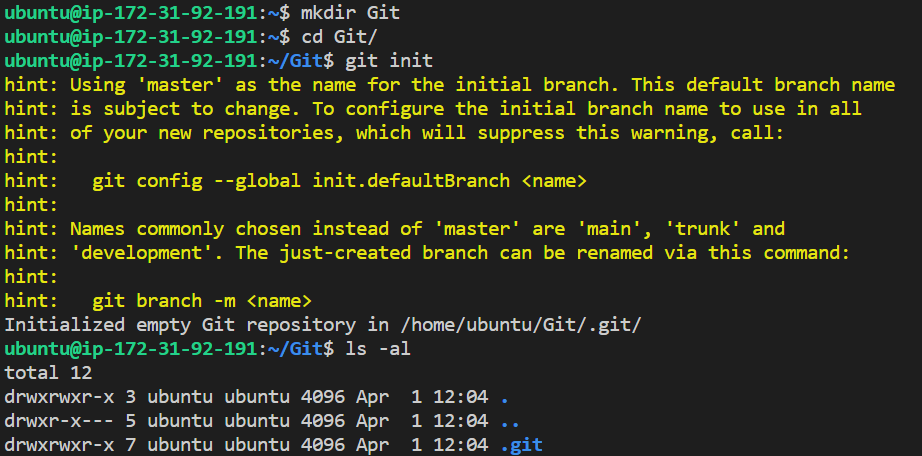
this will create a new subdirectory as .git which has all the necessary repository file i.e.., A Git Repository Skeleton. However, nothing is tracked as of now. So, let's start adding the files and committing them.
Now you can start creating a file:
touch File1
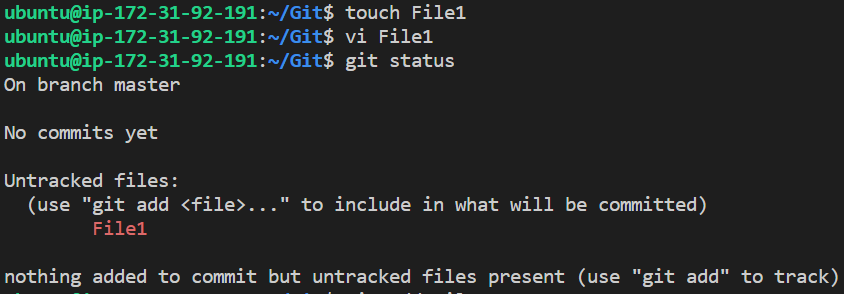
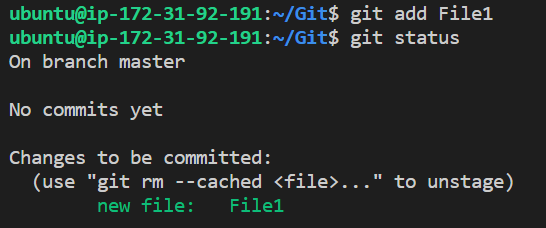
Staging a File
Write some content over it and save it. Now check the git status This file will be tracked now and is ready to be committed
git add File1
Now move the file to the local .git repo by committing it.
Unstaging a File
If you accidentally staged a file, use the following to unstage it:
git reset HEAD <Filename>
If the files are more than one then look here
Deleting a File
If you delete files they will appear in git status as deleted, and you must use git add to stage them. Another way to do this is by using git rm command, which both deletes a file and stages it all with one command:
git rm File1.html               --> to remove a file (and stage it)
git rm -r myfolder              --> to remove a folder (and stage it)
Committing a File
git commit -m "Message for commit that totally signify the changes done"
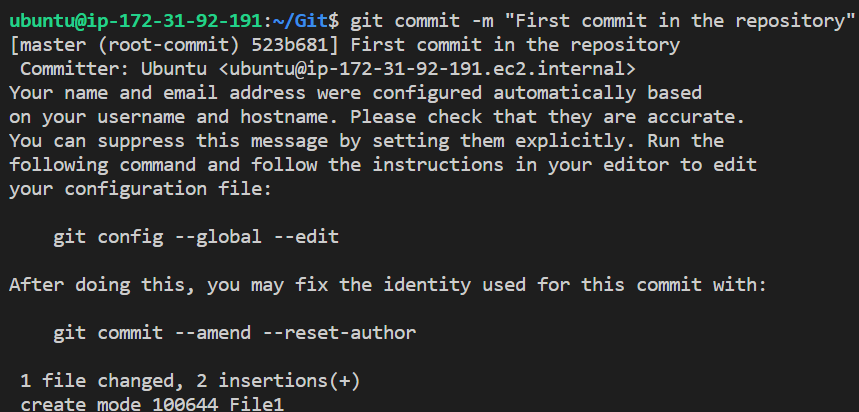
Congratulations!!! you made your first COMMITMENT 😉
This file is currently residing in the local repo, to move it to GitHub we have to push it. So, we have to set upstream and add the origin of Github's repository.
Fixing the Commit Message
Always try to put sensible messages to the commit so that later when referred to, it can be easily understood what it signifies. But still you want to later your commit message then follow below:
git commit --amend -m "Put your corrected message here"
Adding Remote Repository
First check if the remote repository is already setup:
git remote -v
If not then setup with the below commands:
git remote add origin <REMOTE_URL>
You can use the command git remote set-url to change a remote's URL.

Now you could differentiate between both the git remote -v commands.
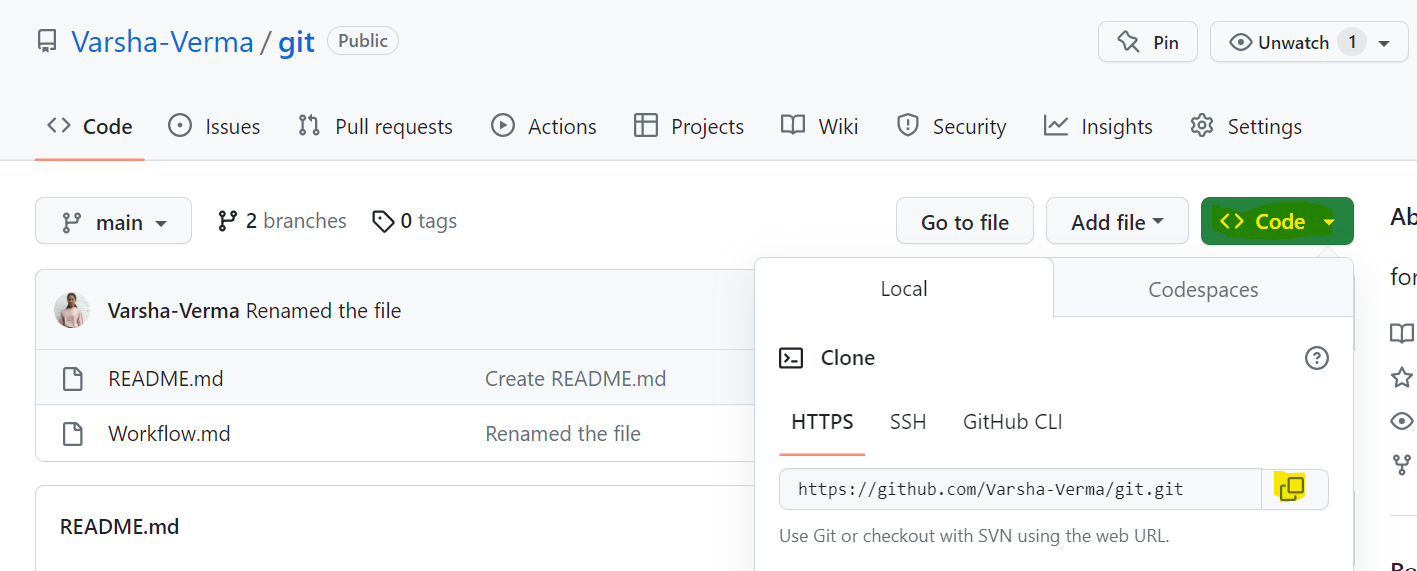
The URL used in the above command will be generated on Github on the specific repository(remote repository not local one) in which you want to push your changes to. Below is the screenshot of the location :
PASSWORDLESS Authentication for every Push
Generating and setting up SSH Keys for authentication
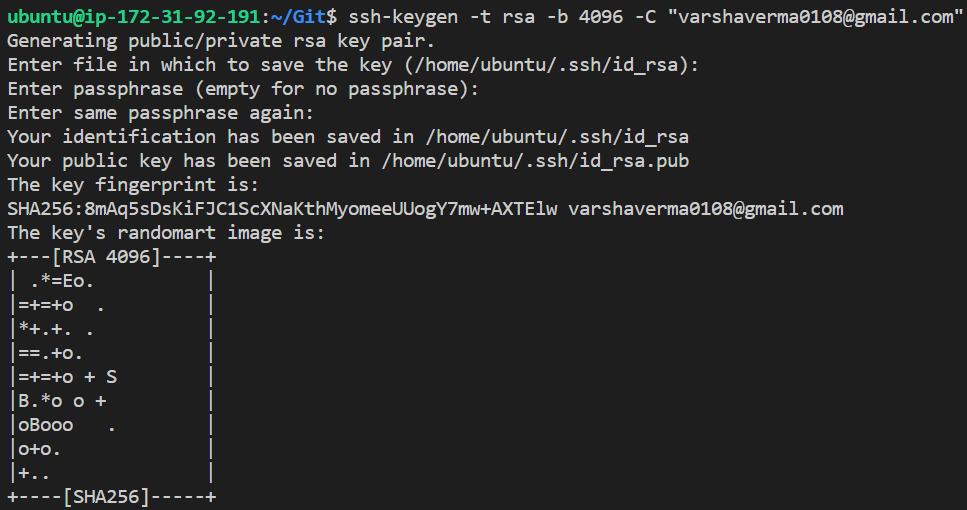
In the command line generate the SSH keys like below:
#Generating SSH key in the cli
ssh-keygen -t rsa -b 4096 -C "MailId"
Checking if the agent is running or not
eval "$(ssh-agent -s)"
In the specified location copy key id_rsa.pub, this will be used in the later steps 🤔.
Visit GitHub profile --> Setting-->SSH And GPG Keys --> generate new SSH Keys

Now here Click on new SSH key, provide Key name and paste the Public key copied in the previous step and save it.
Set your URL with remote set-url
git remote set-url origin g//git.github.com/username/reponame.git

or

git remote set-url origin git+ssh://git.github.com/username/reponame.git
For API authentication, Token confirguration on GitHub
Visit GitHub profile --> Setting--> Developer's section--> Token. Create new Token and provide necessary permissions then Save it.
This will generate new Token which we will be used in CLI for API authentication


Make sure you copied it and save it somewhere because this is one time viewable. Post that, do git pull from local repo to remote repo to refresh the connection:
git pull <Url of remote repo> branch name>

Now your File is ready to be pushed on GitHub
git push origin master

Provide your GitHub Username and instead of the Password use the GPG token that you copied earlier. Refresh the GitHub on the browser and you will see that File1 has been pushed to the remote repo

CONGRATULATIONS!!! On your 2nd milestone, you pushed a file from local repo to the remote repository.
Clone an existing repository from GitHub
I have created File2 in the GitHub repository (remote).
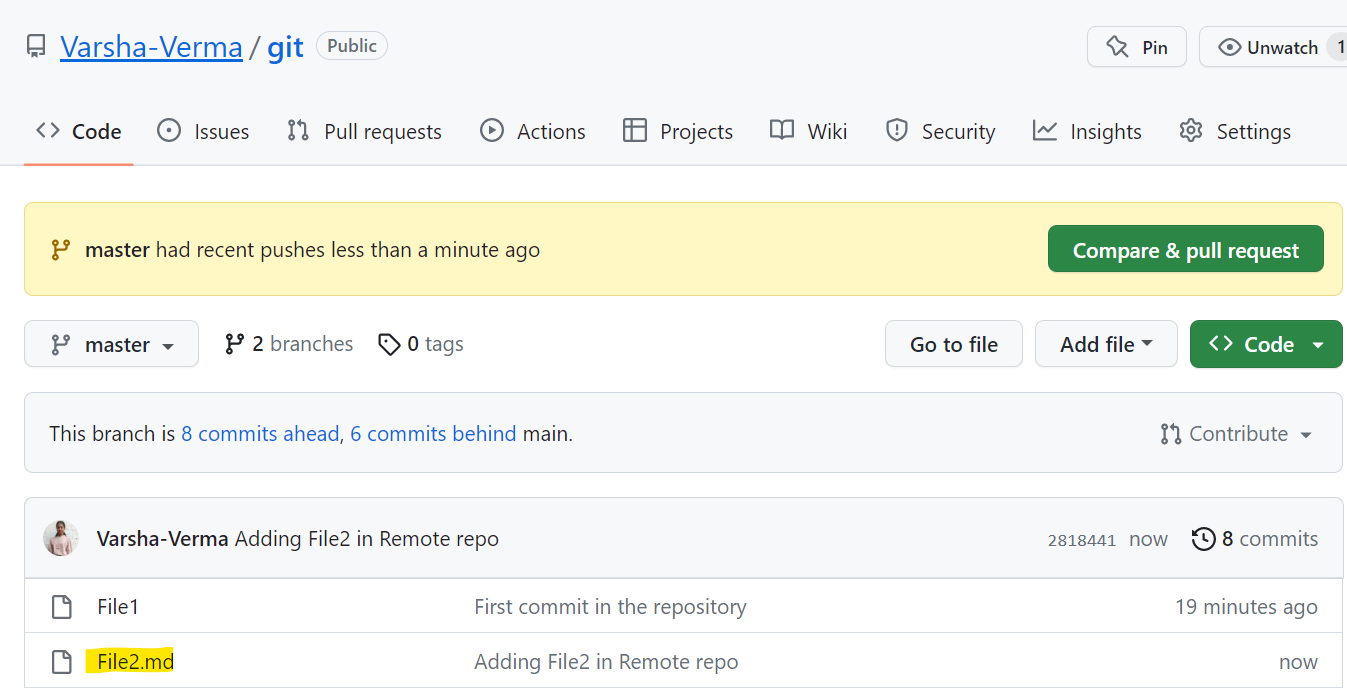
Copy the Url from the Code section on the GitHub repo
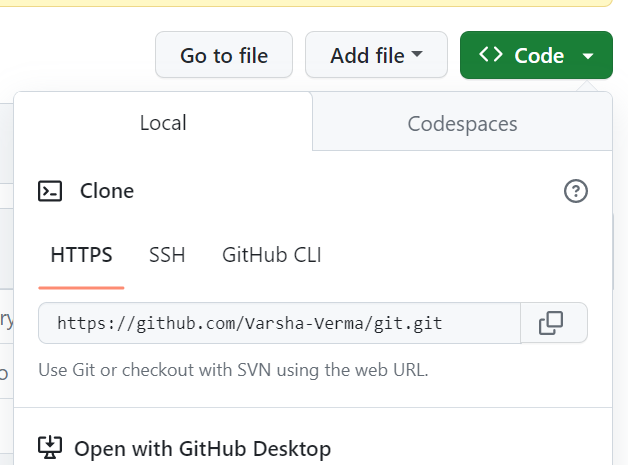
On CLI or local repo, we will be cloning this File2, using the below command
git clone <URL from GitHub>
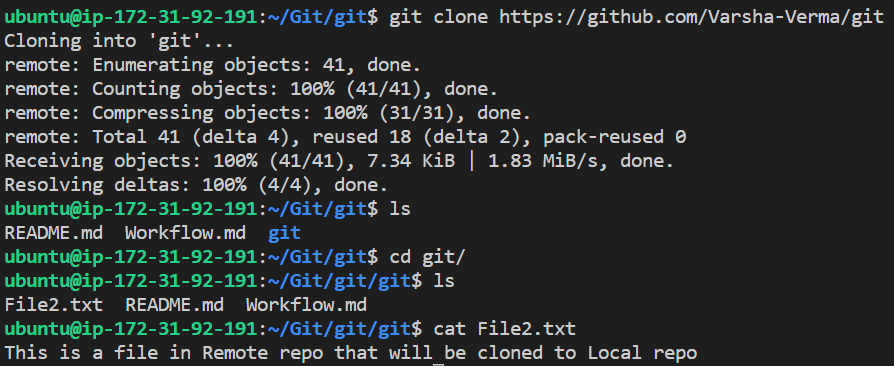
Great!!! we have cloned the remote repo into our local machine. 🤗
GIT Log:
If you want to see the logs of what is being done till now in git with all the details then run:
git log

The above provides complete logs but there are other commands too that will provide the logs with short descriptions.
- To see a simplified list of commits, run this command:
git log --oneline
- To see a list of commits with more detail (such who made the commit and when), run this command:
git log

NOTE: If the list is long, use the Down/Up Arrow keys to scroll and hit Q to quit.
- To see a list of commits with even more detail (including which files changed), run this command:
git log --stat
NOTE: If the list is long, use the Down/Up Arrow keys to scroll and hit Q to quit.
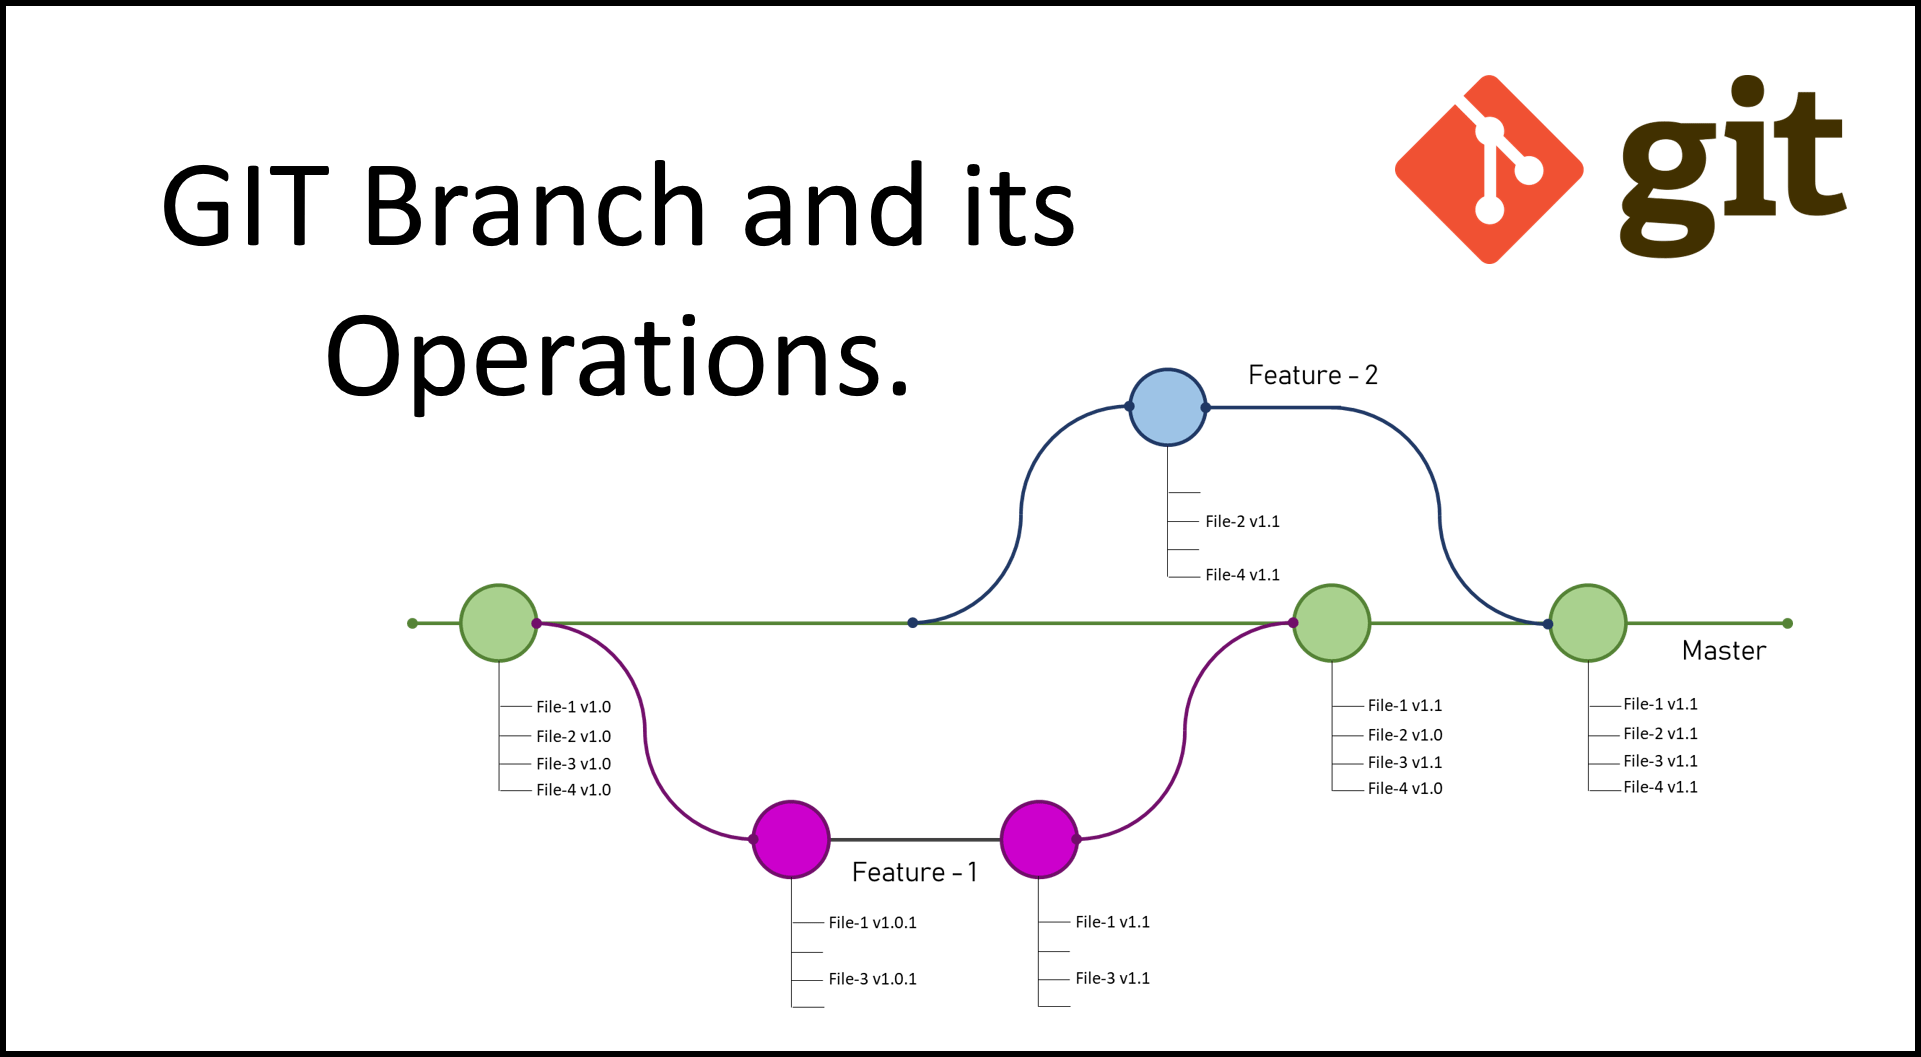
Branches:
A branch in Git is a separate line of development that allows developers to work on a specific feature or bug fix without affecting the main codebase. Each branch is a separate copy of the codebase that can be modified independently, and changes made to one branch do not affect the other branches until they are merged.
It is because of the branching facility Git is supporting the Version control system.
Branching Capabilities:
Due to its sophisticated branching capabilities, developers can easily work on multiple branches for the different features of the project.
It also has an easier merge option along with an efficient workflow feature diagram for tracking it.
Verify your Git Branch
By default, there is only one branch present and that is the master you can verify them as mentioned in the below commands:
git branch
git branch --list

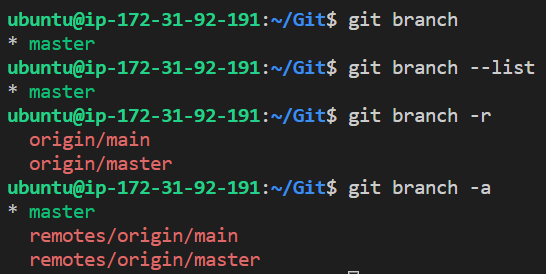
Listing of Git Branches
NOTE: The current local branch will be marked with an asterisk (*).
- To see local branches, run this command:
git branch

git branch --list
- To see remote branches, run this command:
git branch -r
- To see all local and remote branches, run this command:
git branch -a
The Output of all the above commands:
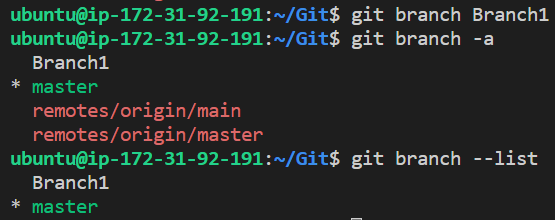
Creating New Branch
- Creating a new branch without leaving the Master branch:
git branch <branch_name>
Here by the above command, only a new branch is created but the user will be still in the Master branch. Below mentioned asterisk(*) points to the current branch.
- Creating a New Branch and Switching to it:
git checkout -b <branch_name>
This will move the user to the newly created Branch and now the asterisk(*) will point to this new branch.

Rename Branch
git branch -m <old_name> <new_name>
Git Checkout in Local Repo
If you want to switch between multiple already created branches then git checkout comes to the rescue:
git checkout <branch_name>

Git Switch in Local Repo
Git 2.23 introduces a new command git switch which is pretty much similar to git checkout.
- Switching to a branch
git switch <branch_name>

- Creating a New Branch and Switching to it using
git switchcommand:
git switch -c <branch_name>
Switch to a Branch That Came From a Remote Repo
- To get a list of all branches from the remote, run this command:
git pull
- Run this command to switch to the branch:
git checkout --track origin/my-branch-name
Git Merge
- Before merging, make sure which branch you are on and whether your working tree is clean or not by checking the status.
git status
- Now switch to the desired branch in which you want to merge your required branch to by:
git checkout <branch_name>
or
git switch <branch_name>
- Now you can merge another branch with the current branch by:
git merge <branch_name>
NOTE: When you merge, there may be a conflict. Refer to Merge Conflicts in below section of the blog.
PUSH to a Branch
- If your local branch does not exist on the remote, run either of these commands:
git push -u origin my-branch-name
git push -u origin HEAD
NOTE: HEAD is a reference to the top of the current branch, so it's an easy way to push to a branch of the same name on the remote. This saves you from having to type out the exact name of the branch!
If your local branch already exists on the remote, run this command:
git push
Delete Branches
To delete a branch we can simply use the command
git branch –d [head].To delete a branch locally, we can simply run the command:
git branch -d <local_branch_name>To delete a branch remotely, run the command:
git push origin --delete <remote_branch_name>Deleting a branching scenario occurs for multiple reasons. One such reason is to get rid of the feature branches once it has been merged into the development branch
To delete a remote branch, run this command:
- git push origin --delete my-branch-name
To delete a local branch, run either of these commands:
git branch -d my-branch-name
git branch -D my-branch-name
NOTE: The -d option only deletes the branch if it has already been merged. The -D option is a shortcut for --delete --force, which deletes the branch irrespective of its merged status.

Merge Conflict
Suppose you and another member of your team working on the same File and the other person has made some changes, added a few more lines and pushed it on the remote repo. When you pulled them to get the latest version, you will get a conflict. But Git has its way of handling conflict. It will show you both versions and you can decide and keep which ones you want to keep.
Steps to resolve conflict:
Firstly make a note of the file(s) that has conflict.
Open the file and look for the conflict markers like below:
<<<<<<< HEADMarks the start of the changes.
=======
Divides your changes from the changes in the other branch.

>>>>>>> branch-name
Marks the end of the changes.
Now decide How to resolve the conflict:
You can edit the code and decide which version you want to keep it can either be your changes or the other person or a combination of both. Whatsoever it is be sure to delete the conflict markers.
Instead of editing the code directly, you may know which changes you want to keep (yours/theirs). For example you may be working on a feature branch as others work on the master branch. When you go to merge your feature branch into master you may get a conflict. Here's how to use one of those versions:
git checkout --yours website1.html (You are on the master branch trying to merge in the feature branch, so --yours will use the version from the current master branch)
git checkout --theirs website.html (You are on the master branch trying to merge in the feature branch, so --theirs will use the version from the feature branch you're merging into master)
If you get confused about which one to pick, then run both the code and depending upon the output you can decide which version you want to keep. These commands can be very useful because you don't have to edit files, remove conflict markers, etc. The files become the version you want.
4. Now you can stage and commit your changes (and push if needed).
This is the complete GIT 101 that you need to know, Advanced topics will be covered in another part of the GIT blog, So, stay tuned!!!🚀
Thanks for reading till the end, I hope you got some knowledge. Here is a BONUS to make you smile #DevOps_Memes:

If you like my work, Let's connect and collaborate😃. I am available on the below platforms and very much active there:
Linkedinℹ️
GitHub😻
Blogs👩🏾💻
Topmate🏆
If you find the blogs helpful, you can also sponsor me too. Letting you know Just in case 😶🌫️🤭
NOTE:
All my Blogs are written in technical as well as in easy-to-understand language. Please do not copy as this is my original work. In case you want to use it, please tag, mention or ask me. Thanks!!


