

Introduction:
What is IBM Cloud?
IBM Cloud is a suite of cloud computing services from IBM that offers both platform as a service (PaaS) and infrastructure as a service (IaaS).
Why is IBM Cloud used?
With IBM Cloud IaaS, organizations can deploy and access virtualized IT resources -- such as compute power, storage and networking -- over the internet. For compute, organizations can choose between bare-metal or virtual servers.
With IBM Cloud PaaS -- which is based on the open source cloud platform Cloud Foundry -- developers can use IBM services to create, manage, run and deploy various types of applications for the public cloud, as well as for local or on-premises environments. IBM Cloud supports various programming languages, such as Java, Node.js, PHP and Python and extends to support other languages.
IBM Cloud products and services
IBM Cloud platform supports access to other IBM tools and services -- including IBM Watson and IBM Cloud Functions for serverless computing -- as well as those from third-party vendors.
IBM Cloud features
There are a number of IBM cloud services that are a part of the IBM cloud. These services are grouped into 16 categories:
AI/machine learning: A collection of Watson-based AI resources and tools for building your own AI models.
Automation: Automation resources enable business workflows to be automated using IBM Cloud Pak. Turbonomic is also available as an automation resource and can be used for application resource management and cost optimization.
Containers: IBM offers its own cloud Kubernetes service, as well as access to the container registry, Red Hat OpenShift and Istio (a server mesh for microservices).
IBM Cloud Paks: IBM Cloud Paks are applications that are certified for use on Red Hat Open Shift. Cloud Paks exist for business automation, data, integration, network automation, security and Watson.
Quantum: Provides the ability to run workloads on quantum systems through IBM Quantum composer, the IBM Quantum Lab and the Qiskit SDK.
Compute: Offers various compute resources, including bare-metal servers, VMs and serverless computing on which enterprises can host their workloads.
Networking: Provides cloud networking services, such as a load balancer, a content delivery network, VPN tunnels and firewalls.
Storage: IBM's cloud storage offerings include object, block and file storage for cloud data.
Logging and monitoring: Provides tools to log, manage and monitor cloud deployments, including Cloud Activity Tracker, Cloud Log Analysis and Cloud Monitoring.
Security: Includes services for activity tracking, identity and access management and authentication.
Databases: Provides a variety of SQL and NoSQL databases, as well as data querying, warehousing and migration tools.
Analytics: Offers data science tools such as Apache Spark, Apache Hadoop and IBM Watson Machine Learning, as well as analytics services for streaming data.
Internet of things (IoT): Includes the IBM IoT Platform, which provides services that connect and manage IoT devices, and analyzes the data they produce.
Developer tools: Includes a CLI, as well as a set of tools for continuous delivery, continuous release and application pipelines.
Blockchain: Provides IBM's Blockchain Platform, a SaaS offering to develop apps, enforce governance and monitor a blockchain network.
Integration: Offers services to integrate cloud and on-premises systems or various applications, such as API Connect, App Connect and IBM Secure Gateway.
IBM Cloud deployment models
IBM offers three deployment models for its cloud platform:
Public: A public cloud that provides access to virtual servers in a multi-tenant environment. An enterprise can choose to deploy its applications in one or multiple geographical regions.
Dedicated: A single-tenant private cloud that IBM hosts in one of its data centers. An enterprise can connect to the environment using a direct network connection or VPN, and IBM manages the platform.
IBM Cloud Private: A version of the IBM platform that an organization deploys as a private cloud in its own data center behind a firewall.
IBM Cloud pricing
The exact cost of IBM Cloud varies depending on resource usage, deployment model, support and other factors. As of 2022, IBM offers two main pricing models. Those who signed up for a lite account prior to October 25, 2021 can keep that account, but all new accounts are automatically created as pay-as-you-go plans.
LAB Overview:
After completing this lab, you will have created an Object Storage instance, bucket, and added objects to the bucket.
OBJECTIVE:
After completing this lab, you will be able to:
Use your IBM Cloud account to create an instance of Object Storage
Create a bucket to store data
Add objects to your bucket
Share objects in your bucket.
PREREQUISITES:
You will need an IBM Cloud account to do this lab. If you have not created one already, click on this link and follow the instructions to create an IBM Cloud account.
Create an IBM Cloud Object storage
Task 1: Create an instance of IBM Cloud Object Storage:
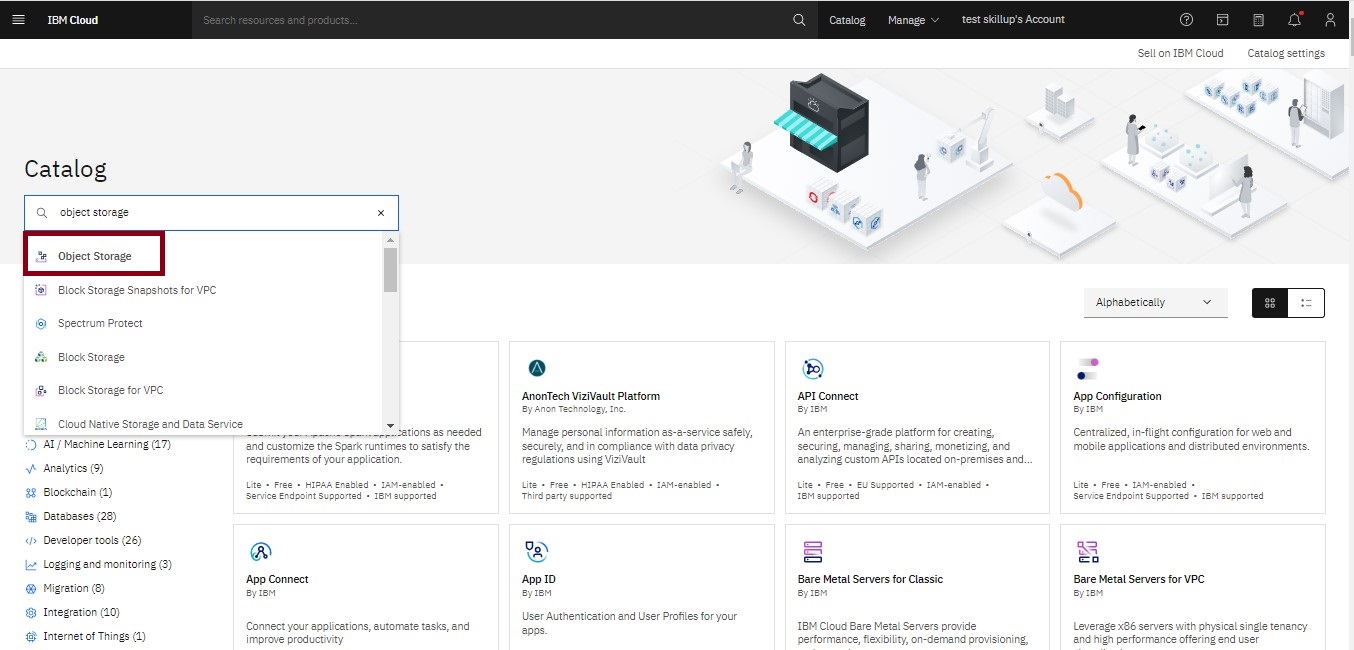
Step1: Login to your IBM Cloud account and open the IBM Cloud Catalog https://cloud.ibm.com/catalog.
Step2: On the Catalog page, make sure the Storage tab is selected and search and select Object Storage:
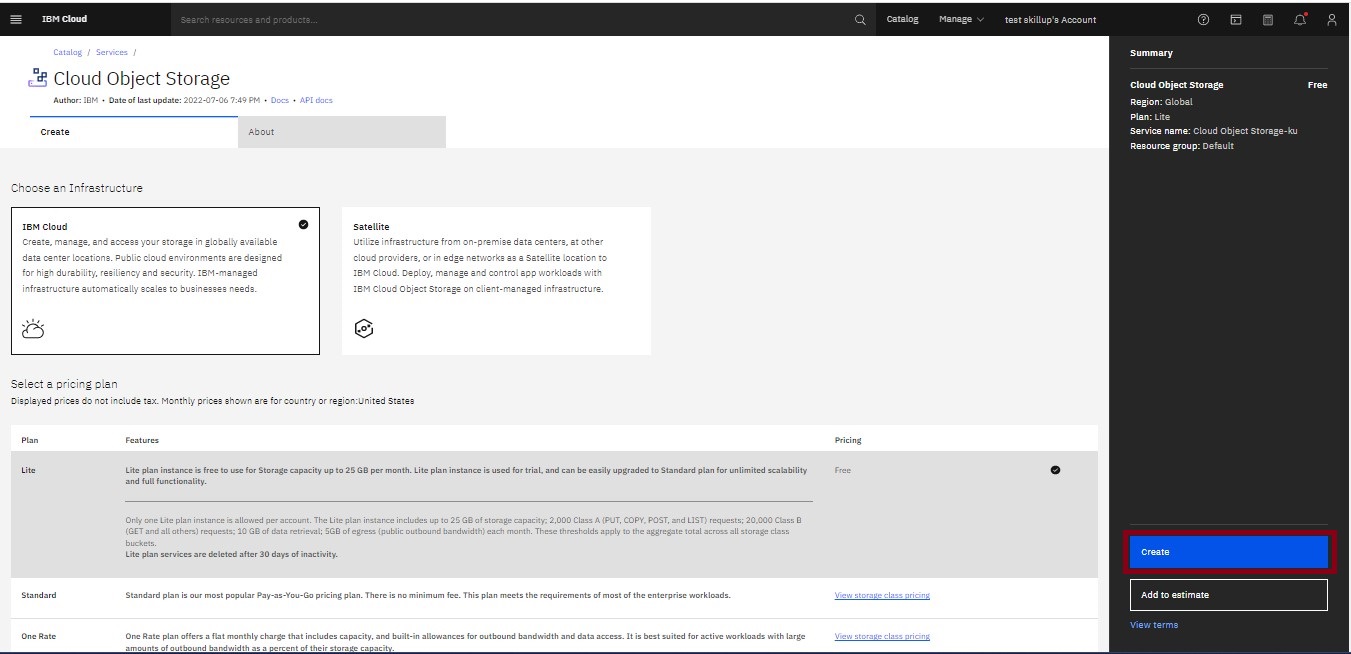
Step3: On the Cloud Object Storage (COS) page, choose the Lite plan. You can use the name that is shown in the service name or rename it as you want, accept the Default resource group, and then click Create.
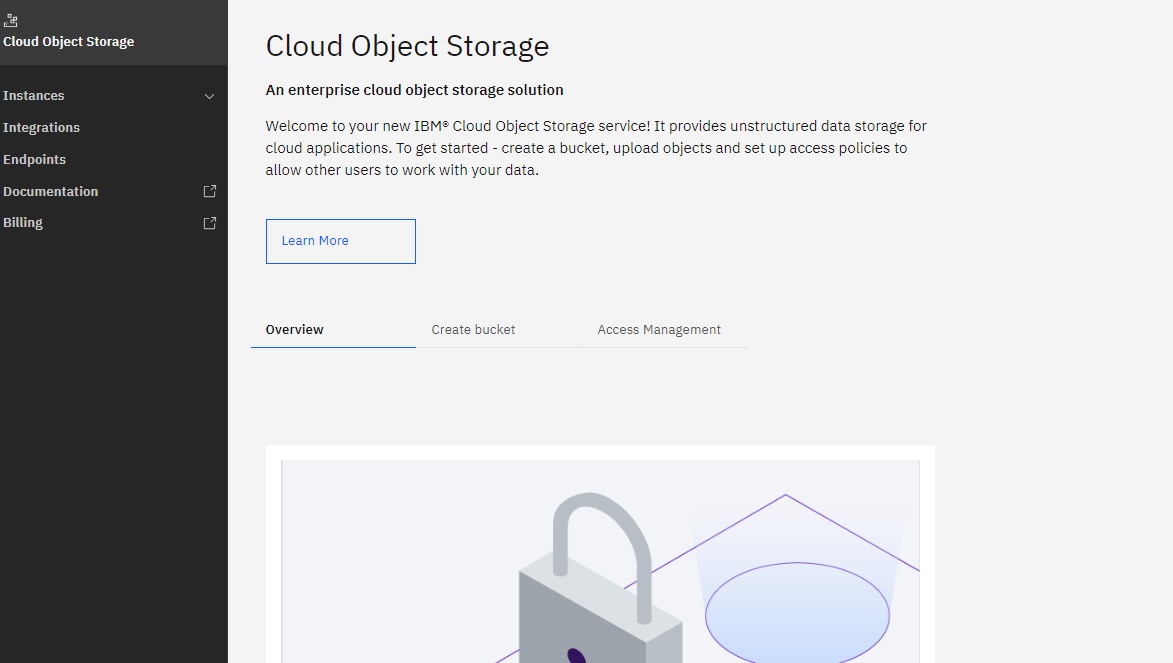
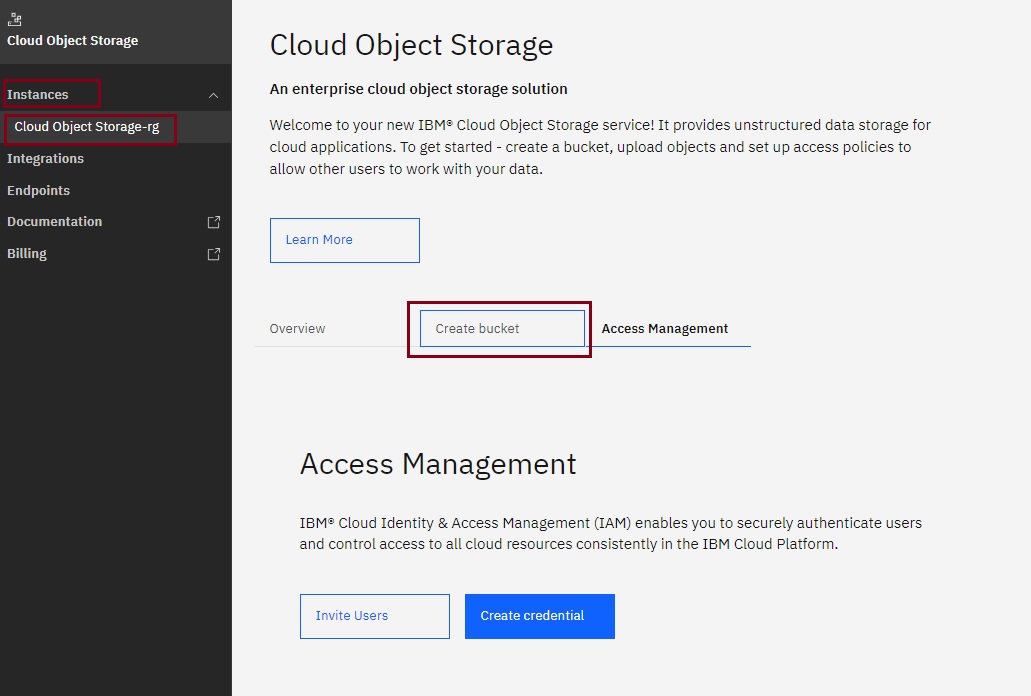
Step4: Once the Cloud Object Storage (COS) instance is created, you will automatically be directed to the Cloud Object Storage page. Here you can create a bucket and invite users for your Cloud Object Storage instance.
Task 2: Create a Bucket to store your data:
Step1: On your new Object Storage instance page, click on Create Bucket.
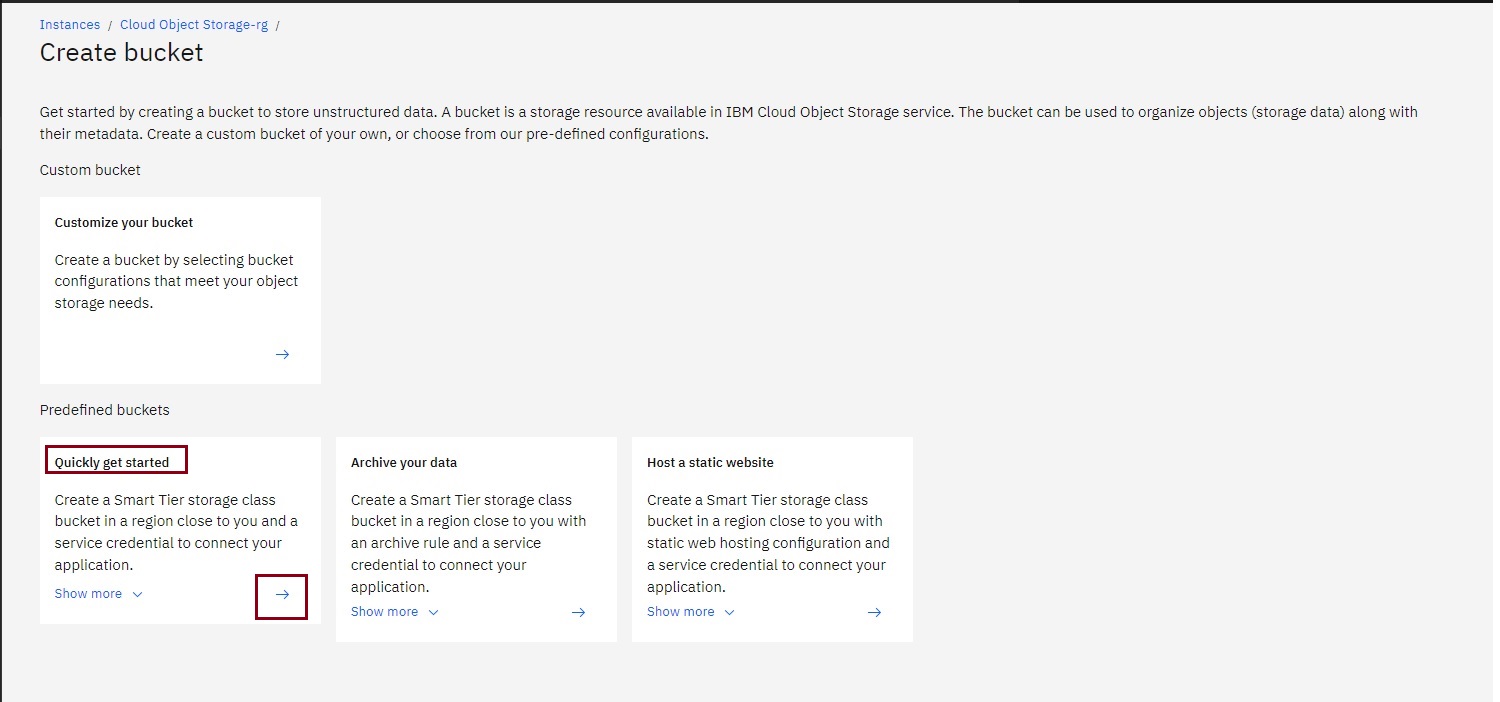
Step2: On the Create a bucket page, you can create a predefined bucket.
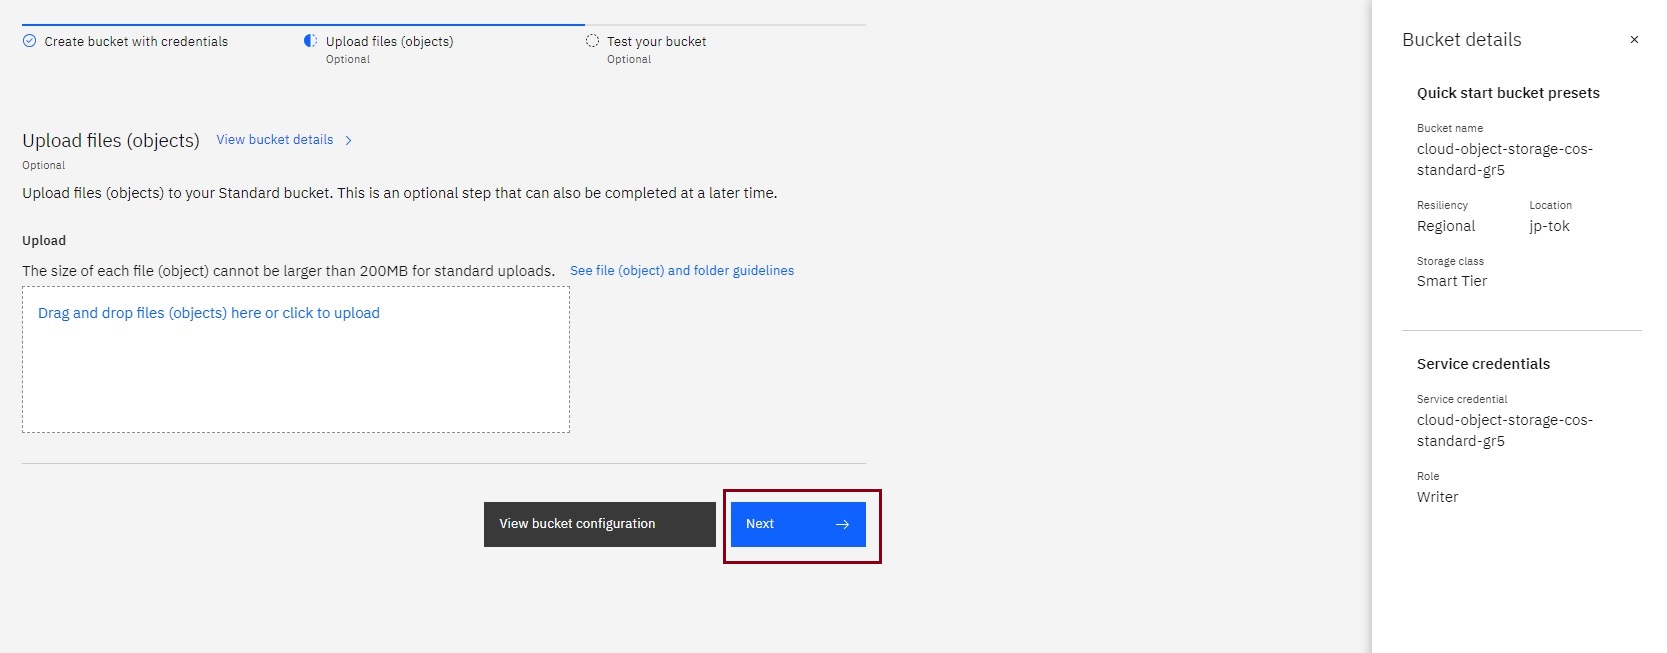
Step3: Use the pre-assigned name for your bucket and review the pre-configured settings and service credentials and click Next.

Step4: The Bucket page appears where you can begin adding objects to the bucket. For now, You can even have an option not to upload any file and click Next.
Task 3: Add Objects to your Bucket:
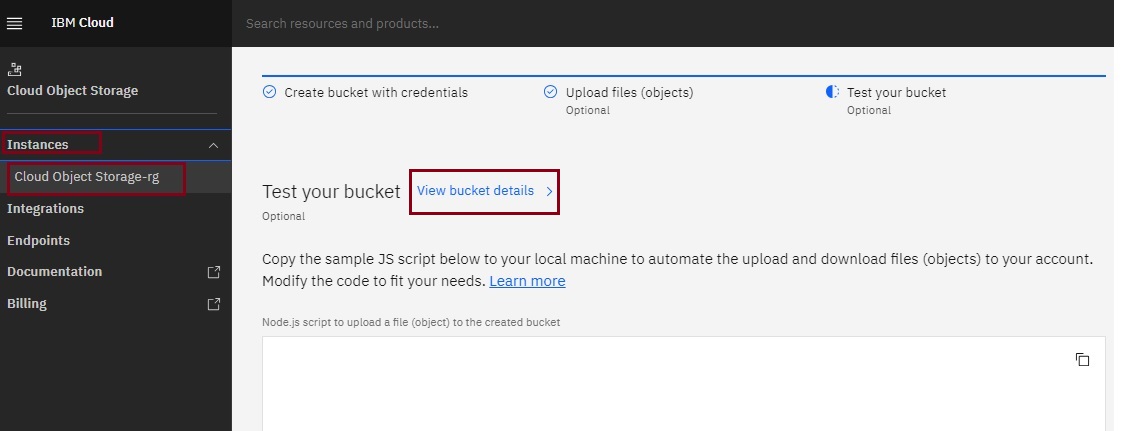
Step1: On the Bucket page, click on View Details and the details for the bucket are displayed.
Step2: In the object storage main page, you can now click on Buckets and see all the buckets.
Step3: Click the name of the bucket to which you want to add objects.
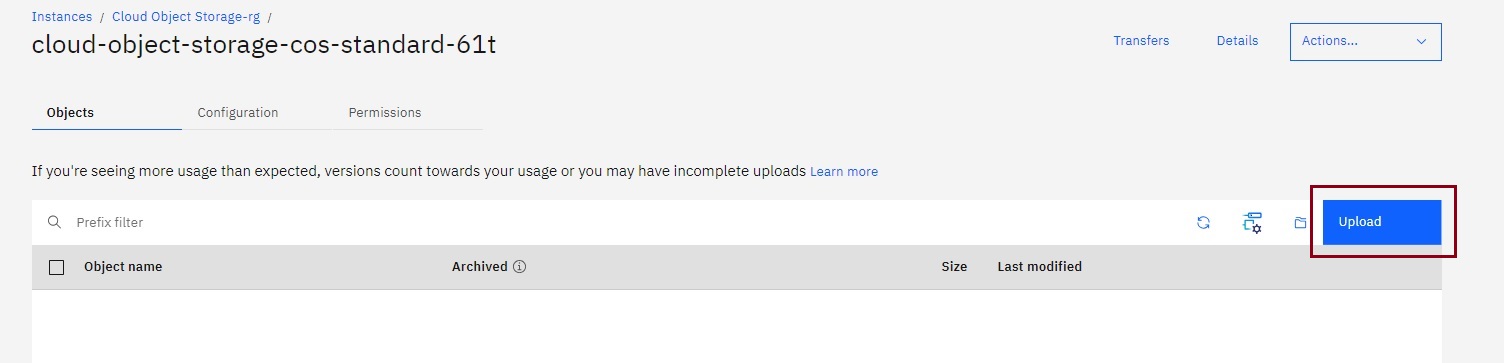
Step4: The Objects page appears where you can click Upload. You can also drag and drop files or folders into the space.

Step5: For this lab, we’ve provided an HTML file that you can use to add to your bucket. Right-click on Index.html
and click on Save Link or Save Page to save the index.html file to your computer.
Step6: (Optional) Edit the index.html file to customize it if you like.
Step7: Upload the index.html file from your computer to your COS bucket.
Task 4: Share Objects in your Bucket:
If you need to share objects in your buckets with other users, you can set up Access Policies. You can set access policies for specific users and groups, or you can choose to make certain buckets public so that anyone can access them (e.g. if you want to host static files on your website).
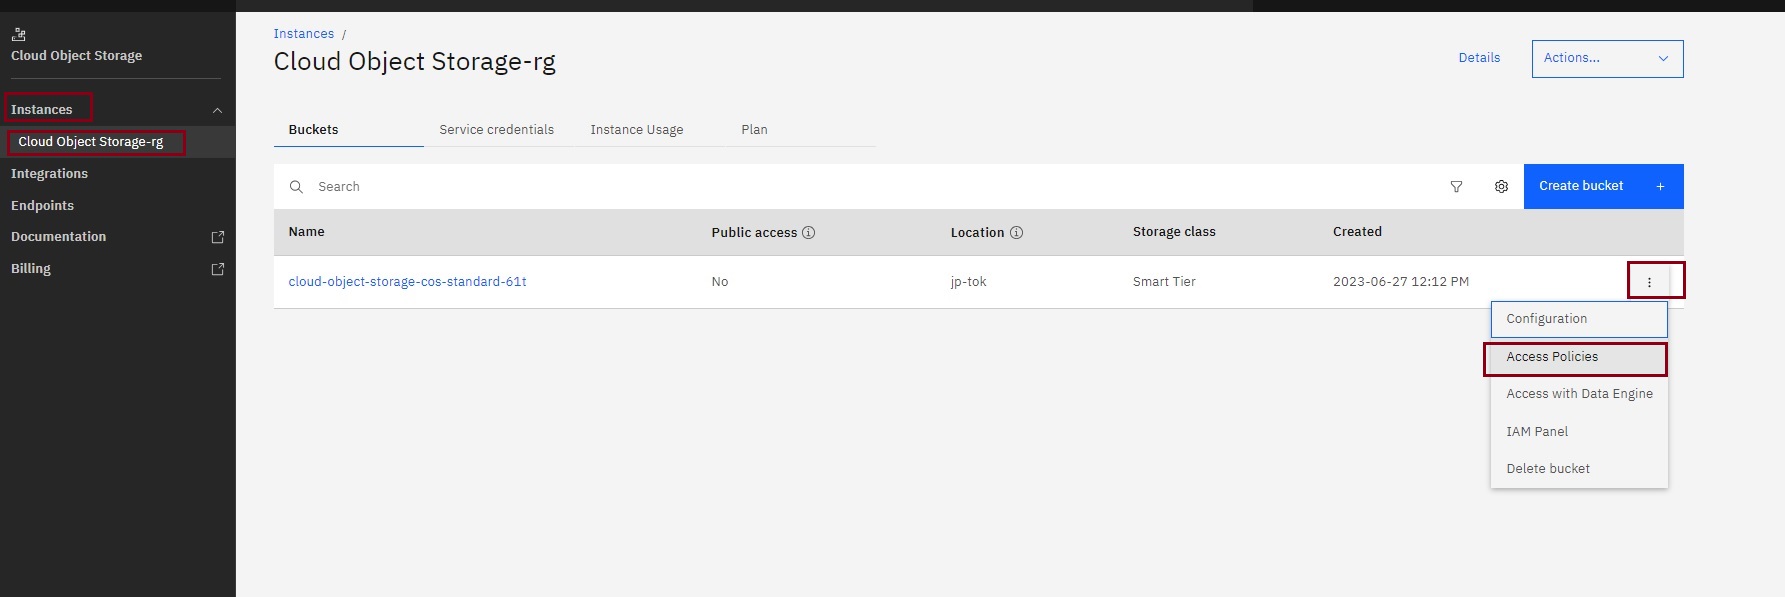
Step1: In the Bucket tab, click the “three dots” option of the bucket that you created. Then click “Access Policies”.
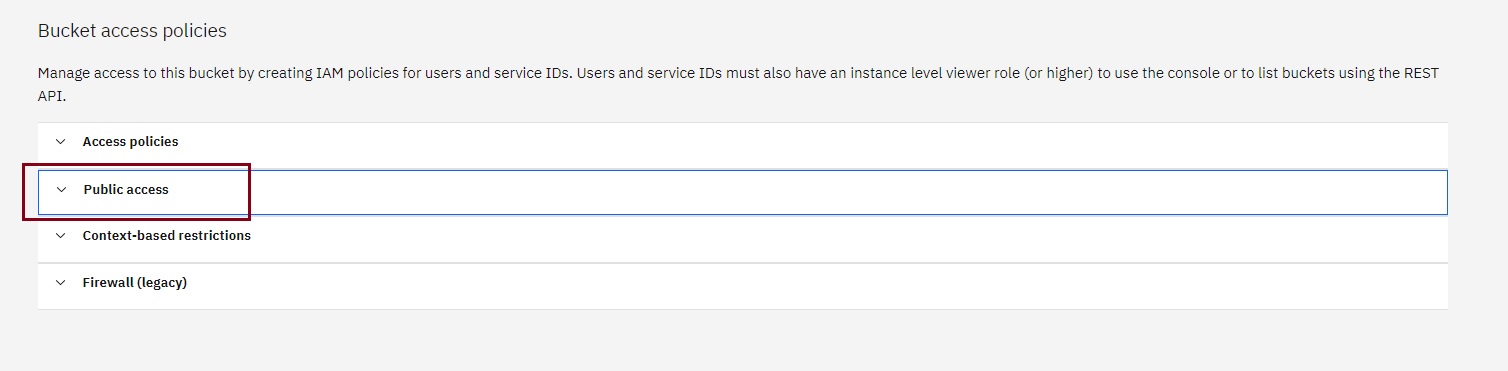
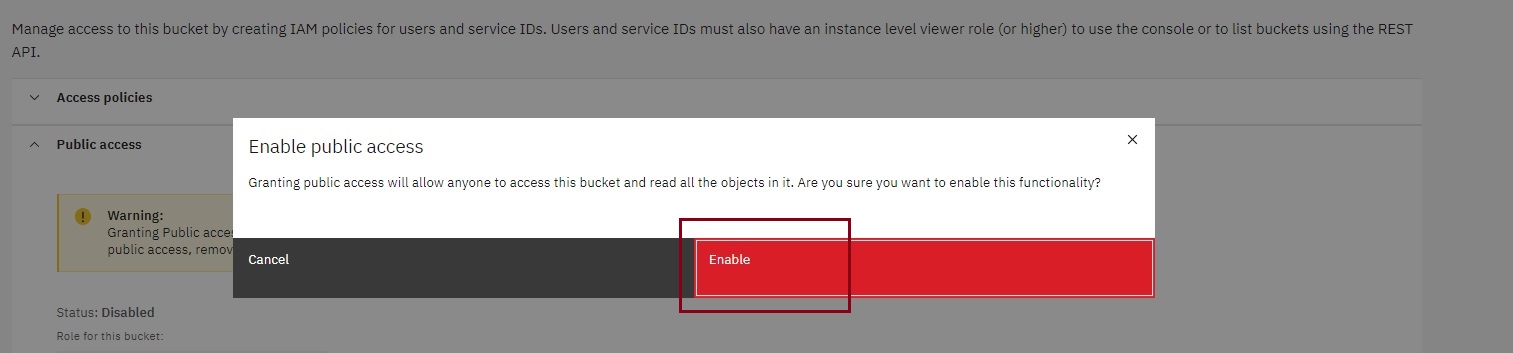
Step2: Under the Permission Tab, click Public Access.
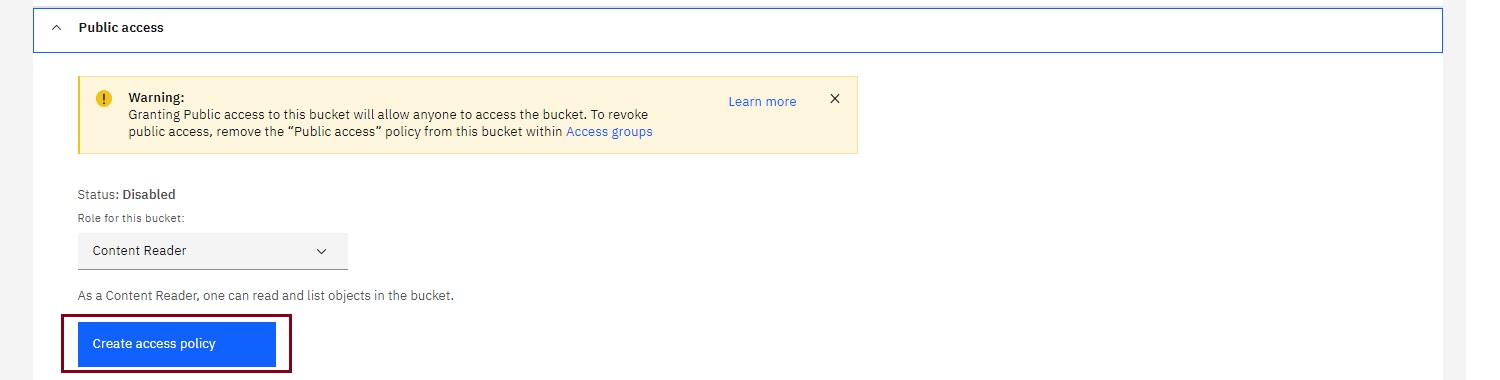
Step3: When you click on Public Access. Click Create access policy.
Step4: Next, a popup window appears. Click Enable to allow public access.
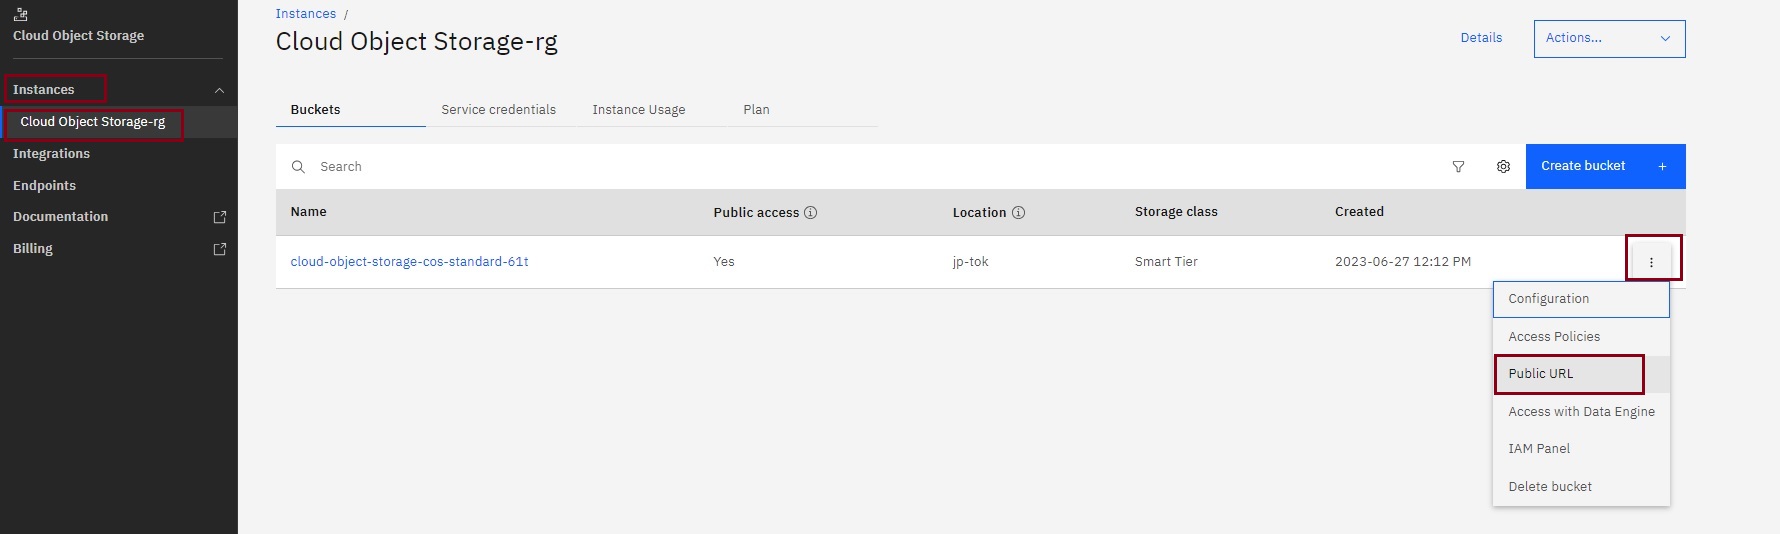
Step5: Next, click Objects in the navigation pane and select three dots under which you will find Public URL. Once you click there will be a pop-up where you will find the public URL for the Html file that you loaded to your bucket.
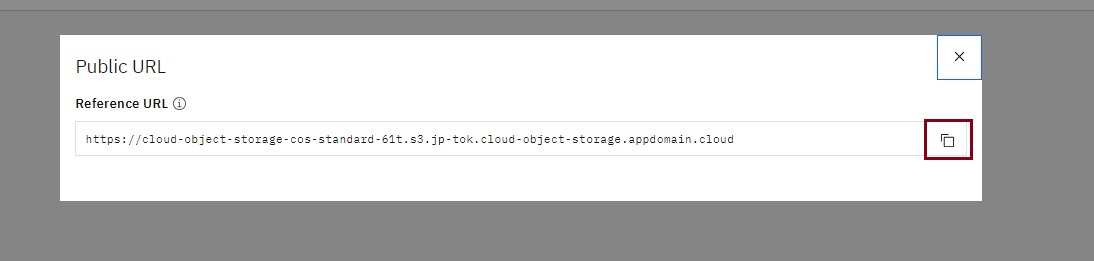
Step6: On the Objects page, click on the index.html to view the generated Object Public URL.
Note: If the Object Public URL did not appear, kindly refresh the page as it might takes some time to reflect
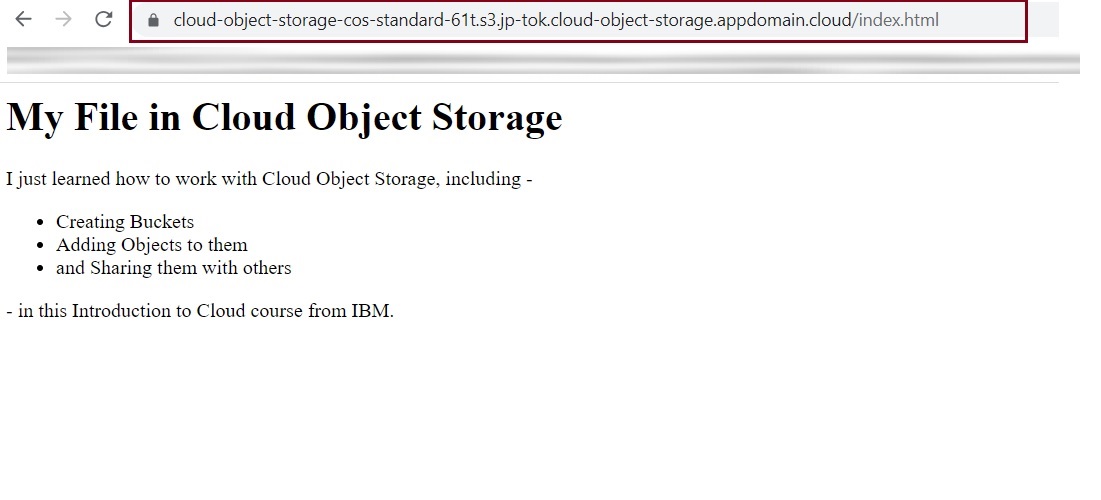
Step7: You can also test the public URL that you copied by opening it in your browser.
Did you realize something??? you are now a multi-cloud user, Wohooo!!!🎉
Don't let anyone define your journey, because you are the sculptor of your way which will lead you to a beautiful destination. Learning all clouds is not worthy if your concepts are not clear. Learn any of the clouds deeply and use the concepts to relate them with other available ones.
Don't forget to tag me if this blog helps you.😉
Here is a BONUS to make you smile #DevOps_Memes because you are doing great with your learnings and thank you so much for sticking by my blog till the end:

If you like my work, Let's connect and collaborate😃. I am available on the below platforms and very much active there:
linkedin.com/in/varsha-verma-182a04148
github.com/Varsha-Verma
cloud-and-devops.hashnode.dev
#Devops #Multicloud_Project #LearnIBM_cloud