Jenkins

👋 Hi, I’m @Varsha-Verma 👀 I’m interested in Cloud 🌱 I’m currently learning multi-cloud technologies and Devops 📫 How to reach me www.linkedin.com/in/Varsha-Verma-Cloud-DevOps
Jenkins is a Java-built open-source CI/CD software platform that supports continuous integration (CI) and continuous delivery (CD). It’s used to automate software testing, building, delivery, and deployment. Using Jenkins on Ubuntu creates a powerful management tool that takes a development workflow to the next level.
Jenkins is loved by teams of all sizes, for different language projects like Java, Ruby, Dot Net, PHP etc. Jenkins is a platform that is autonomous and can be used on Windows, Linux or any other operating system.
CI and CD are two acronyms frequently used in modern development practices and DevOps. CI stands for continuous integration, a fundamental DevOps best practice where developers frequently merge code changes into a central repository where automated builds and tests run. But CD can either mean continuous delivery or continuous deployment.
What Is Jenkins Used For?
To understand Jenkins, users must have an understanding of continuous integration (CI) and continuous delivery (CD) models and their purpose:
Continuous integration (CI) – a practice of constantly merging development work with the main branch.
Continuous delivery (CD) – a continual delivery of code to an environment once the code is ready to ship, applicable for both staging and production environments. The product is then delivered to quality assurance specialists or customers for review and inspection.
Developers update the code regularly in the shared repository (such as GitHub or TFS). Improvements made in the source code are made at the end of the day, making it difficult to identify the errors. So, Jenkins is used here.
Once a developer changes the repository, Jenkins will automatically enable the build and immediately warn you in the event of an error (Continuous Integration CI).
How to install Jenkins:
Jenkins requires the Java Runtime Environment (JRE). This guide uses OpenJDK for the Java environment. OpenJDK is a Development Kit and includes the Java Runtime Environment.
Step1: Install Java:
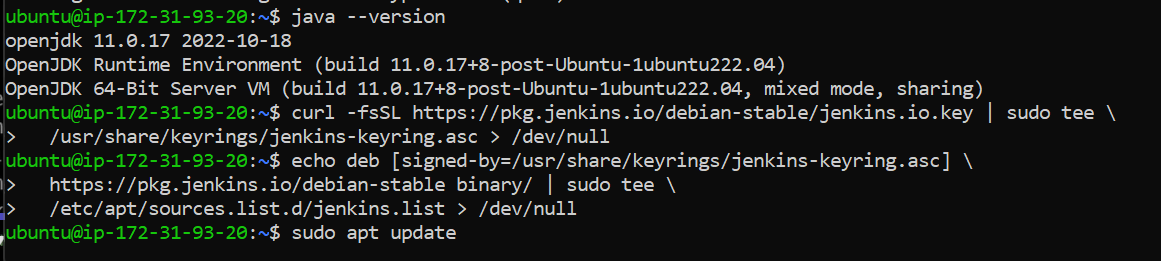
java --version
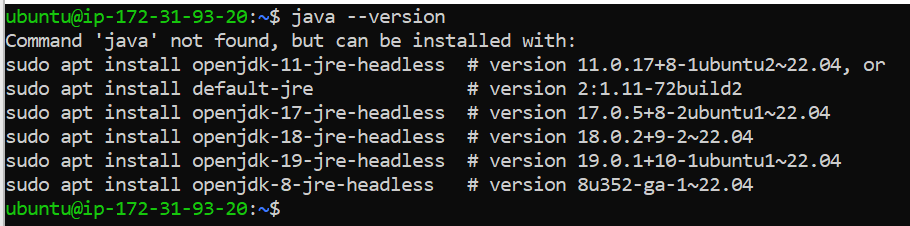
Since Java is not installed on our system, we will install it using OpenJDK.
Step 1.1: Open the terminal window and update the system package repository by running:
sudo apt update
Step 1.2: Depending on which Java version you want to install, Java 8 or 11, run one of the following commands:
sudo apt install openjdk-11-jre
Step 1.3: Start Importing GPG keys The GPG key verifies package integrity but there is no output.
curl -fsSL https://pkg.jenkins.io/debian-stable/jenkins.io.key | sudo tee /usr/share/keyrings/jenkins-keyring.asc > /dev/null
Step1.4: Add the Jenkins software repository to the source list and provide the authentication key:
echo deb [signed-by=/usr/share/keyrings/jenkins-keyring.asc] https://pkg.jenkins.io/debian-stable binary/ | sudo tee /etc/apt/sources.list.d/jenkins.list > /dev/null
Notes: Why use apt and not apt-get or another command?
It has a command structure that is similar to apt-get but was created to be a more pleasant experience for typical users which brings updates from the server and then installs it to the target. Simple software management tasks like install, search and remove are easier with apt.
| apt command | The command it replaces | The function of the command |
| apt install | apt-get install | Installs a package |
| apt remove | apt-get remove | Removes a package |
| apt purge | apt-get purge | Removes package with configuration |
| apt update | apt-get update | Refreshes repository index |
| apt upgrade | apt-get upgrade | Upgrades all upgradable packages |
| apt autoremove | apt-get autoremove | Removes unwanted packages |
| apt full-upgrade | apt-get dist-upgrade | Upgrades packages with auto-handling of dependencies |
| apt search | apt-cache search | Searches for the program |
| apt show | apt-cache show | Shows package details |
Step2: Install Jenkins:
After setting up the prerequisites, follow the steps below to install Jenkins on Ubuntu:
Step 2.1: Update the system repository one more time (Don't ignore this step as we need to apply the update to refresh the cache of the machine). Updating refreshes the cache and makes the system aware of the new Jenkins repository.
sudo apt update
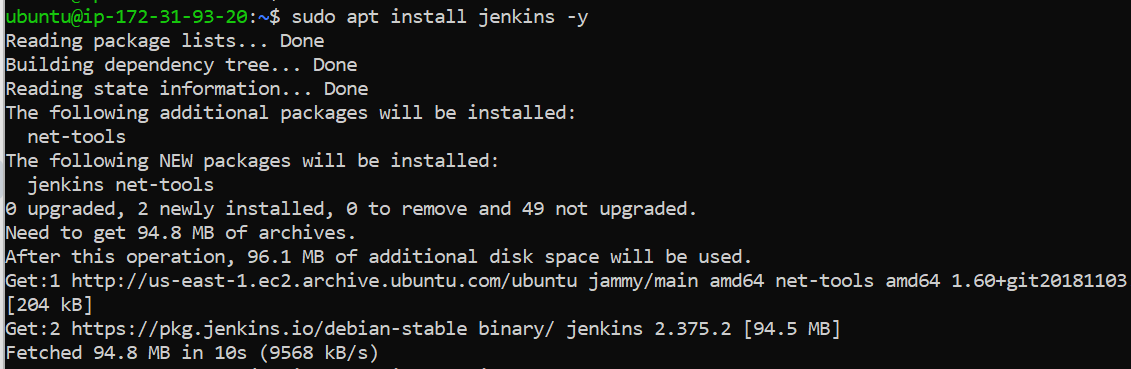
Step 2.2: Install Jenkins:
sudo apt install jenkins -y
Step2.3: To check if Jenkins is installed and running, run the following command
systemctl status jenkins

If Jenkins service is not running/active use:
sudo systemctl enable --now jenkins
Step2.4: Open the port 8080:
If you are using Ec2 Instance then allow port 8080 in Security groups and save it.

Incase of Firewall, open port by below command:
  sudo ufw allow 8080

  sudo ufw status

  sudo ufw enable
Step3: Set up Jenkins:
Step3.1: Open a web browser, and navigate to your server's IP address. Use the actual IP address or domain name for the server you're using Jenkins on. For example, if you're running Jenkins locally, use localhost (127.0.0.1)
<Server IP>:8080
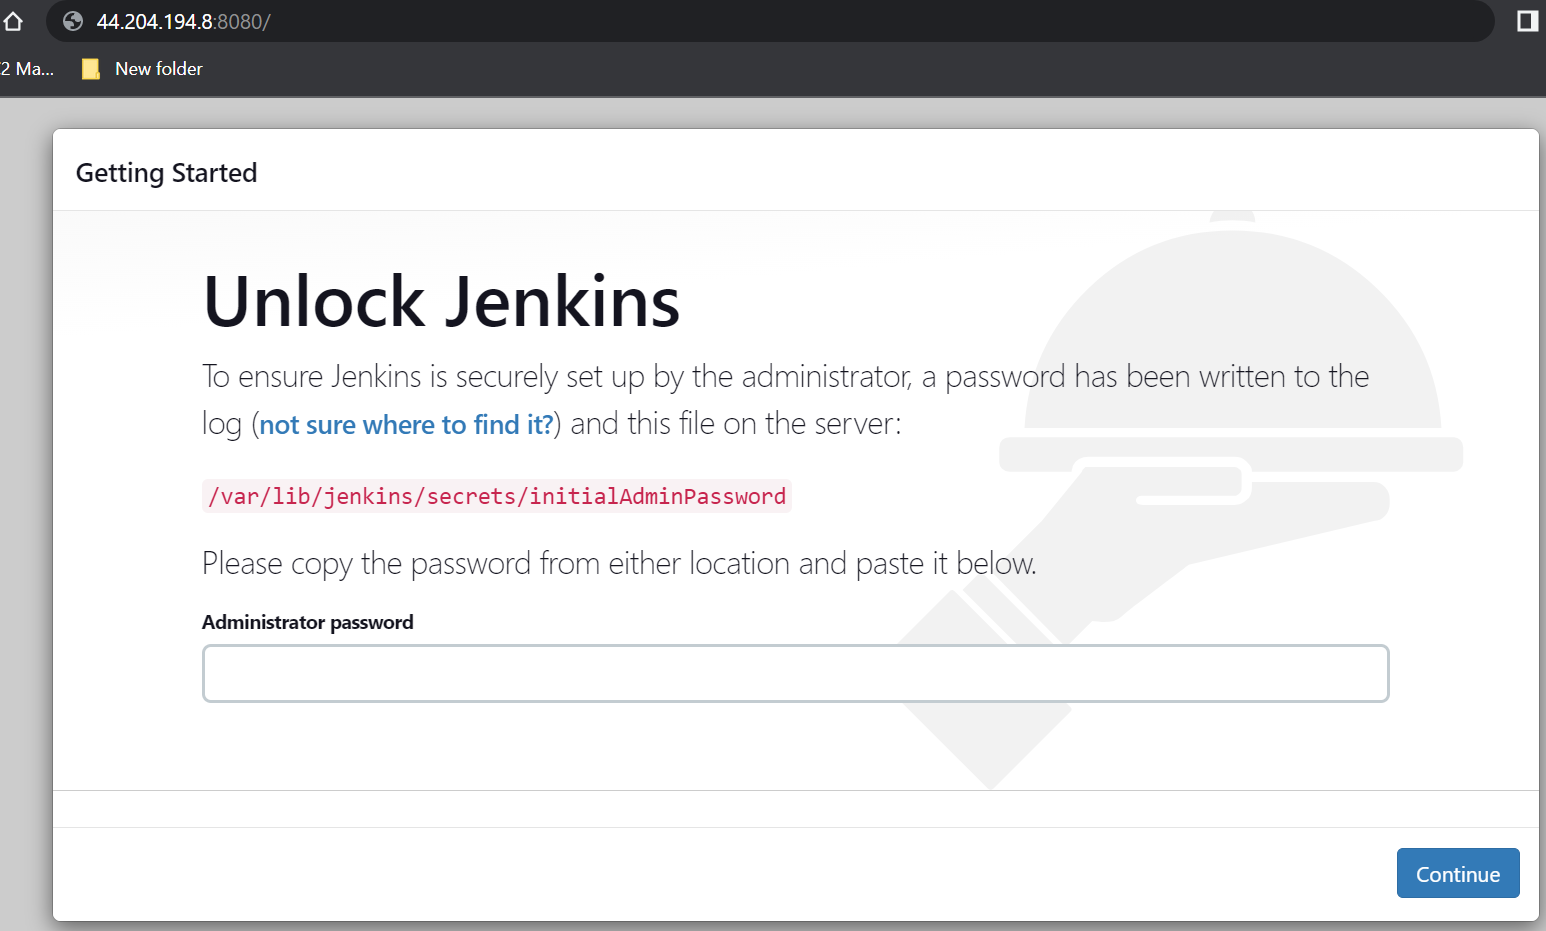
This page prompts you to Unlock Jenkins. Obtain the required administrator password in the next step.
Step3.2: Unlock Jenkins by switching to the mentioned location in the Jenkins server:
sudo cat /var/lib/jenkins/secrets/initialAdminPassword
It shows an alphanumeric code. Enter it in the Administrator password field and click Continue.
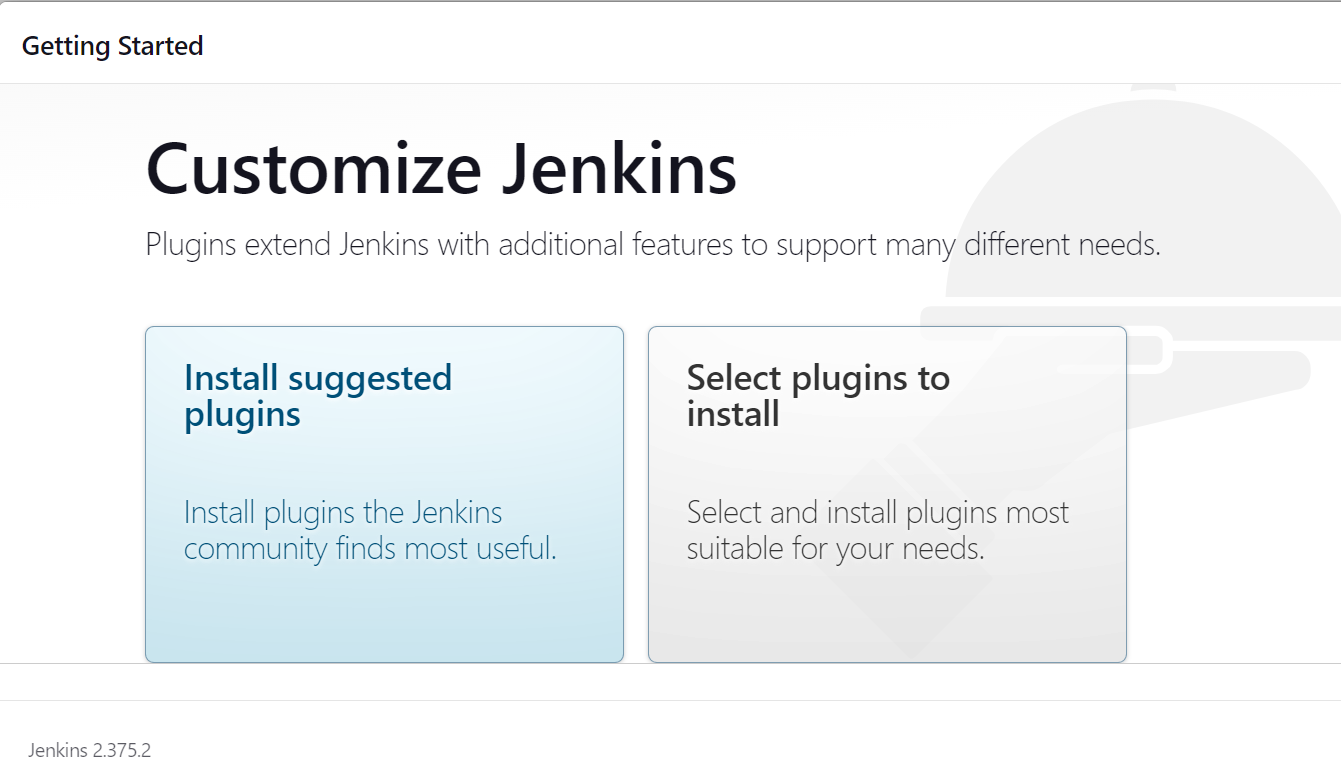
Step3.3: The setup prompts to either Install suggested plugins or Select plugins to install. Go with suggested plugins:

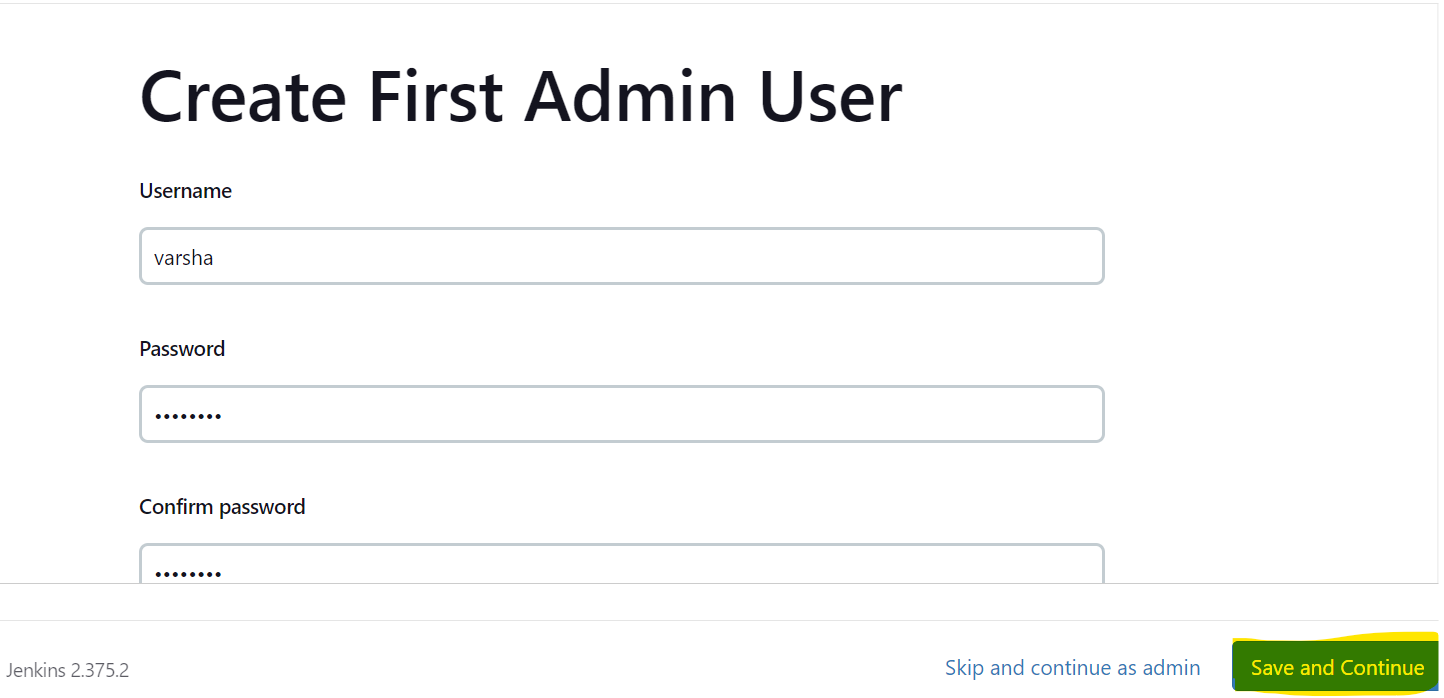
Step3.4: Create First Admin User for your Jenkins administrator, then click Save and Continue:
Step3.5: Set up the Instance Configuration. This is the preferred network address for this Jenkins installation. Confirm the address you want to use for your server. This is most likely the same address you used to get to this configuration page.

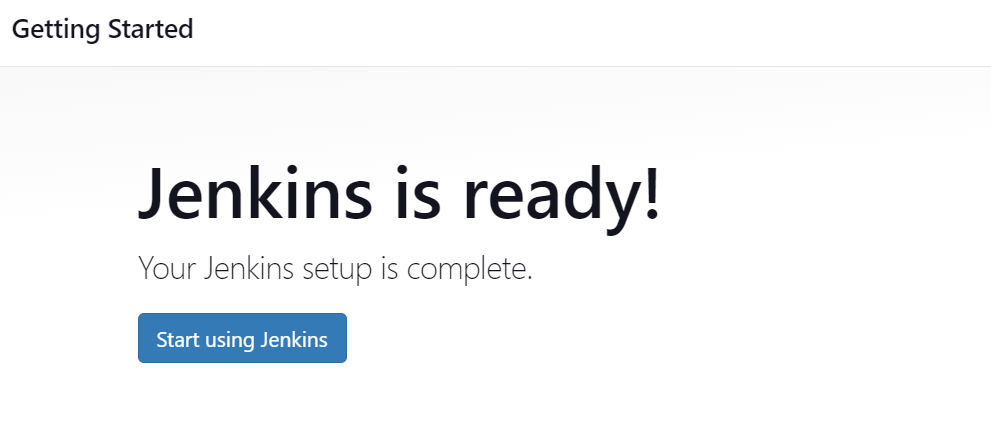
Step3.6: Now Setup is done, Click on start using Jenkins:
Step4: Jenkins Dashboard
Below is the Jenkins Dashboard, Start exploring it:

Projects for your Practice:
Project1: Let's say Hello world via Jenkins 😃
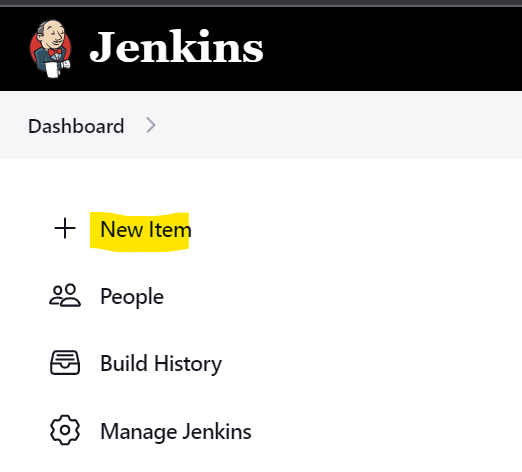
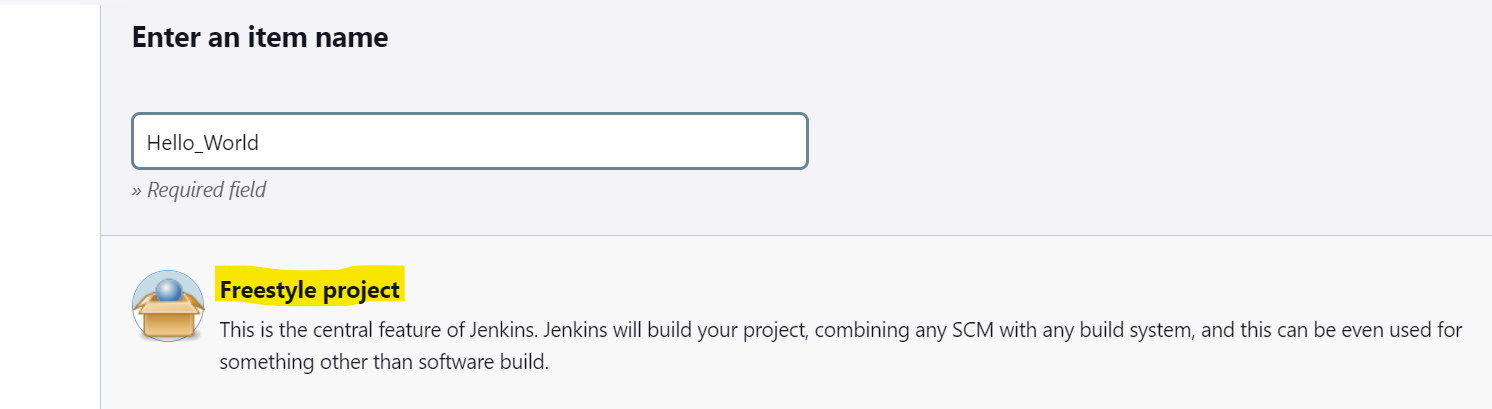
Step1: In the Jenkins dashboard, Click on the New Item:
Step2: Enter the Name and Select FreeStyle Project:
Step3: You will reach a page where you have different options(like build, build triggers, and source code management) that help you manage your job. Provide a Description here and select Source code Management as None
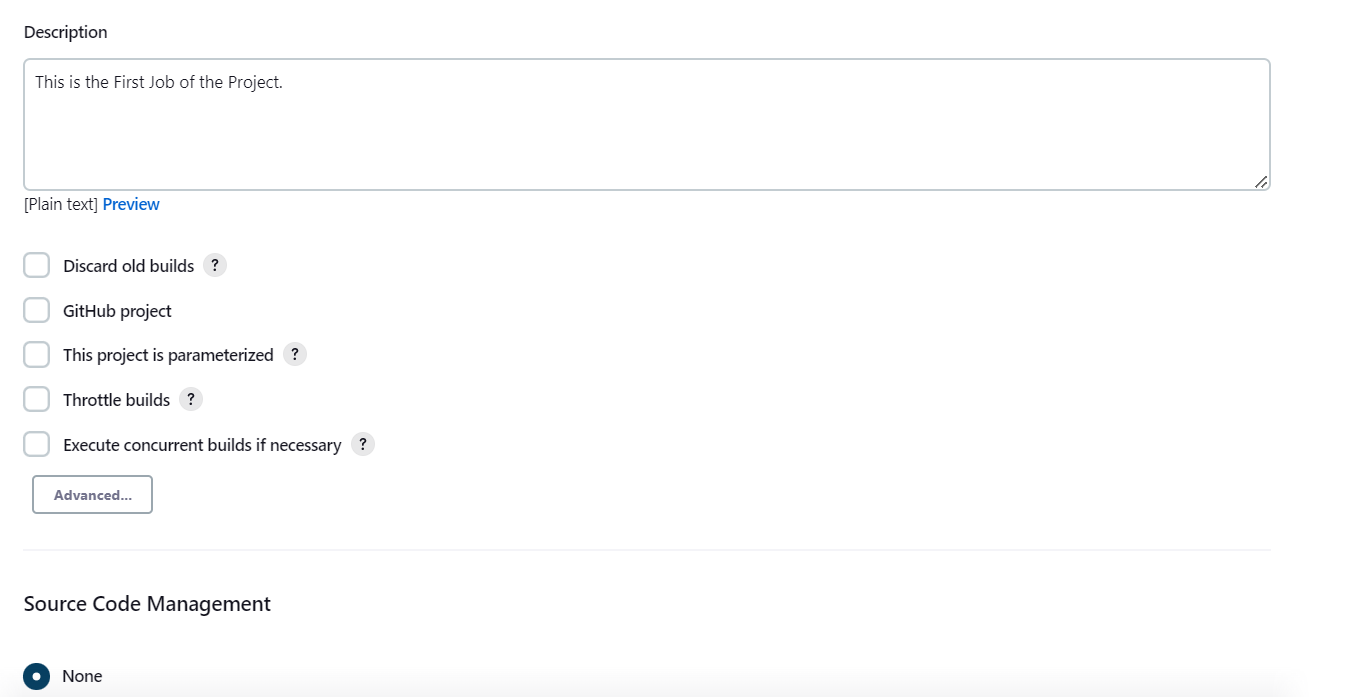
Here we are making a simple job, so we are not using any triggers and build environment options.
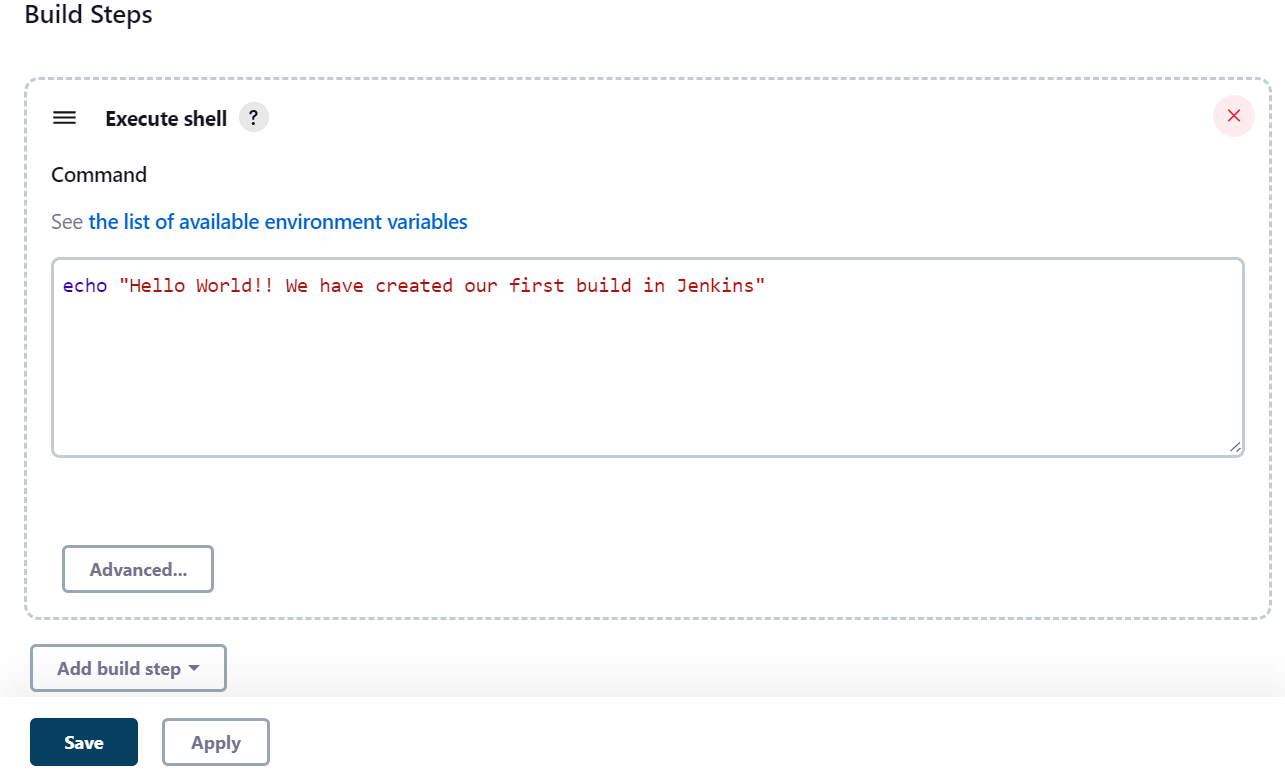
Step4: In the build section we have an option ‘Execute Shell’ by which we can write some commands or code:

Step5: Provide the batch Command and Apply:
Step6: Select Build Now from the Left pane:

Note: In case build is failed, then update the Jenkins server via sudo apt update and reboot the server once.
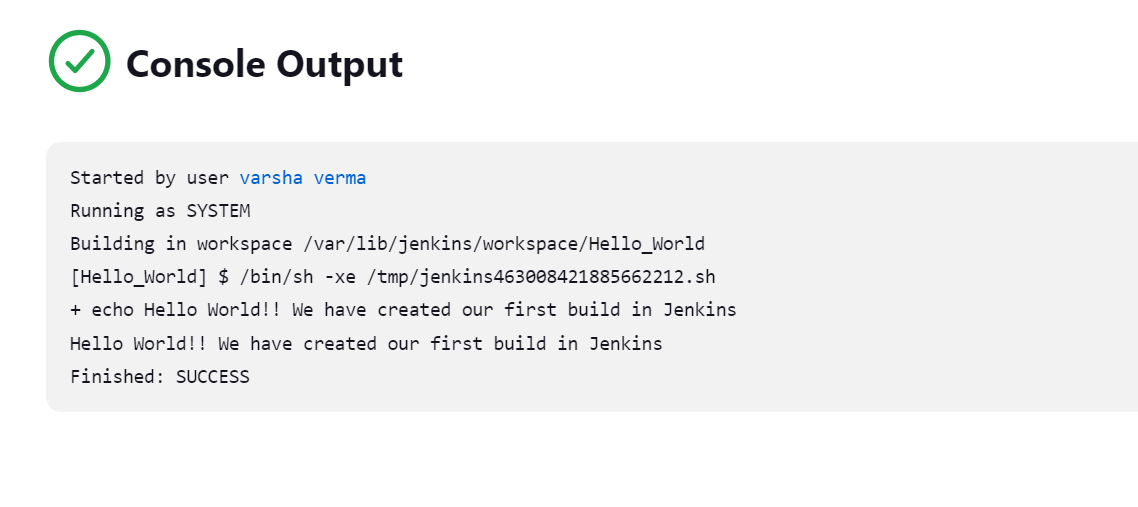
Step7: Click on the last build(#1) link and select Console Output from Left Pane:

Step8: Voila!!!!! You have successfully created your first build project 🎉🥂
Project2: Integrating Git-Hub with Jenkins🤯
Let's move forward and take a deep dive into Jenkins🏊🏿♀️ and deploy a project from git-hub.
Pre-requisites:Hint: make sure docker is already installed and running on the server and jenkins & docker have proper permission otherwise code provided above will throw an error:
Use below at server end:
sudo usermod -a -G docker jenkins

sudo reboot
this will reboot the server and now both docker and Jenkins have required access to run the build and run commands.
Step1: Generate SSH keys in the server where Jenkins is installed.
ssh-keygen
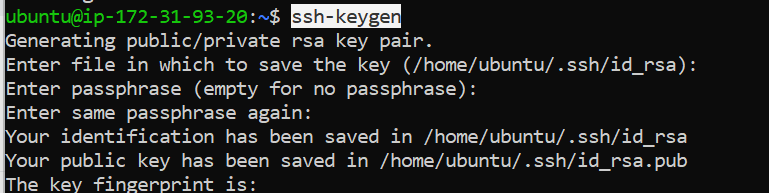
Your public key has been saved in /home/ubuntu/.ssh/id_rsa.pub, Copy and paste it in Step1.2 key section.
Your identification has been saved in /home/ubuntu/.ssh/id_rsa, copy and paste it in Step1.3
Step1.2: Create SSH keys in Git-Hub settings page --> SSH and GPG Keys:


Add the keys and save.
Step1.3: Now move to Jenkins Dashboard and create the Project
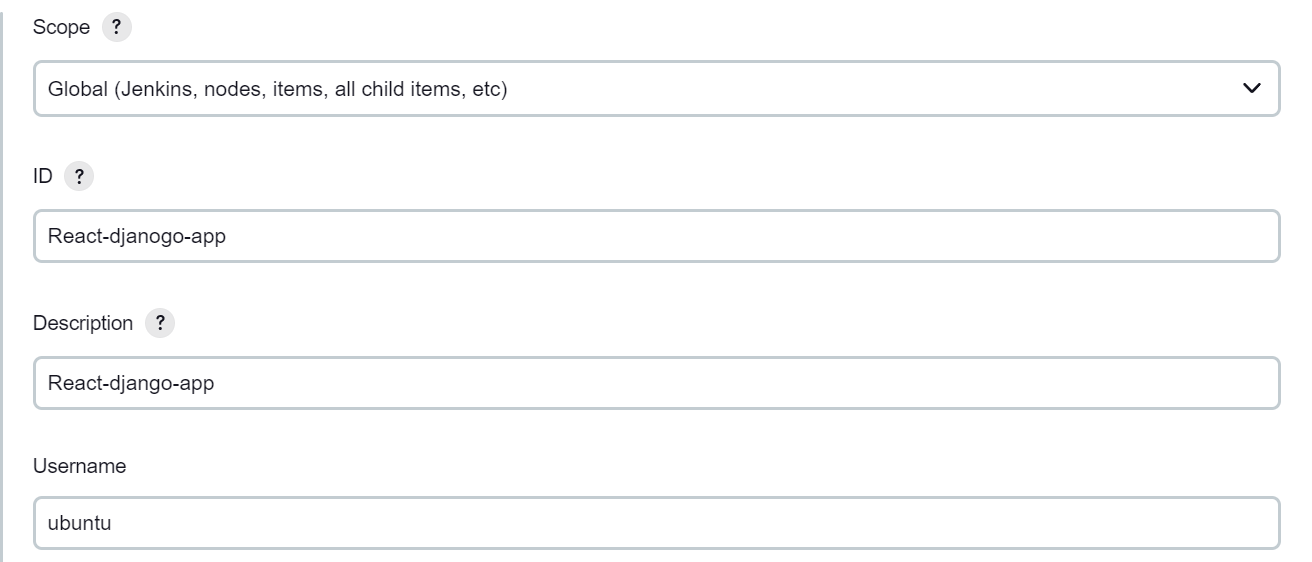
- Create a new Project and provide description, (here we will be using react-django-app as a project)
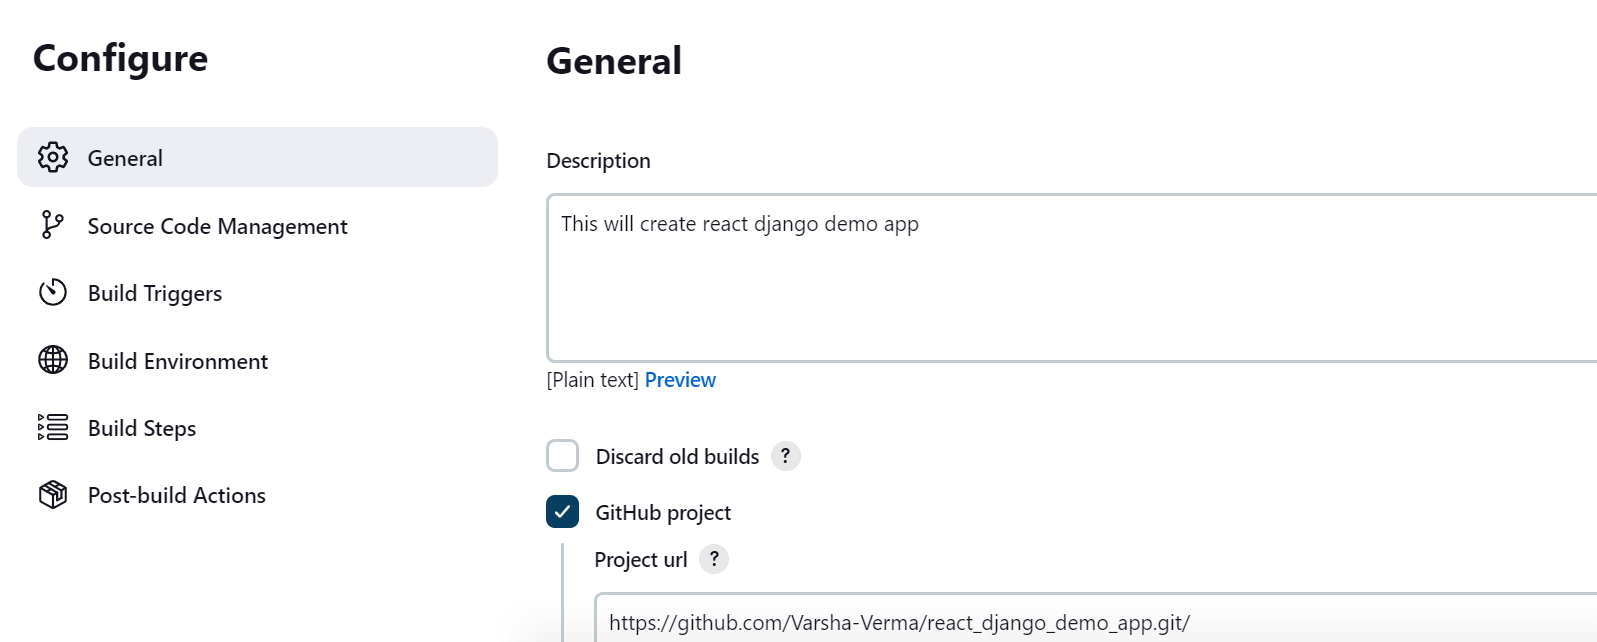
Provide the Git-Hub url of the code:
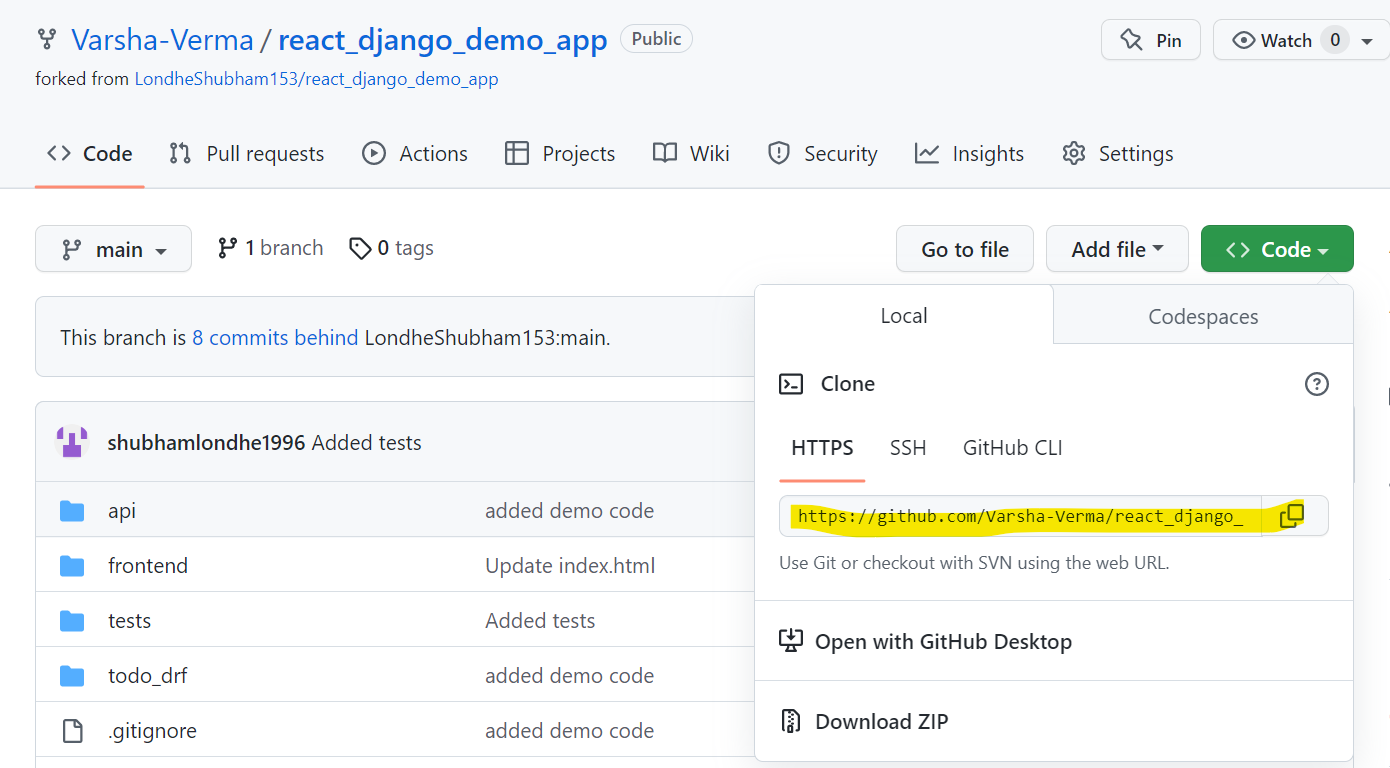
Reference: Fork the repo:https://github.com/Varsha-Verma/react_django_demo_appand use the code.
- Again trace back to the Jenkins portal and provide the URL in below sections:


- For credentials, click on add and provide the below info:
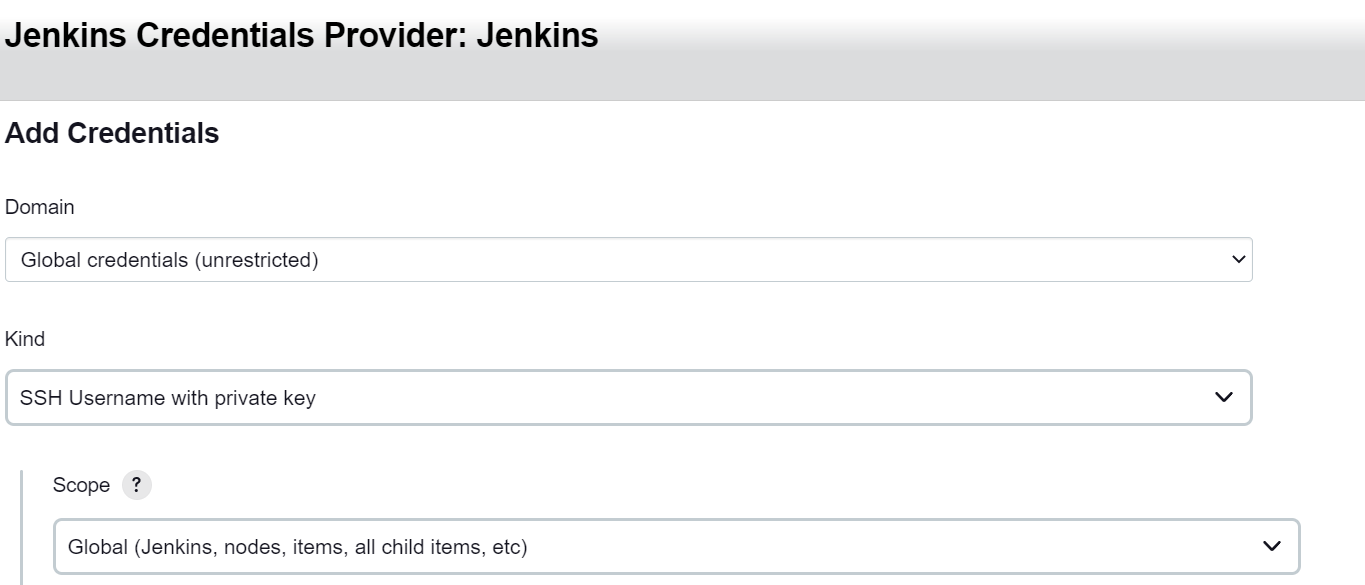
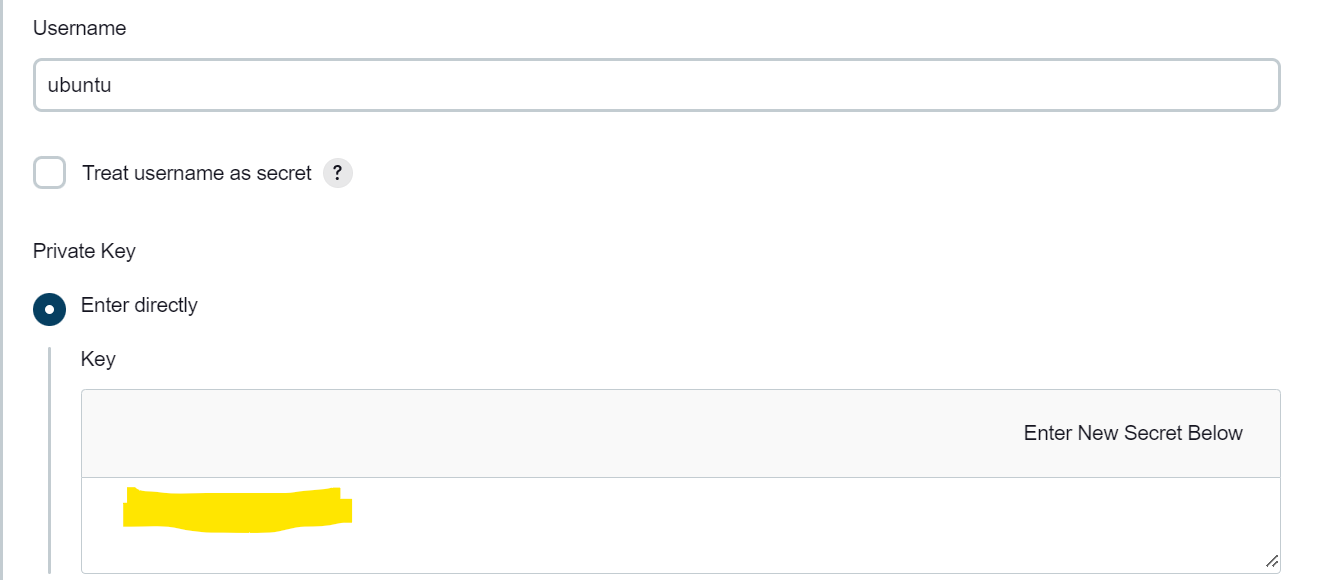
Provide the private key that was generated in Step 1 and save this.
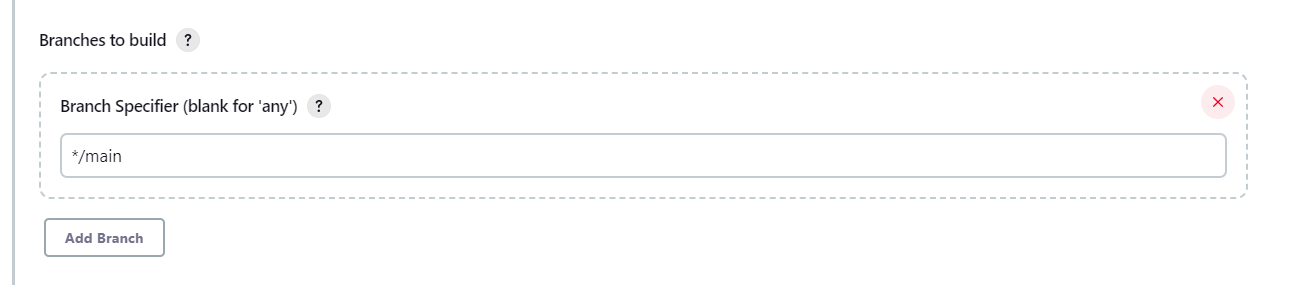
- Once saved select the credentials and move further to the selection of the branch:

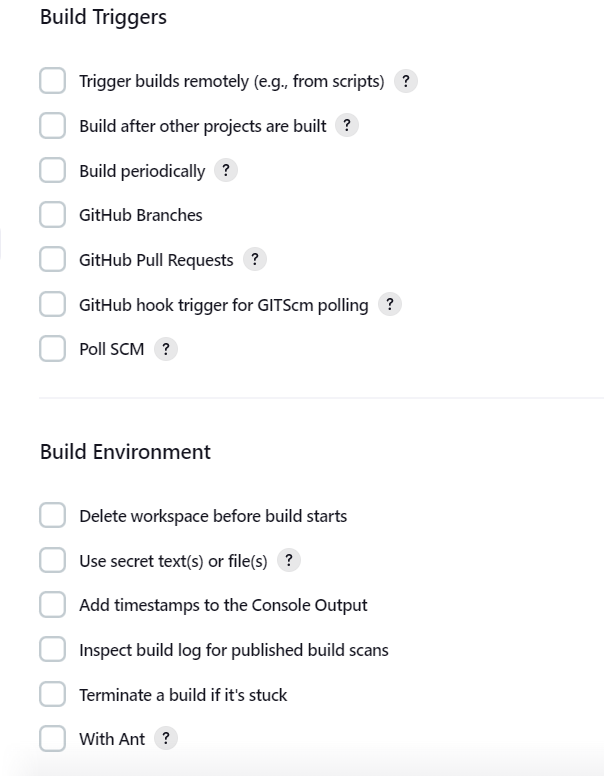
- If you want you can select the Build Triggers and Environments accordingly. but I am leaving everything as default:
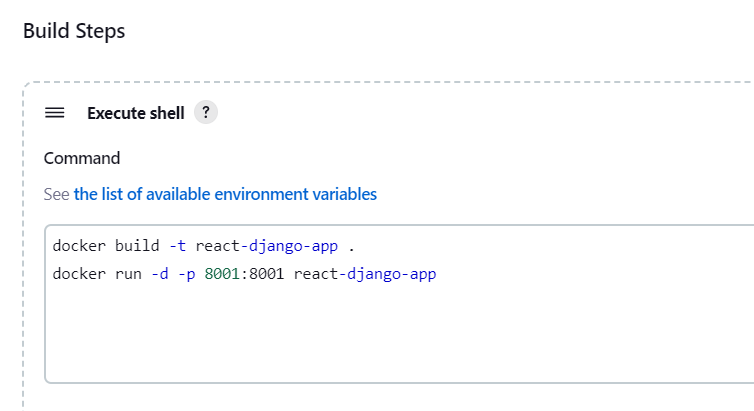
Provide the commands required to build Dockerfile and run the Image:
 docker build -t react-django-app .

 docker run -d -p 8001:8001 react-django-app
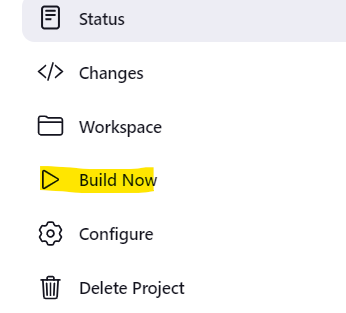
- Save the changes and Build the Project:
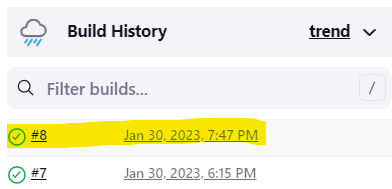
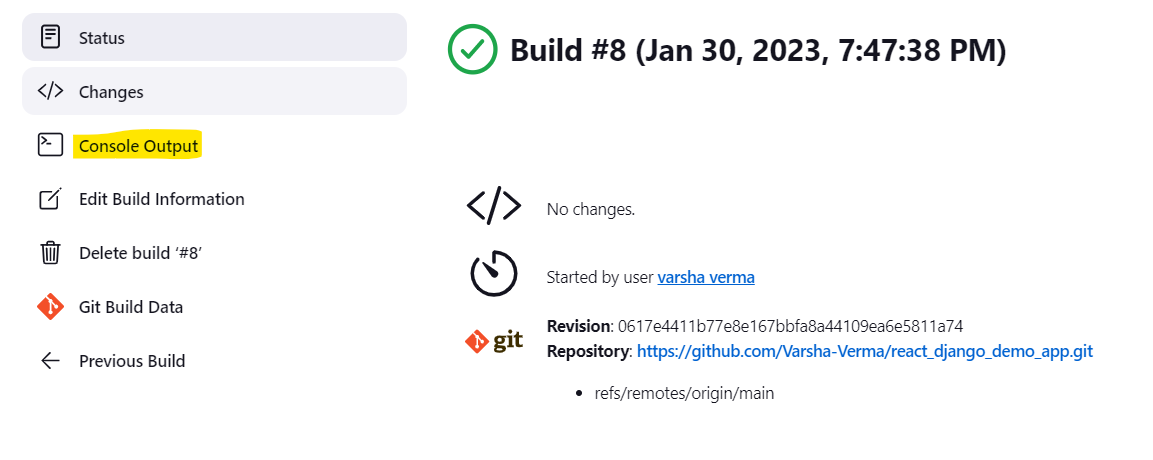
- Check the status on Build History and open Console Output:

As the build is completed, you can able to check the project by hitting the IP:Port
Hint: Make sure the port defined is already allowed in the Security group)

Hint: This is a Demo Static Project with only a frontend for practice purposes, you can deploy other projects in the same way and share it across. Don't forget to tag me, if this blog helps you.😉
Thanks for reading till the end, I hope you got some knowledge. Here is a BONUS to make you smile #DevOps_Memes:

If you like my work, Let's connect and collaborate😃. I am available on the below platforms and very much active there:
If you find the blogs helpful, you can also sponsor me too. Letting you know Just in case 😶🌫️🤭
#Devops #Jenkins_Project #AWS #Jenkins_pipeline


