Git 007 : Learn Advanced GIT topics like a Pro

👋 Hi, I’m @Varsha-Verma 👀 I’m interested in Cloud 🌱 I’m currently learning multi-cloud technologies and Devops 📫 How to reach me www.linkedin.com/in/Varsha-Verma-Cloud-DevOps
Prerequisites:
Before proceeding with Advanced Git concepts, kindly visit my Git 101: A Beginners Guide for Git, which will clear the Basic to Intermediate concepts and will help you understand the Advance topic with better clarity.
GIT Merge:
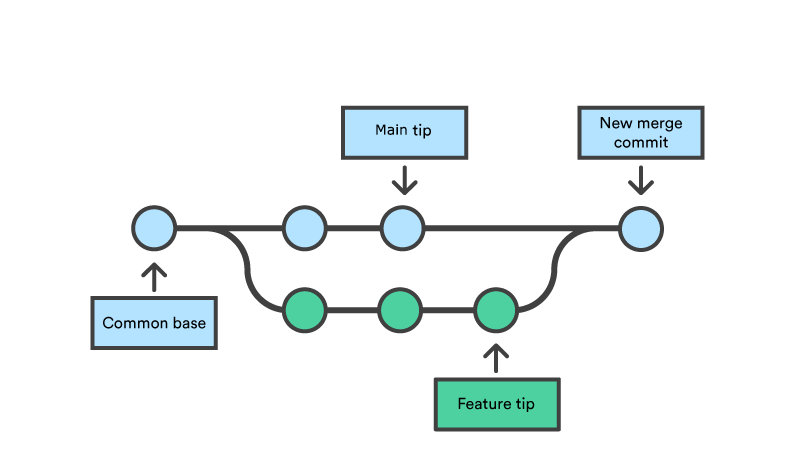
git merge <branchname> -m "Merge Message"
Let's understand this with the help of an example:
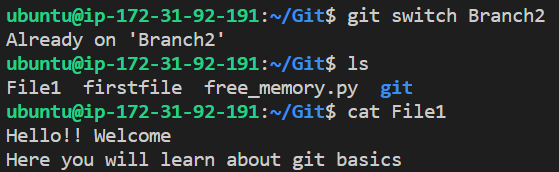
Suppose Our repo has multiple branches and we have to merge Branch2 to the Master Branch.
Then switch to Branch2 and check the content of the File which you want to modify. Here we are modifying File1.
- Opening the File in Vi editor and adding a few lines of content.
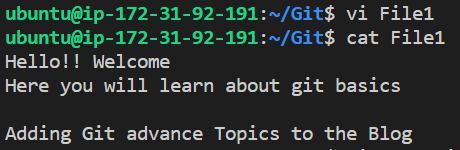
- Add it to the Staging area and commit it.

- Checking the logs of the Branch2

- Now switch to the Master Branch and edit the same file "File1" with different content this time.
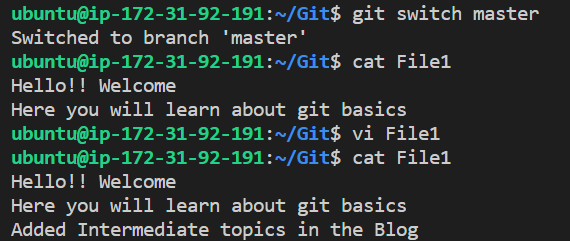
- Commit the File1 and check the logs
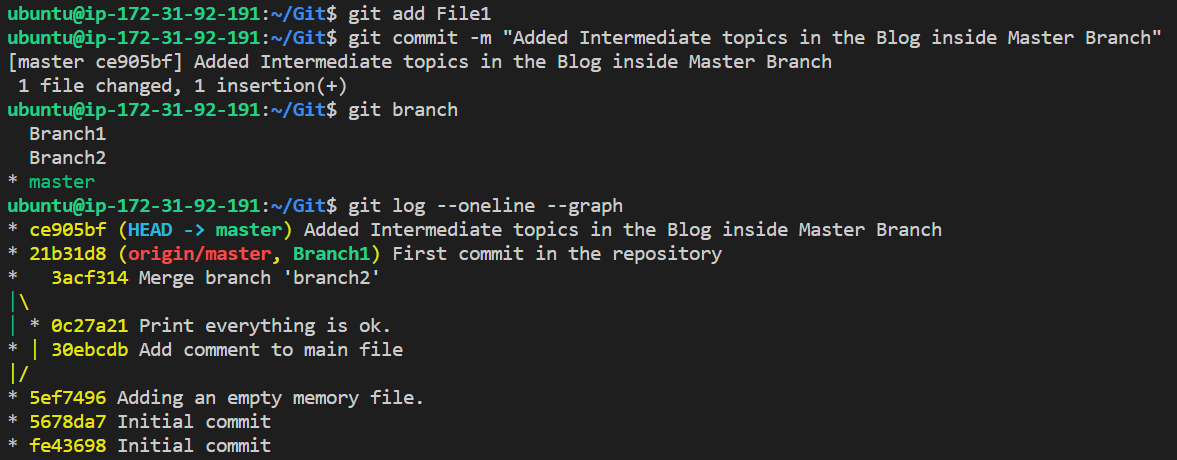
- Now applying git merge in Master Branch for Branch2 i.e.., Branch 2 will be merged with the Master Branch.

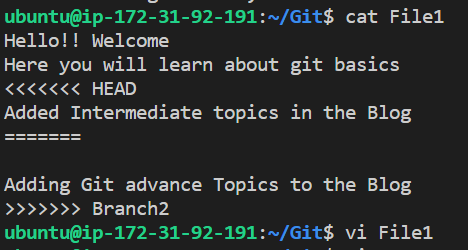
- Checking File 1 for merge conflict and keeping the required changes accordingly.

- Now File1 will be untracked so we will be committing it like below and check the logs:
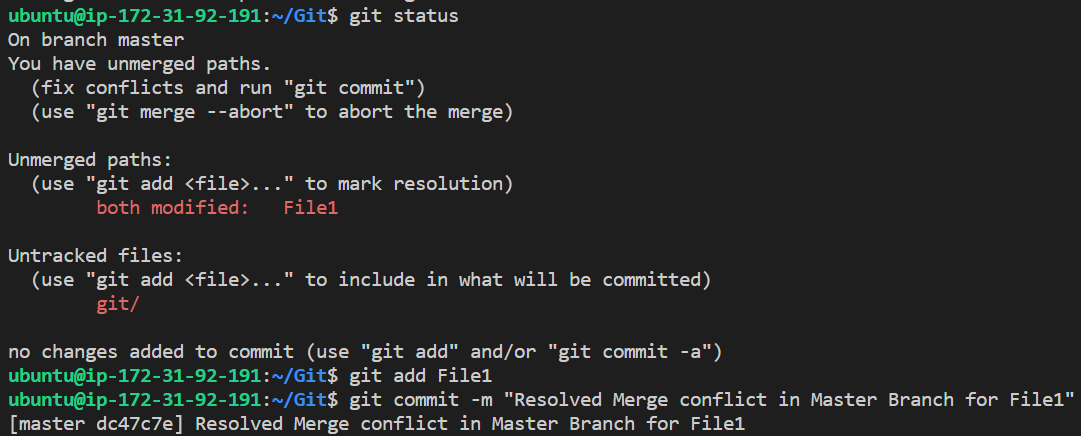
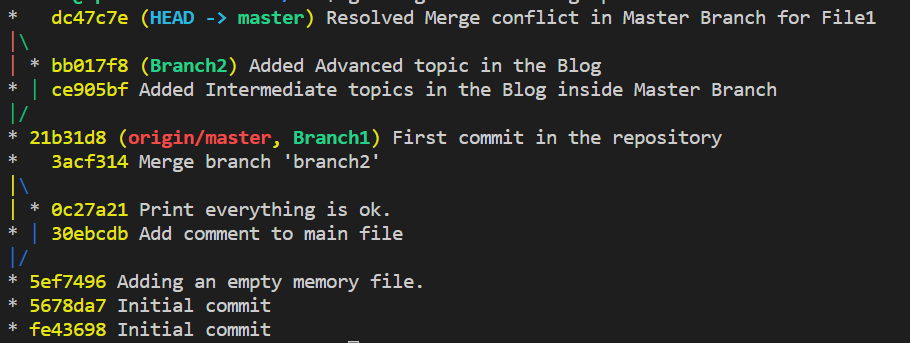
Yayy!! Merge completed 🥳
GIT Commands to Solve Merge Conflict
git diffThis helps to identify the difference between the state's repositories/files.
git log --mergeThis helps to produce the list of commits that are causing the conflict.
git checkoutThis helps to undo the change made to the file or can be used to change the branch.
git reset --mixedThis command helps to undo changes to the Working Directory/Staging Area.
git merge --abortThis command helps in exiting the merge process and returning back to the state before the merging began.
For More Information refer:
- Git documentation: gitmerge
GIT Ignore
A
gitignorefile specifies intentionally untracked files that Git should ignore. Files already tracked by Git were not gets affected.There are mainly two kinds of
.gitignorefiles: Local & GlobalIt is placed inside root (/) directory of a Project. You can create a global
.gitignorefile, and the entries inside the file will b ignored by all of the Git Repositories.While creating a local
gitignorefile remembers to put a dot at the beginning and make it a normal text file. You can alter this file according to the requirements. Each line should list an additional file/folder or matching Patterns that you want Git to ignore.
Patterns:
*is used as a wildcard match/is used to ignore pathnames relative to the.gitignorefile#is used to add comments to a.gitignorefile
Examples:
# Ignore ALL .log files
*.log

# Ignore all text files
*.txt

# Ignore ALL files in ANY directory named temp
temp/

# Ignore Mac system files
.DS_store

# Ignore node_modules folder
node_modules

# Ignore files related to API keys
.env

# Ignore SASS config files
.sass-cache
To add or change your global .gitignore file:
git config --global core.excludesfile ~/.gitignore_global
This will create the file ~/.gitignore_global. You can edit this file the same way as a local .gitignore file. All of your Git repositories will ignore the files and folders listed in the global .gitignore file.
Untrack Already Committed Files via New Gitignore
To untrack a single file, ie stop tracking the file but not delete it from the system use:
git rm --cached filename
To untrack all the files in .gitignore, First commit the code changes
git rm -r --cached
This will remove any changed file from the Index/Staging Area then add and commit it:
git add .
git commit -m ".gitignore is now working!!!!"
Notes: To undo git rm --cached filename, use git add filename
For More Information refer:
GIT Restore
Git Restore is used to unstage or discard uncommitted local changes in a file.
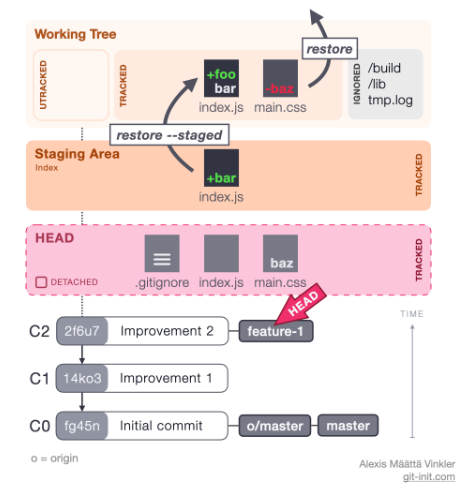
git restore [--source=commit-hash] [--worktree] [--staged] [--] file
--worktree means to make the restore to worktree
--staged means make the restore to --staged.
specify both --staged and --worktree to make the restore from --source to both the worktree and the staging-area
when --source is specified the restore is always from the source
when --source is not specified and --staged is given the restore is from the HEAD
when neither --source nor --staged are specified then the restore is from staging area to the work tree
Suggestion - Use git restore to bring the files from
commit blob to the staging area and/or work tree.
staging-area to worktree
Notes: If you have deleted the file and already committed the changes, you need to use the git checkoutcommand to restore the file.
Example:
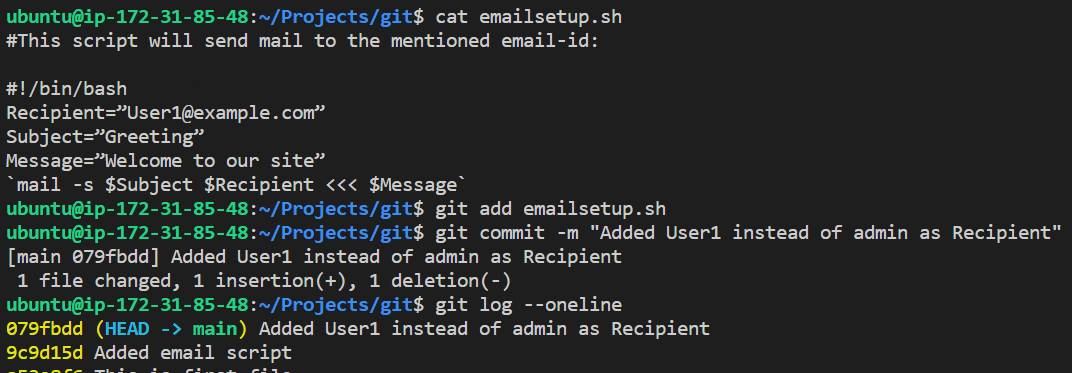
- I have created an email script file like below:
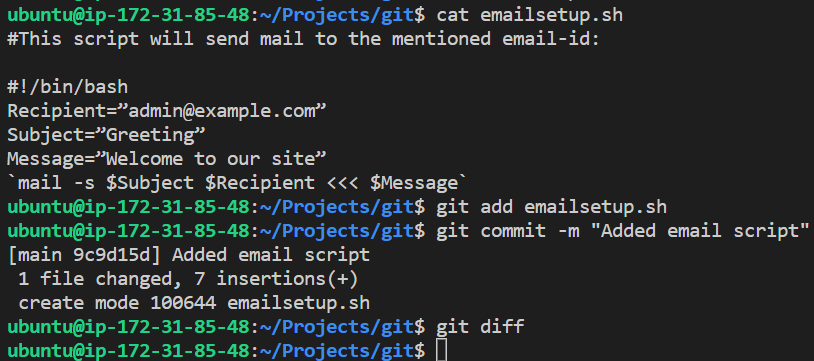
- Now I want to change the mail id to
User1@example.comand check the difference from the last commit to the current state:
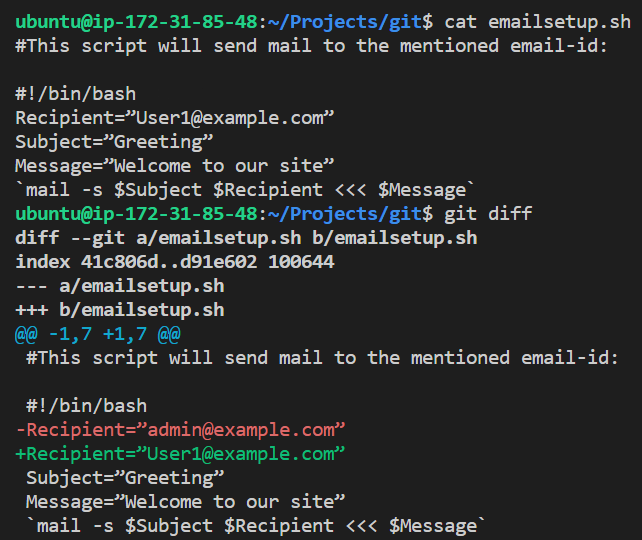
It shows that the Red highlighted part is removed and the Green highlighted part is added recently.
But then the requirement was altered and it was confirmed that the mail should be sent to admin instead of User1. And luckily we have not committed the changes yet so, in this scenario we will use
git restoreto get the script file in the previous state as it was in the last commit.

For More Information refer:
Git documentation: git restore
Git restore more info
GIT Revert
git revert <hashid>
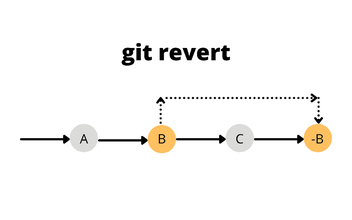
It is a forward-moving undo operation that offers a safe method of undoing changes. We require the commit Id to revert the changes
Git Revert is used when we want to take a previous commit and add it as a new commit, keeping the log intact.
Instead of deleting or orphaning commits in the commit history, a revert will create a new commit that inverses the changes specified.
Git revertis a safer alternative togit resetin regards to losing work.Revert will also generate a hash id, as everything is a commit in git
Example:
- Suppose you created a script to send an email and initially the requirement was to add email-id as admin@example.com. You worked on it and committed it like below:

- After some time, they mentioned adding User1@example.com instead of Admin. You made the changes and committed it:
- After further discussion, the requirement gets concluded that email needs to be sent to admin if the issue arrives not the user1. Here we will be using
git revertto revert to the desired commit:


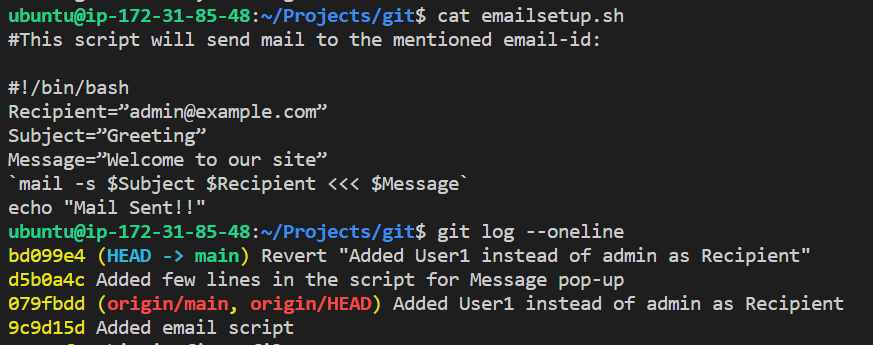
- If you observe it closely then the git revert also creates a separate commit.
For More Information refer:
GIT Reset
git reset <index/commit number you want to roll back to>
This command is a little more complicated. It does a couple of different things depending on how it is invoked. It modifies the index (the so-called "staging area") Or it changes which commit a branch head is currently pointing at. This command may alter existing history (by changing the commit that a branch references).
You were in a detached head state - git reset would move the HEAD to the specified commit hash. Just like git checkout commit-hash
You were not in a detached head state - git reset would move the entire (HEAD -> branch) to the specified commit hash. If this resulted in commits that no branch is ahead of then those commits are removed from Git history
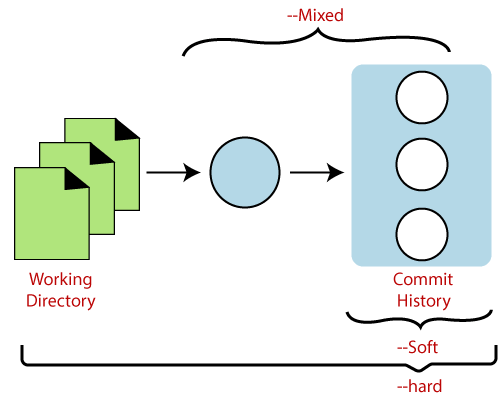
git reset also has three options --soft, --mixed, --hard. How should your work tree and Index(staging area) look once you have moved your HEAD to a different commit?
--hard - Both the Worktree and the Index match the files in the new commit you moved to. Here file will not come in the staging area after a hard reset (not advisable🙅🏾♀️).
--mixed (default) - Worktree remains as it was before you ran git reset and Index matches the files in the new commit you moved to.
--soft - Worktree and Index both remain as they were before you ran git reset.
Here file will come to the staging area after a soft reset. So, you need to unstage it so it will not be tracked:
  git status  #To check the files which are in working area
  git restore --staged <Filename>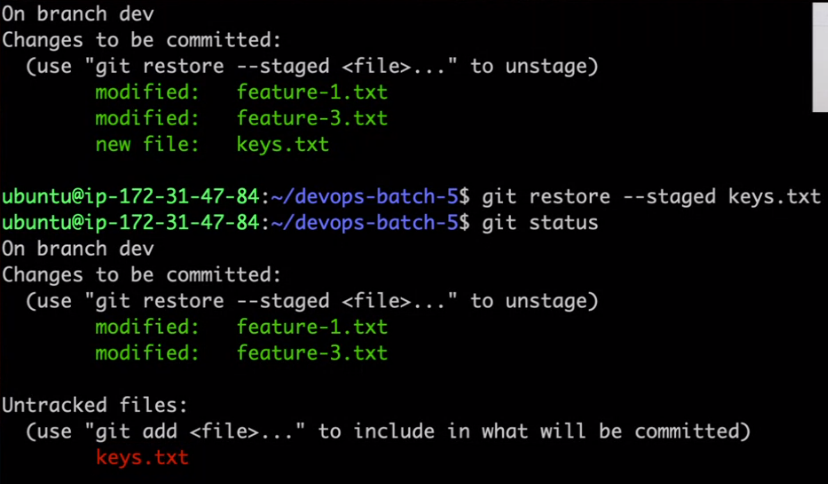
git reset for the most part can be replicated using a combination of git checkout, git branch -D and git restore except that there is no easy way to control the contents of work tree and staging area as well except if you don't use git reset
Suggestion: Have you made a few commits that should not have been made and have not pushed the changes to the public repo? Is it best to just have it as if these commits never existed? Use git reset. If you have pushed the changes to the public repo then as discussed earlier you want to use git revert.
Ex: Git RESET soft is used to roll back changes to previous commits i.e.., The index will be changed and show the previous one but the content will not be rolled back.
Example:
- Here we have reverted the changes that created logs as well:

- In order to go back to previous commit and wipeout the undesired commit logs, we will use
soft reset

- If you want to change the content of the file use
git reset --hard:


Difference between GIT Revert and GIT Reset
While
git resetdoes this by moving the current head of the branch back to the specified commit, thereby changing the commit history,git revertdoes this by creating a new commit that undoes the changes in the specified commit and so does not change the history.Git revert is a safer alternative to git reset in regards to losing work.

For More Information refer:
Troubleshooting :
Unstaging everything
If you accidentally staged all files from a folder, use following to un-stage it:
git restore --staged .
GIT Cherry Picking
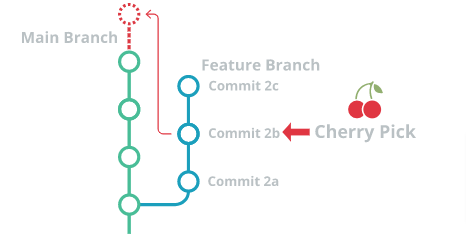
Cherry Picking is the act of picking a commit from a branch and applying it to another.
git cherry-pickcan be used for undoing changes. For example, when a commit is accidentally made to the wrong branch. You can switch to the correct branch and cherry-pick the commit to where it should belong.It is a powerful command that enables arbitrary Git commits to be picked by reference and appended to the current working HEAD.
git cherry-pick <commitSha/commitID>
Git cherry-pick can also be passed some execution options.
- Passing the
-editoption will cause git to prompt for a commit message before applying the cherry-pick operation
-edit
- The
--no-commitoption will execute the cherry pick but instead of making a new commit it will move the contents of the target commit into the working directory of the current branch.
--no-commit
- The
--signoffoption will add a 'signoff' signature line to the end of the cherry-pick commit message
--signoff
Choose Wisely when to use GIT Cherry-Pick
Git Cherry-Pick is a useful tool but not always a best practice.
Cherry Picking can cause duplicate commits.
Still today traditional merges are preferred instead of cherry picking.
Sometimes a
featurebranch may go stale and not get merged intomain.Sometimes a pull request might get closed without merging. Git never loses those commits and through commands like
git logandgit reflogthey can be found and cherry picked back to life.
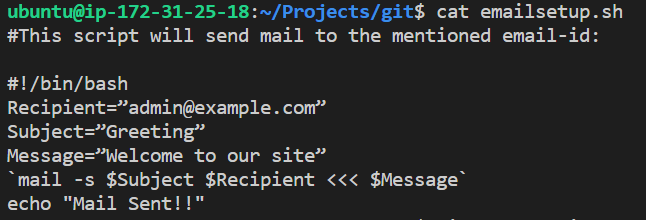
Example1:
- Suppose we added email script where we made few alterations:

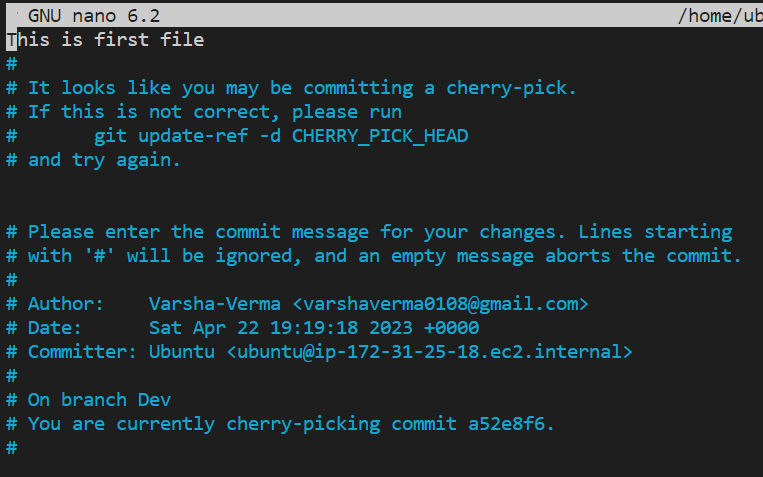
- Later, we want to alter the file so we cherrypicked the commit. But it will abort cherrypicking because the same script file was there previously as well and later we added few lines of code to it. So, Git thinks of it, as if we want to merge it because the content is same for the first few lines. That is why we got merge conflict.


- Script file will be in the working directory, so we have to alter the requirement and resolve the merge conflict. Post that again add and commit the script file:


Example2:
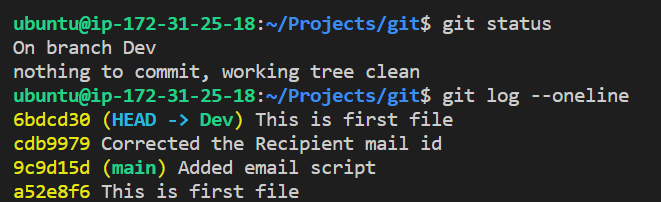
- Suppose we cherrypick another file from the main branch.


- After applying cherry pick, it will automatically open nano editor and show the changes it will make
- Press Ctrl+X and it will exit the nano editor. If we see logs now then there is a recent commit message similar to the one that we cherrypicked but hash id changed
And you did it again!!!!! 👏🏾👏🏾 Keep going🔥🚀
For More Information refer:
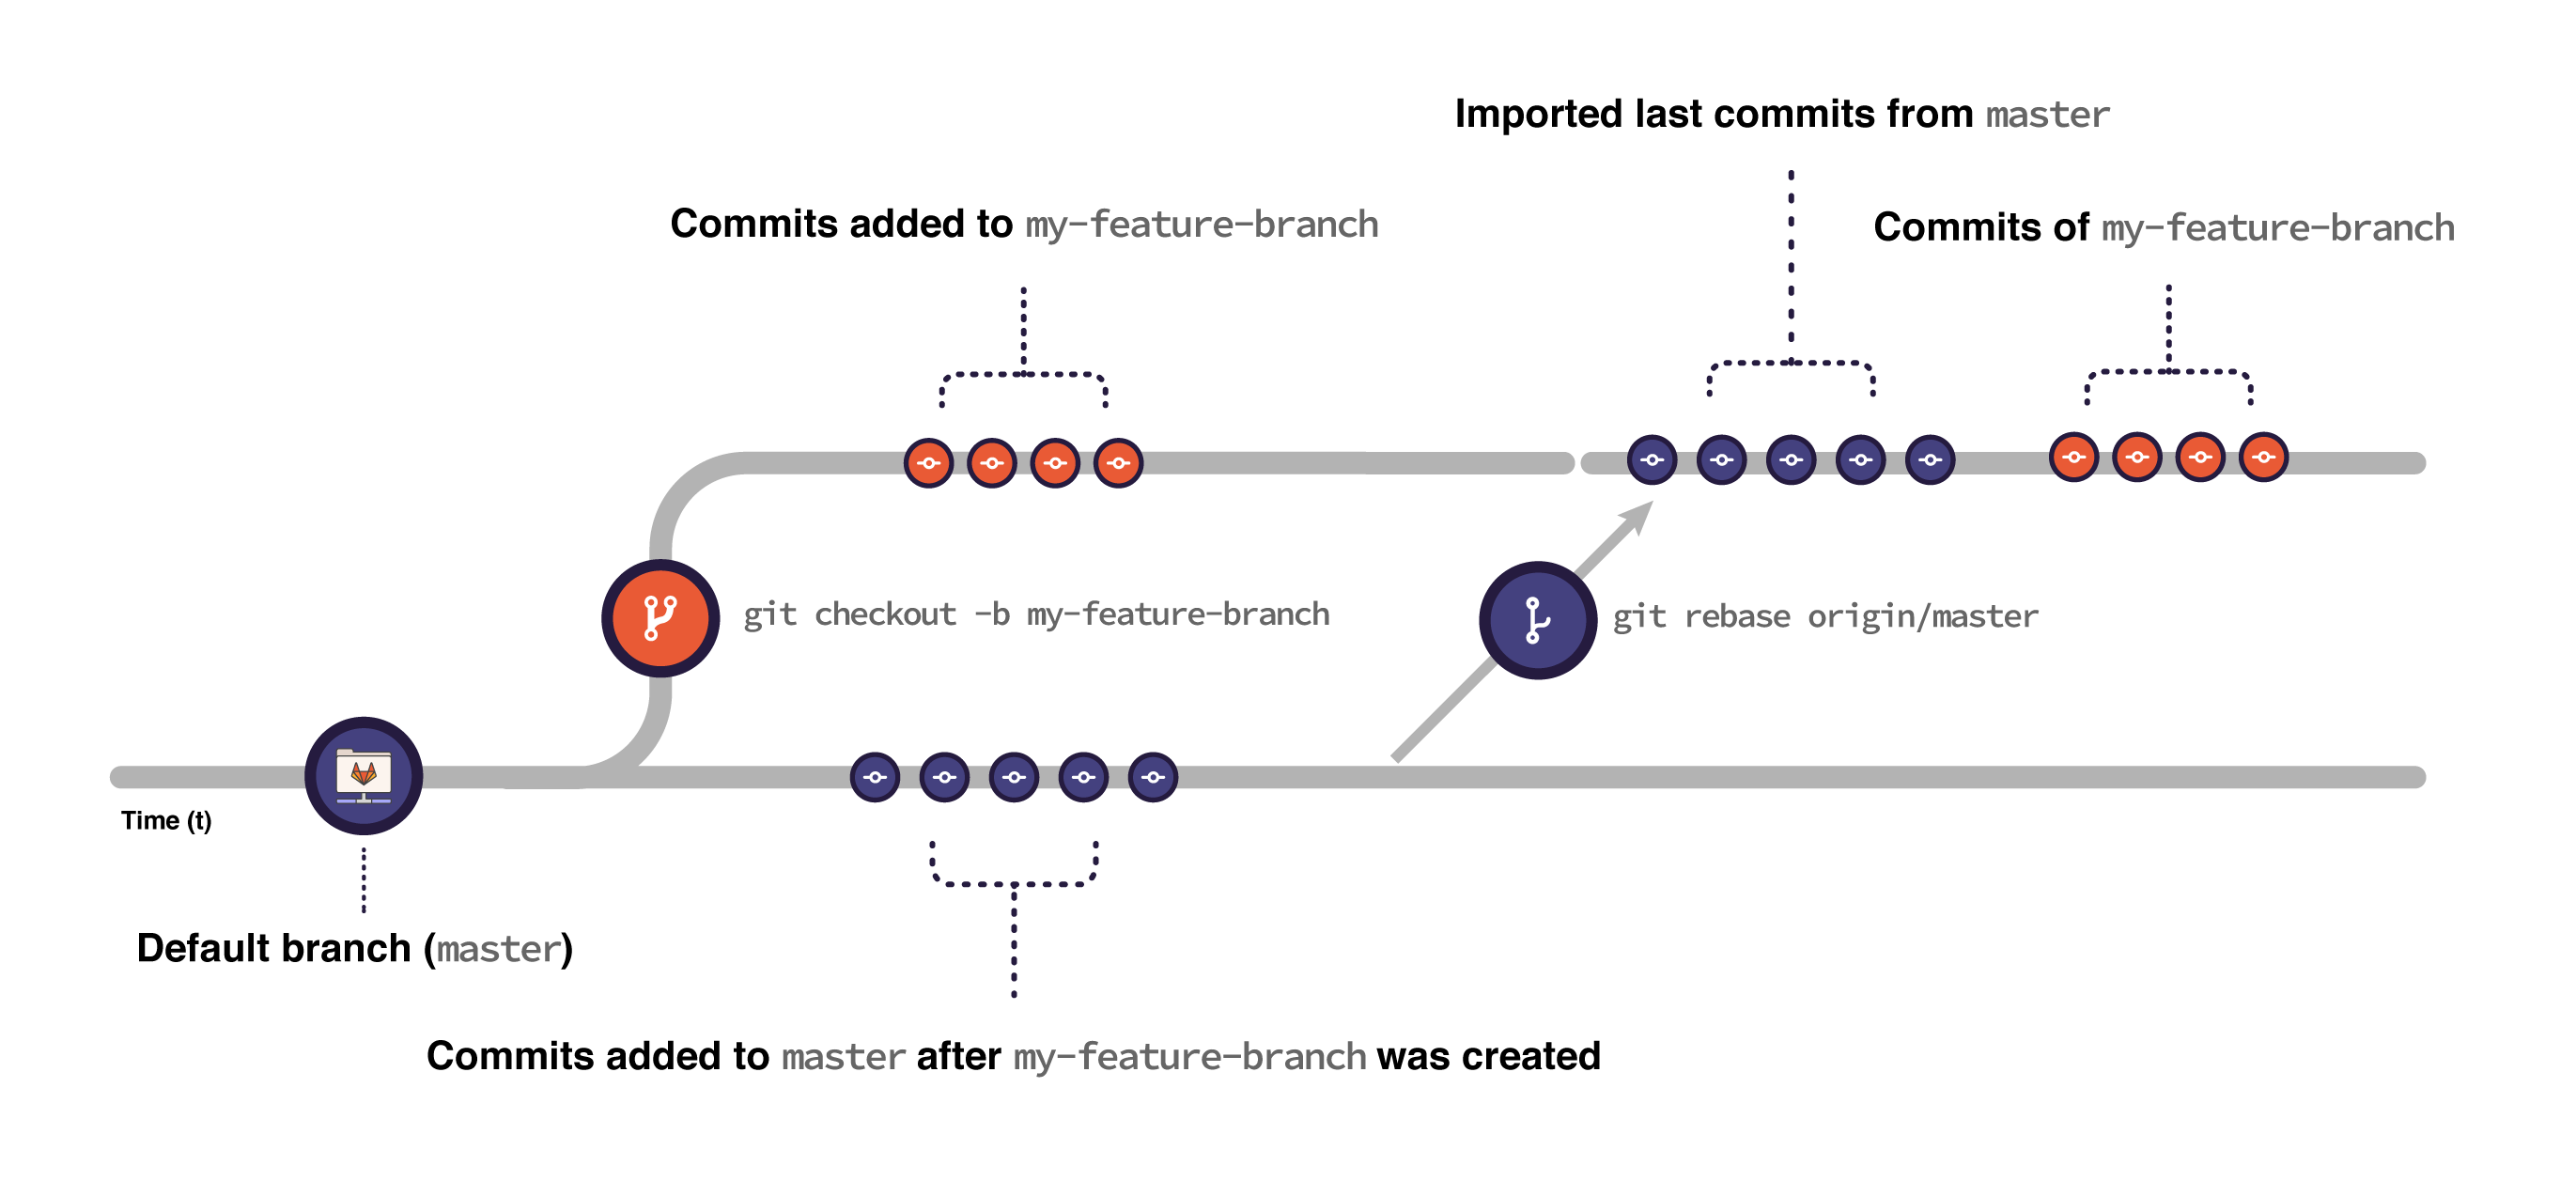
GIT Rebase
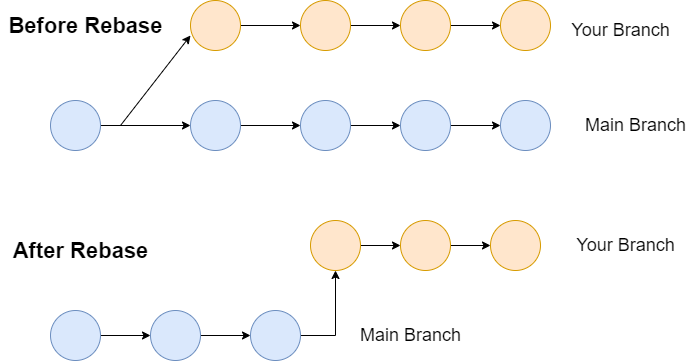
Rebasing is the process of moving or combining a sequence of commits to a new base commit.
Git rebase takes commits from one Git branch and adds them to another. It can be helpful to think of this as a Git “cut-and-paste” action. When you Git rebase, you are essentially deleting commits from one branch and adding them to a different branch.
Rebasing is most useful and easily visualized in the context of a feature branching workflow.
The Primary reason for Rebasing is to maintain a linear Project history.
It is good to rebase your branch before merging it.
More detailed view:
#Here’s the syntax for launching a standard Git rebase:
git rebase <base>

#And here’s the syntax for launching an interactive Git rebase:
git rebase --interactive <base>
| git rebase <base> | Performs the standard rebase |
| git rebase – interactive <base> | Performs the interactive rebase |
| git rebase -- d | The commit gets discarded from the final combined commit block during playback. |
| git rebase -- p | This leaves the commit alone, not modifying the content or message, and keeping it as an individual commit in the branches’ history. |
| git rebase -- x | This executes a command line shell script for each marked commit during playback. |
| git status | Checks the rebase status. |
| git rebase -- continue | Continue with the changes that you made. |
| git rebase --skip | Skips the changes |
| git add <project file> | Adds your branch to the repository |
| git commit -m "new commit for <branch name>." | Commits the changes. |
Know better when to use GIT Rebase:
Edit previous commit messages
Combine multiple commits into one
Delete or revert commits that are no longer necessary
Commands available while rebasing
pick
pick simply means that the commit is included. Rearranging the order of the pick commands changes the order of the commits when the rebase is underway. If you choose not to include a commit, you should delete the entire line.
reword
The reword command is similar to pick, but after you use it, the rebase process will pause and give you a chance to alter the commit message. Any changes made by the commit are not affected.
edit
If you choose to edit a commit, you'll be given the chance to amend the commit, meaning that you can add or change the commit entirely. You can also make more commits before you continue the rebase. This allows you to split a large commit into smaller ones, or, remove erroneous changes made in a commit.
squash
This command lets you combine two or more commits into a single commit. A commit is squashed into the commit above it. Git gives you the chance to write a new commit message describing both changes.
fixup
This is similar to squash, but the commit to be merged has its message discarded. The commit is simply merged into the commit above it, and the earlier commit's message is used to describe both changes.
exec
This lets you run arbitrary shell commands against a commit.
Break (-b)
The break option stops the rebasing at just position. It will continue rebasing later with 'git rebase --continue' command.
Drop (-d)
The drop option is used to remove the commit.
Label (-l)
The label option is used to mark the current head position with a name.
Reset (-t)
The reset option is used to reset head to a label.
Example:
- We have created a new branch name "Feature" and added a feature.txt file.

- Added a few lines and committed like below:

- Now I checkout to the Main branch and applied
git rebase feature

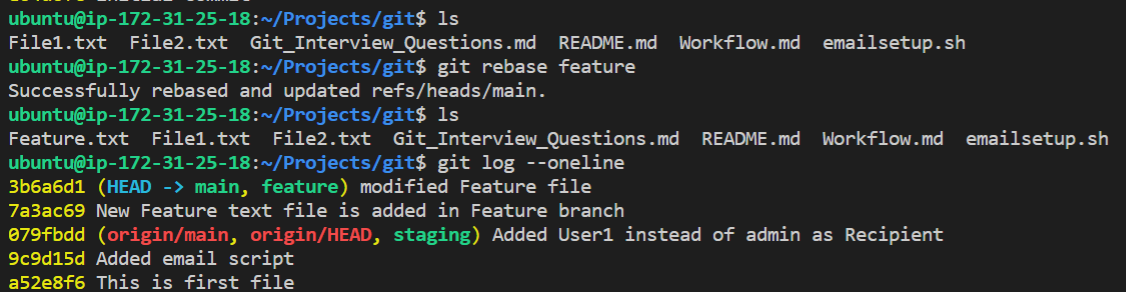
If you are in the main and you applied rebase to Your branch then all the commits of yourbranch will be first synced with the Main and new commits will be added in the Main branch.
Git Merge vs. Rebase
Git Merge and rebase are two different ways which, can be used to merge changes from one branch into another. Git merge can develop a new commit that can integrate the changes from two branches. This new commit has two parent commits, one from each branch. Git rebase, execute the changes from one branch onto another and explore it as though the changes were made directly on that branch.
| Git Merge | Git Rebase |
| Merging creates a final commit at merging. | Git rebase does not create any commit at rebasing. |
| It merges all commits as a single commit. | It creates a linear track of commits. |
| It creates a graphical history that might be a bit complex to understand. | It creates a linear history that can be easily understood. |
| It is safe to merge two branches. | Git "rebase" deals with the severe operation. |
| Merging can be performed on both public and private branches. | It is the wrong choice to use rebasing on public branches. |
| Merging integrates the content of the feature branch with the master branch. So, the master branch is changed, and feature branch history remains consistence. | Rebasing of the master branch may affect the feature branch. |
| Merging preserves history. | Rebasing rewrites history. |
| Git merge presents all conflicts at once. | Git rebase presents conflicts one by one. |
For More Information refer:
GIT Squash

"squash" in Git means to combine multiple commits into one. You can do this at any point in time (by using Git's "Interactive Rebase" feature), though it is most often done when merging branches.
Git Squash is a pretty powerful tool inside Git. It allows you to basically pick up a bunch of commits and just squash them together into a big commit.
git mege --squash
git rebase -i HEAD~n
Choose Wisely When to Squash:
If you decide to squash before merging, then all of those individual commits from your feature branch will be combined into a single commit. The main commit history, therefore, will only show a single commit for this integration.
If you decide AGAINST squashing, all of your individual commits will be preserved as such.
How to Squash Commits in Git via Interactive Rebase:
git rebase -i HEAD~n
In this process, you will grab all the commits with the git rebase command with the i flag and put them together with squash. Apart from squashing, the command also allows you to drop commits, reword commit messages, and add new files.
I have these commits I would like to combine into one:
In this process, you will grab all the commits with the git rebase command with the i flag and put them together with squash. Apart from squashing, the command also allows you to drop commits, reword commit messages, and add new files.
I have these commits I would like to combine into one:
Example:
- Created Feature2.txt file and added few commits like below:

- I will squash the latest two commits via interactive rebase, so will use:
git rebase -i HEAD~n

#where n could be the number of lines
example: git rebase -i HEAD~4
- It will open up nano editor and we have to modify the lines which we want to squash into one.
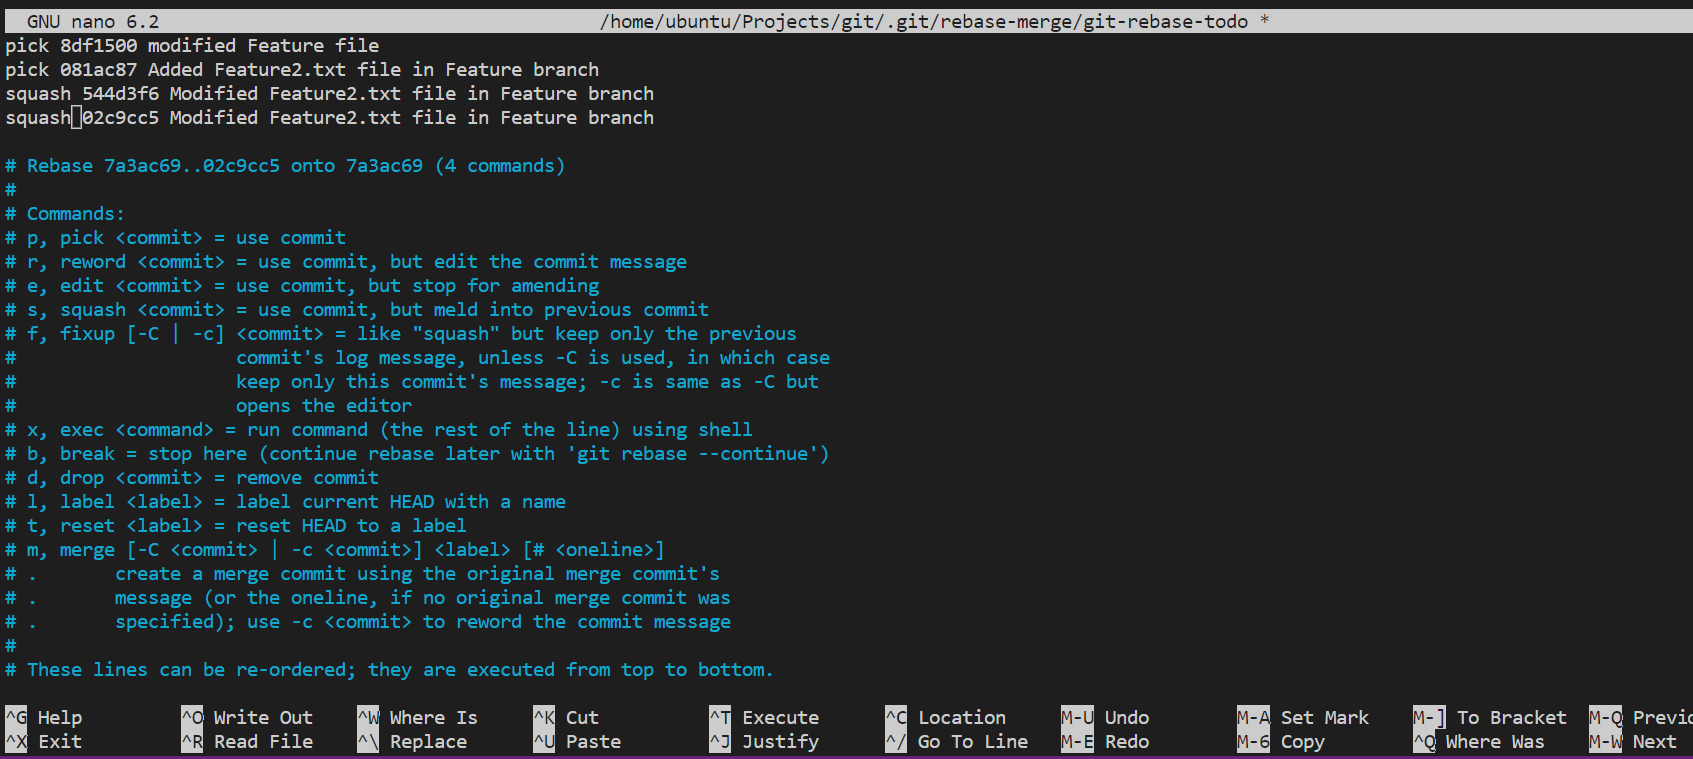
Press Ctrl+X and give CTRL+Y. comment others Commits and write the one with which you want this merge to reflect into Feature branch's latest commit:

- Checking git log on feature Branch:

**How to Squash Commits in Git via merge --**Squash:
git merge --squash
You can also combine multiple commits into one when you’re about to merge branches.
This helps clean up the incoming branch of redundant commits. The downside of this approach is that you don’t have much control as you do with rebase. It will simply squash all the commits of that branch into a single.
Example:
- I have created a staging.txt file and made a few commits in the Staging branch.

- Now I want to merge this Staging branch with the Main branch, as you could see there is no staging.txt file present yet in the Main branch


- After applying the below command, i.e.., merge squashing and committing the changes in the Main branch. There will be a staging.txt file added in the Main branch and logs will also be updated
git merge --squash staging && git commit -m "Squashing the staging branch commits"

You really SQUASHED it like a Pro😎.
GIT STASH
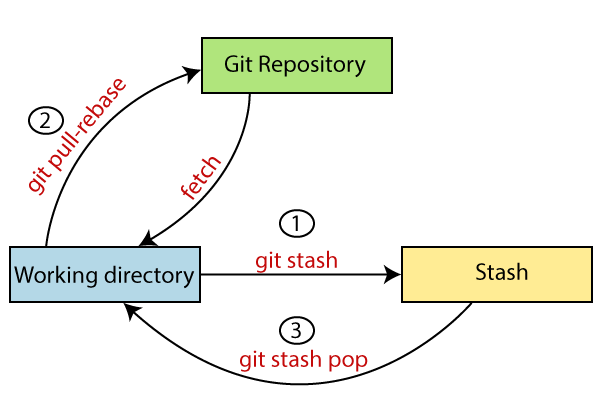
It temporarily saves/stashes changes you've made to your working copy so you can work on something else, and then come back and re-apply them later on. Stashing is handy if you need to quickly switch context and work on something else, but you're mid-way through a code change and aren't quite ready to commit.
The
git stashcommand takes your uncommitted changes (both staged and unstaged), saves them away for later use, and then reverts them from your working copy.At this point you're free to make changes, create new commits, switch branches, and perform any other Git operations; then come back and re-apply your stash when you're ready.
Note that the stash is local to your Git repository; stashes are not transferred to the server when you push.
Git Stash Save (Saving Stashes with the message):
In Git, the changes can be stashed with a message. To stash a change with a message, run the below command:
git stash save "<Stashing Message>"

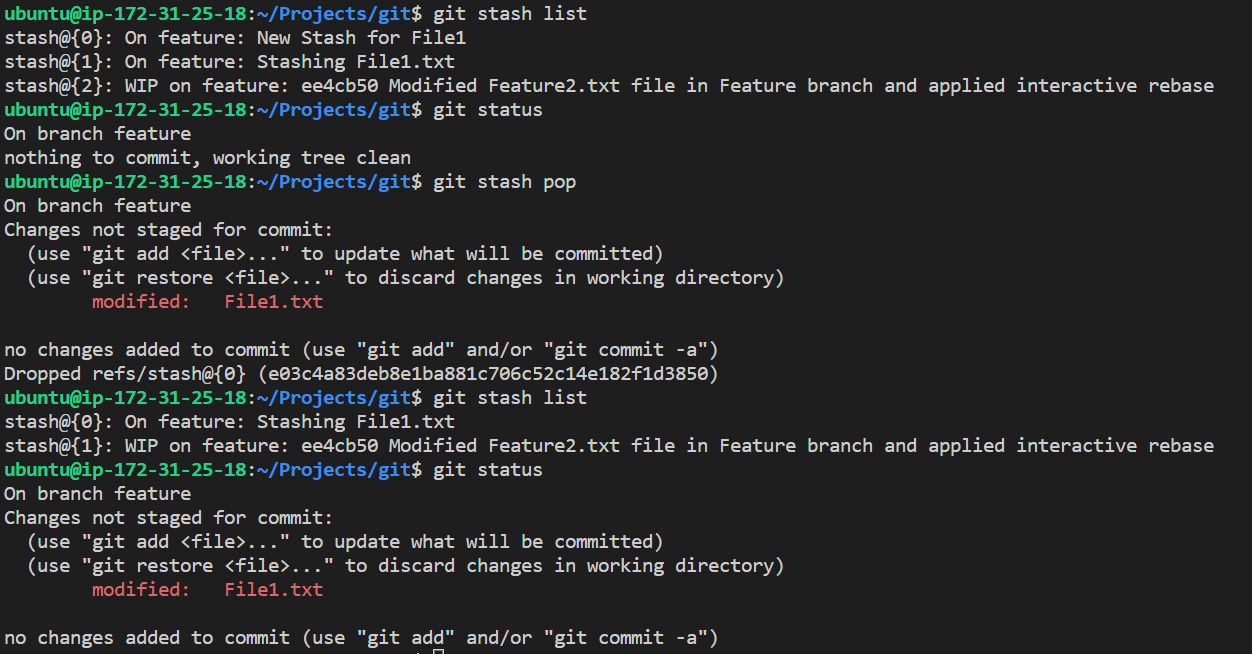
Git Stash List (Check the Stored Stashes)
It will show the list of stashes. It will show all the stashes with indexing as stash@{0}: stash@{1}. This is helpful if you have multiple files in Stash and you want to un-stash it to the desired one.
git stash list

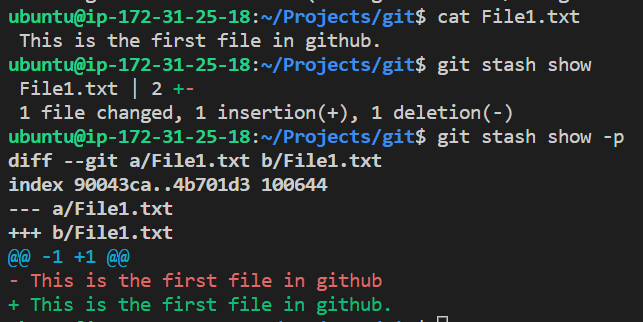
Git Stash Changes
We can track the stashes and their changes. To see the changes in the file before stash and after stash operation, run the below command:
git stash show
The above command will show the file that is stashed and changes made on them. Consider the below output:

We can exactly track what changes are made on the file. To display the changed content of the file, perform the below command
git stash show -p
# p is for partial stash
How to Reapply Your Stashed Changes?
You can reapply previously stashed changes with
git stash pop:Popping your stash removes the changes from your stash and reapplies them to your working copy.
Alternatively, you can reapply the changes to your working copy and keep them in your stash with
git stash applyThis is useful if you want to apply the same stashed changes to multiple branches.
Now that you know the basics of stashing, there is one caveat with
git stashyou need to be aware of: by default Git won't stash changes made to untracked or ignored files.The key difference between git stash pop and apply involves the stash history. When a developer uses the git stash apply command, the most recently saved stash overwrites files in the current working tree but leaves the stash history alone. In contrast, the pop command restores files but then deletes the applied stash. If a developer ever feels the need to use that restored stash again, it will be saved in the local file system.
Think of the git stash pop command as a two-step process. It pulls the most recent stash from history, makes the appropriate changes to files in the local workspace and then deletes that entry from the stash history. Once the git stash pop command is successfully invoked, the stash is permanently deleted and can never be accessed again.
For more details: Git Stash
Git Stash Apply
You can re-apply the changes that you just stashed by using the git stash command. To apply the commit, use the git stash command, followed by the apply option. It is used as:
git stash apply
The above output restores the last stash. Now, if you will check the status of the repository, it will show the changes that are made to the file.
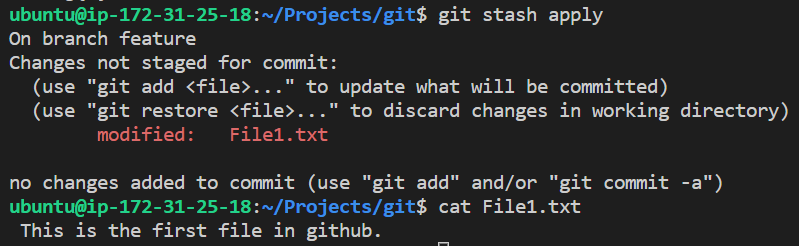
you can see that the repository is restored to its previous state before stash. It is showing output as "Changes not staged for commit." So you have to add thema nd commit to apply the changes:
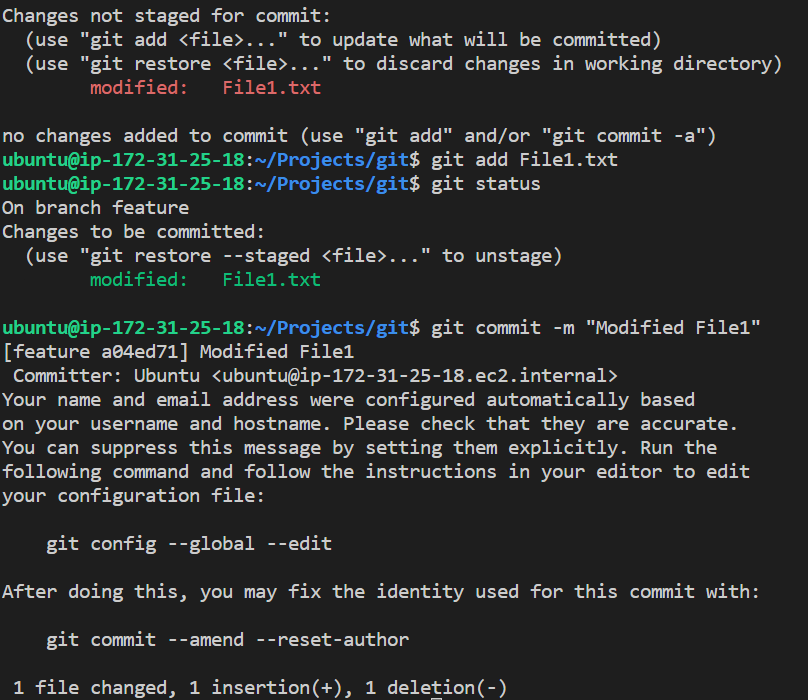
But still that Stash is reflecting while listing the stashes:

To delete it from stash list either use git stash drop (This will delete the stash forever)or git stash pop (This will unstash the file and remove the entry in stash list)
In case of more than one stash, you can use "git stash apply" command followed by stash index id to apply the particular commit. It is used as
git stash apply <Stash Index ID>
If we don't specify a stash, Git takes the most recent stash and tries to apply it.
Git Stash Pop (Reapplying Stashed Changes)
Git allows the user to re-apply the previous commits by using the git stash pop command. The popping option removes the changes from stash and applies them to your working file.
The git stash pop command is quite similar to git stash apply. The main difference between both of these commands is stash pop command that deletes the stash from the stack after it is applied.
git stash pop
git stash pop <Stash Index>
It will re-apply the previous commits to the repository. Consider the below output.
Git Stash Drop (Unstash)
The git stash drop command is used to delete a stash from the queue. Generally, it deletes the most recent stash. Caution should be taken before using the stash drop command, as it is difficult to undo if once applied.
The only way to revert it is if you do not close the terminal after deleting the stash. The stash drop command will be used as:
git stash drop
for deleting a particular Stash from the list then use:
git stash drop <stash id>

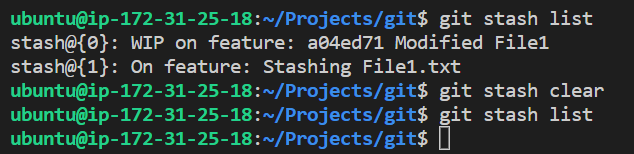
Git Stash Clear
The git stash clear command allows deleting all the available stashes at once. To delete all the available stashes that exist in the repository.
git stash clear
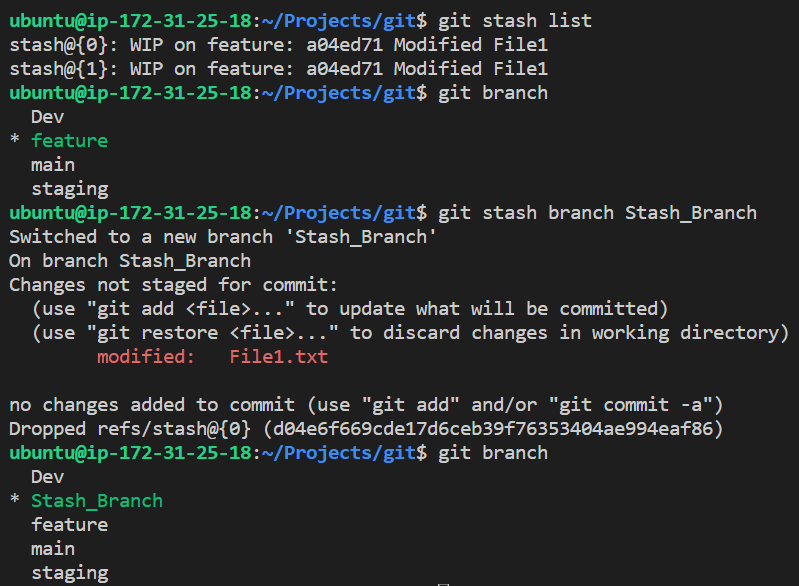
Git Stash Branch
If you stashed some work on a particular branch and continue working on that branch. Then, it may create a conflict during merging. So, it is good to stash work on a separate branch.
The git stash branch command allows the user to stash work on a separate branch to avoid conflicts. The syntax for this branch is as follows:
git stash branch <Branch Name>
The above command will create a new branch and transfer the stashed work on that.
Congratulations on your Milestone🏆 You have completed GIT Advanced Topic too like a Pro. Thanks for reading my Blog till the end, I hope you got some knowledge. Here is a BONUS to make you smile #DevOps_Memes:

If you like my work, Let's connect and collaborate😃. I am available on the below platforms and very much active there:
Linkedinℹ️
GitHub😻
Blogs👩🏾💻
Topmate 🏆
If you find the blogs helpful, you can sponsor me too. Letting you know Just in case 😶🌫️🤭


